Sunny Diary - Page 2
Finally another update! (12/3/03)
The car has made some good progress lately. The pedal box is in, the "taxi" bar behind the drivers seat has been fitted - this is used to attach the harness. A new seat has been purchased and fitted, and the entire car was stripped and rubbed back ready for paint.
Many thanks go to Scott Flemming of Rev Doctor Motorsports in Hornsby for the outstanding quality of work performed on the car.

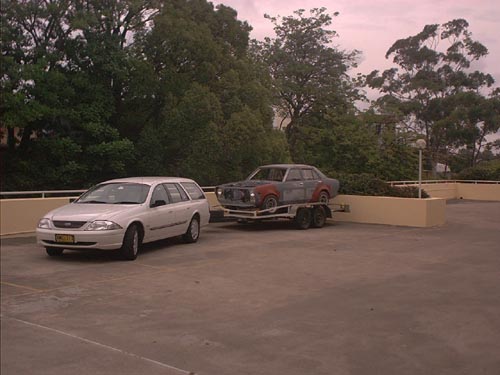
A closer picture of the car prior to paint. She looks pretty rough at the moment but a coat of paint certainly makes a difference.
The work that has been done on the flares is fantastic, this picture shows how well the flares suit the car. Even the factory would be proud of these ones!

The car has finally been painted, and Tony at Essex Street Smash Repairs in Minto has done a great job. Apart from the blue and white colour scheme, a red stripe will be added to seperate the two colours. The stripe will be about 3 inches wide.
Now the real fun begins. Time to re-assemble the car. I have started from the rear of the car, and have so far added tail lights and Bumper to the exterior. Inside the boot, the Oil tank, Fuel tank, Surge tank, Both fuel pumps and all associated plumbing has been fitted. Pictures of this new work to be added shortly. Until then check out the new paint scheme.


 April Update! (19/4/03)
Apologies for the delay in getting updates posted, but life has been frantic lately. Work has been progressing.... all be it slowly! I have finished most of the rear end. All that remains is to mount the brake calipers, and run the brake lines to the rear of the car. As can be seen is this picture, the tail lights and bumper in.
The fuel system an oil tank are also installed in the boot and ready to be connected to the front of the car. A number of people have now seen the car, and everyone has commented on the quality of the paint finish. Once again, this is due to Tony's efforts at Sussex St. Smash Repairs in Minto - Thanks Tony!

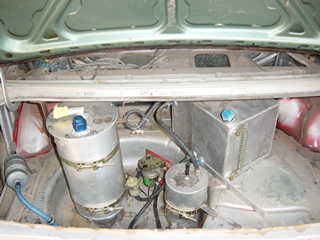 As can be seen, the boot area is pretty close to being finished. I still have to run all the wiring for the lights, and also add in a high pressure fuel filter. We will be using a filter from a VT Commodore for this task.
Comparing the before and after shots, we are certainly making good progress.

 Inside the car it is now starting to resemble a race car! The seat is fitted and the instrument panel is close to completion. Just warning lights for charge and oil pressure to be added. I will also be adding a third light which will indicate the operation of the water spray system.
Gauges in the panel include- Tacho, Oil Pressure & Temp, Water Temp, Volts, Fuel Pressure and Boost Pressure.

 The Oil lines have also been connected to the rear of the car, and are ready to be connected to the engine once it is fitted to the car.
The pic on the left shows the empty engine bay waiting for the engine to go in. The crossmember has been modified to aid in aquiring the required Camber and Castor. The car now has the engine and gearbox fitted. (More Pics Soon)

Well it had to happen....... the first Test Pilot! My new Fiancee is officially the first person to be photographed behind the wheel. Looking at this picture, I am glad I am over 6' tall..... at least I will be able to see the road in front of me!
Lara is my number one supporter and soon to be the teams financial controller..... so I have to be extra nice to her! I must say, it is fantastic to have such a supportive partner.... so watch out for us later in the year at the track when we take on the rest of the Improved Production field!
It's May already! (4/5/03)
We are nearly half way through the year, and the car is still a long way from hitting the track. I must admit, it has taken a lot more man hours than I had originally thought, but I am very happy with the quality of the work that is being performed. When the car does hit the track, at least it will be right..... we will only need to look at different set-ups etc. Since the last update, I have now re-fitted both the engine and gearbox, inlet manifold, radiator, intercooler and oil cooler are also fitted. We discovered a problem with the turbo after removing it from the manifold however. One of the studs on the exhaust flange had snapped off, and is now with Damien from "One Stop Engineering" our latest sponsor, for removal of the stud. Damien also milled up some spacers for the rear brake calipers also to aid in proper alignmentof the caliper to the disc. Most of the oil and water lines have also been fitted, and once the turbo is ready to be fitted, the engine bay will be getting very close to completion.
At the rear of the car, the rear brake calipers (VL Commodore) have finally been fitted. I made an error in judgement when initially measuring up for the caliper brackets. This was a result of taking measurments prior to fitting the bearings to the axles. After the bearings were fitted, the axles extended and extra 8mm further out, subsequently, a spacer was needed to get the caliper back into the proper position. With these now made, the rear brakes are now sorted. All that is needed is to put caliper kits through each one before filling the system with fluid.
The latest task has been to tackle the wiring loom that came with the car. I have two looms, one for the engine management and one from a standard Datsun Sunny. Before we get to lights and indicators, I want to hear the car roar into life, so I have started trying to decipher what is happening with the Motec wiring loom. After a lot of cross referencing to the schematic drawings of the loom etc, I have now figured out where most of the plugs/leads go, so it shouldn't be too much longer now. Some pictures of the mess are shown below.

 Left: Engine with inlet manifold, but minus the turbo.
Right: Front shot with grill - Bumper still to be fitted.

 Left: Photo of positioning of both Oil cooler and Intercooler.
Right: Rear brake setup consists of VL Commodore brake calipers with slotted Nissan Pintara rear discs from DBA. Also visible is the pick up line from the dry sump tank.

 Pictures of the custom made exhaust manifold. This manifold allows the Garret T28 turbo to be mounted quite high. The turbo itself is from the Nissan Pulsar GTi-R.

 Left: Picture of the rear suspension set-up. The blue collars at the top of the spring sit on a threaded tube, and can be adjusted up and down the tube to adjust ride height. The tube, which sits inside the spring, can also be seen in the brake set-up picture. The bottom spring platform is yet to be modified, but is currently being fabricated by One Stop Engineering.
Right: The brains of the engine - Motec M4 Pro.

 Left: The mess being seperated out, all of this wiring came bundled up in one box. Including a bunch of wiring not directly related to the engine loom.... What a mess!.
Right: The engine loom, including relays for fuel pumps, clutch activation swith (allows for flat changes without lifting off the gas) and all engine clips/sensors.

 Left: This picture shows the restrictor I have to run for our class. The restrictor is just 36mm in diameter, this really limits the power output to a maximum of 330bhp at the crank. Also we have to run in the 3000cc - 6000cc class.
Right: Picture of the internal wastegate and turbine wheel. This turbo is off a Nissan Pulsar GTi-R. They have quite a big compressor wheel!
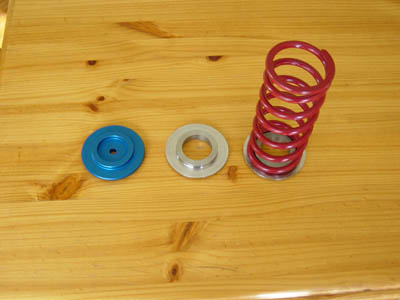
 These pics show the new spring platforms that we are using with the height adjustable set-up in the rear of the car. The Blue platform was supplied as part of the kit from Noltec. Due to it being made of aluminium, we can not weld it to the diff housing. Therefore, we made a copy from steel. These platforms will be welded to the diff housing for the location of the Eibach springs.

Making Progress (10/5/03)
Everything is starting to get back together. Now that the turbo is re-fitted, I just have to assemble the exhaust, and re-fit the dry sump pump (currently on loan). Once tht is done, all the mechanical work is finished for the engine, and it will be on to the wiring. Once the wiring is installed, we will be able to finally start the engine! WOOHOO!
Hopefully we should hear the beast roar into life in a relatively short period of time.

 Looking good! (26/5/03)
Definately making some progress now! Finally the car is starting to resemble a race car. The rear spring platforms and springs still need to be mounted, this will address the height problem in the rear end.
Looking good! (26/5/03)
Definately making some progress now! Finally the car is starting to resemble a race car. The rear spring platforms and springs still need to be mounted, this will address the height problem in the rear end.
 Ride Height Fixed (14/7/03)
The new spring platforms have now been added to the Diff housing, and the smaller diameter & shorter springs have been added. This has addressed the rear end ride height issue, and the car is now looking much more balanced. All that is left to do in the rear is attach the Shock absorbers (Spax Adjustables)
We have made the decision to now concentrate on getting the engine started. So the next step is now to start wiring up all necassary components to get the engine to run. Essentially the entire electrical system of the car will be be split into two areas, one for the engine and the other for the lighting and other Auxilary operations (Wipers etc). Getting the car started for the first time will be very exciting!
Progress Report (28/7/03)
The massive job of sorting and figuring out the wiring mess has been started. Thankfully, the mahority of the engine loom has now been sorted out and we have started mounting the parts as neatly as possible. All relays, fuses, wires and switches have been sorted out. A new battery has been sourced and the starter motor checked. We should see the car turning over in the next couple of weeks. First Step will be to turn the engine over to create oil pressure. Once we achieve oil pressure, we can then flick the ignition switch and fire the engine........ Getting closer! More pics soon.
Home Page
Sunny Specifications
Sunny Diary Page 1
Sunny Diary Page 3
Sunny Diary Page 4
Sunny Diary - Page 5