
Instructions on how to make a Marked Deck of Cards. This is designed for Bicycle Rider Back Playing Cards.
When amazing someone with your unbelievable magic tricks or playing a game of poker or blackjack with a buddy, marked cards would come in very handy. This instruction manual was made to give you the ability to make your very own professionally marked deck of cards. Whether you are young or old the instructions you are about to inherit will give you the ability to make a professionally marked deck of cards with ease and not a whole lot of time. This is intended to be used for entertainment only. Please do not abuse this knowledge and scam people for money.
1. To begin the process you need a deck of cards (obviously). The brand that the instructions are based off of are Bicycle Rider Back playing cards. The color does not matter.
2. There are a few different ways to mark a deck of cards. I personally like the shading form because it is the easiest, and most beneficial for my needs. The way you will be marking these cards is called shading. There are also a few different tools that can be used to shade a deck of cards. To name a few of the more available and easy to use are: a permanent marker, a fine tip pen (with correct type of ink), or a paintbrush (which requires some extra time and patience). You have to find the right color and shade of the card you are about to shade so the ink or paint is not noticeable. I use a Sharpie Fine Point Permanent Marker. The red marker is very close in color to the red color on Bicycle's playing cards. This method I have used multiple times and still has gone unnoticed.
3. The next step is to decide where you want the marking at and if you want to apply a special system of your own. In the following illustrations you will see different ways to shade the cards. I will show you a more common system and you can easily come up with an altered version of this.
METHOD #1
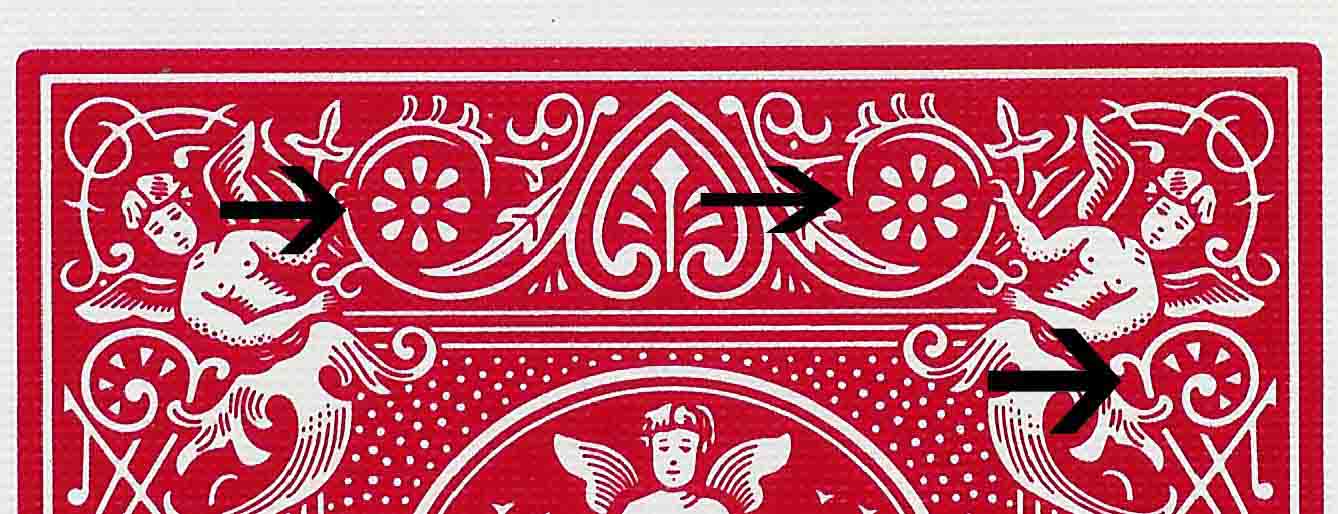 These are the most commonly used spots on a card to mark it. The flower
looking object, or sometimes called a dial, is used to identify the number of
the card, (i.e. 4, 8, J, or A). This object on the card, like all of them,
are located on all 4 corners and set up in an asymmetrical design. This enables
you to put the marking on one, two, or all of the corners, which ever fits your
needs most. The dots in this pattern are filled in accordingly with the
corresponding card.
These are the most commonly used spots on a card to mark it. The flower
looking object, or sometimes called a dial, is used to identify the number of
the card, (i.e. 4, 8, J, or A). This object on the card, like all of them,
are located on all 4 corners and set up in an asymmetrical design. This enables
you to put the marking on one, two, or all of the corners, which ever fits your
needs most. The dots in this pattern are filled in accordingly with the
corresponding card.
For example in the figure below, in the right side dial the top or 12 o'clock position dot is filled in. This represents an Ace. The dots will be filled in, only one dot for the specific card, clockwise until you reach the number 8, or 11 o'clock position.

The illustration below to the left represents a number 2 card. Notice how the 2nd dot or 1 o'clock position is filled in. And the figure below to the right represents a number 5 card. This process continues clockwise until you reach the number 8 card or the 11 o'clock position.


For the cards numbered 9, 10, J, Q, and K, The dial to the left of, or opposite the first one is used. The 7 o'clock position represents the 9 card, the 8 o'clock position represents the 10 card and this continues clockwise until you reach the King at the 1 o'clock position. The two figures below represent the 9 card (bottom left) and the Queen (bottom right).


Now that you understand this process you can begin marking to identify the
specific suits. There are 5 dots in the object used to mark the suits.
One dot is filled in accordingly with the corresponding card suit. If the
first dot is missing it is a Club, the second dot is a Heart, the third is a
Spade, the fourth is a Diamond and the fifth one filled in represents a Joker
card. The figures below represent the Clubs suit (bottom left) and the
Hearts suit. 

The figures below have both card number and suit marked. This is how you would identify the cards exactly.


The top left card would represent the Queen of Hearts. The top right card would be the Ace of Spades and the bottom left card would be the 5 of Diamonds.
METHOD #2
The next possible method is very similar. The only difference is that you would use only one dial, whichever side you choose, to identify all Ace through King. The way you could do this is by using the center dot of the dial you choose and filling that in for the number 10 card and on up through the King. The Ace would be a completely unfilled dial, no markings, and the number 2 card would start at the top or 12 o'clock position. The system would work the same as far as the numbers would go higher as the dots were filled in clockwise. The suits would also be used the same.


The cards above are marked using Method #2. The top left is a 10 of Hearts, the top right is a Jack of Spades. The bottom left is a King of Diamonds and the bottom right is a 5 of Diamonds.
As you can see, the methods mentioned above are fairly similar but very different. You can pick one that can best work for you, or design your own system to suit your needs. All it takes is an imagination and you can mark your cards however you want.
