We are going to learn how to make a sparkle name tag. It is assumed that you
have some working knowledge of PSP or PS. The items you will need
for this are: PSP, Alien Skin Xenofex 2 Constellation which is a Pay plug in
and Jasc Animation Shop.
1. The first thing we need to do is open a 400 x 250 image with a translucent background.
2. Now pick two colors you want to use for your name and a different color for a background.
(I chose black, red and white for mine)
3. Flood fill your image with your background color. Then go to IMAGE>ADD BORDERS
using one of the colors for your name. Use the settings symmetric checked
and the number setting of 5. Repeat using your other font color and change the number to 10
keeping the other setting the same. Your image should now look like this.


4. Now you want to pick a font of choice preferable a bold heavy font (works best). I chose to
use IMAPCT for easier viewing/teaching purposes in this tutorial. The seting for your font
should be one of your colors for the foreground and the other color for your background. Have
your width set at 5 then type out your name to a size that will fit into your framed area without
touching the edges of your frame. Then go to OBJECTS>ALIGN>Center in Canvas. Convert
to a raster.

5. Duplicate your name layer twice and close the eye next to the second and third layers. You
want to click on your magic wand with these settings: ADD, RGB VALUE; TOLERANCE 0;
FEATHER 0; ANTI ALIAS CHECKED and OUTSIDE. Select the outer color around your name,
you may have to do each letter seperately, just make sure you get the inside of like an A or R as
in my name. You may want to zoom in on it to make it easier to see depending on font choice.
Close the eye next to the duplicate layers.

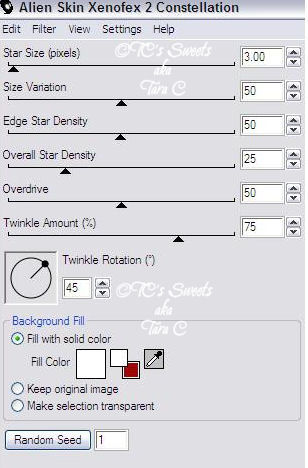
7. After you duplicate your name layer and get the duplicates closed off. We want to go to your EFFECTS>
PLUG INS> ALIEN SKIN XENOFEX2 and use these original settings shown below. Repeat the same steps for your other 2 layers, but hit random for each layer. It is at the bottom of the settings.

8. This is what you should have now. Open up your Animation Shop. Now back to PSP, we
want to close off the top 2 layers of your name again. so it looks like this. Now we want to copy it
merged so we can paste it into AS as a new animation. Now after we get that done, we need to
go back to PSP and do the same thing to the other two name layers, just paste them after the first
image we copied there. You should have this now in animation shop. Now all you do is save your
image and you have your animated name tag.

8. Congratulations on completing your tuorial. You can make a lot of different things by applying
these steps to other images or selections of your choice. As shown below with the one I made using halloween colors.
I hope you have enjoyed learning about animation with Xenofex 2.


