

Mood:
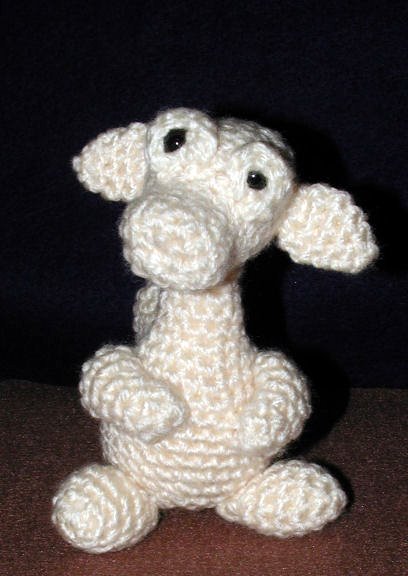
This pattern is one of my most popular, and I am delighted to find it is still going strong. There are baby dragons all over the world now, with my pattern translated into french, german and who knows what other languages! I originally posted it on Crochetville.org, and due to it's popularity there and other places, I developed a tutorial on the assembly process I used. I still need to figure out how to make that tutorial read right, instead of backwards!
Bulky yarn (I used Bernat Softee Chunky for my baby snow dragon)
"G" hook
tapestry or darning needle to sew pieces together
stitch markers (or a piece of yarn or thread to mark ends of rounds)
two post eyes or buttons, or for young children, eyes could be embroidered on
fiberfill or stuffing material
Abbreviations used:
sc = single crochet
st = stitch
ss = slip stitch
inc = increase (do 2 single crochets in one stitch)
dec = decrease ( insert hook into first stitch, yarn over, pull up a loop, insert hook into the next stitch, yarn over, pull up a loop, yarn over and pull through the two loops on your hook)
Head
As amigurumi is made in spirals, do not join rounds. Use a stitch marker or a piece of thread or yarn to mark the end of your rounds.
Start 6 sc in a magic ring. (6 sc)
Rnd 2: 2 sc (inc) in each st around (12 sc)
Rnd 3 -6 : work even, no inc or dec (12 sc)
Rnd 7: 2 sc (inc) in each of the first 6 st, sc in each of remaining 6 sc (18 sc) (This starts to form the forehead ridge)
Rnd 8: sc in each of the first 8 st, 2 sc (inc) in the next 2 st, sc in the remaining 8 st (20 sc)
Rnd 9 - 11: work even, no inc or dec (20 sc)
Rnd 12: *sc first 2 st together (dec), sc in the next 3 st* repeat from * to * around (16 sc)
Rnd 13:*sc first 2 st together (dec), sc in the next 2 st* repeat from * to * around (12 sc)
Rnd 14: *sc first 2 st together (dec), sc in the next st* repeat from * to * around (8 sc)
ss in next st and fasten off, leaving a long tail for closing and sewing.
BODY
Start 4 sc in a magic ring. (4 sc)
Rnd 2: 2 sc (inc) in each st around (8 sc)
Rnd 3 -5 : work even, no inc or dec (8 sc)
Rnd 6: *1 sc in first st, 2 sc (inc) in second st* repeat from * to * around. (12 sc)
Rnd 7 - 8: work even, no inc or dec (12 sc)
Rnd 9: *1 sc in first 2 st, 2 sc (inc) in third st* repeat from * to * around. (16 sc)
Rnd 10:*1 sc in first 3 st, 2 sc (inc) in fourth st* repeat from * to * around. (20 sc)
Rnd 11: *1 sc in first 4 st, 2 sc (inc) in fifth st* repeat from * to * around. (24 sc)
Rnd 12: *1 sc in first 5 st, 2 sc (inc) in sixth st* repeat from * to * around. (28 sc)
Rnd 13 - 16: work even, no inc or dec (28 sc)
Rnd 17: *sc first 2 st together (dec), sc in the next 5 st* repeat from * to * around ( 24 sc)
Rnd 18: *sc first 2 st together (dec), sc in the next 4 st* repeat from * to * around ( 20 sc)
Rnd 19:*sc first 2 st together (dec), sc in the next 3 st* repeat from * to * around ( 16 sc)
Rnd 20: *sc first 2 st together (dec), sc in the next 2 st* repeat from * to * around ( 12 sc)
Rnd 21: *sc first 2 st together (dec)* repeat from * to * around. (6 sc) ss in next st and fasten off, leaving a long tail for closing and sewing.
TAIL
Start 3 sc in a magic ring (3 sc)
Rnd 2: 2 sc (inc) in each st around (6 sc)
Rnd 3: work even, no inc or dec (6 sc)
Rnd 4: *1 sc in first st, 2 sc (inc) in second st* repeat from * to * around. (9 sc)
Rnd 5: work even, no inc or dec (9 sc)
Rnd 6: *1 sc in first 2 st, 2 sc (inc) in second st* repeat from * to * around. (12 sc)
Rnd 7: work even, no inc or dec (12 sc)
Rnd 8: *1 sc in first 3 st, 2 sc (inc) in second st* repeat from * to * around. (15 sc)
Rnd 9: work even, no inc or dec (15 sc)
Rnd 10: *1 sc in first 4 st, 2 sc (inc) in second st* repeat from * to * around. (18 sc)
Rnd 11: work even, no inc or dec (18 sc)
Rnd 12: *1 sc in first 5 st, 2 sc (inc) in second st* repeat from * to * around. (21 sc)
Rnd 13 - 15: work even, no inc or dec (21 sc) At the end of rnd 15, ss in next st and fasten off, leaving a long tail for sewing.
FEET (Make 2)
Start 4 sc in a magic ring. (4 sc)
Rnd 2: 2 sc (inc) in each st around (8 sc)
Rnd 3: *1 sc in first st, 2 sc (inc) in second st* repeat from * to * around. (12 sc)
Rnd 4 - 6: work even, no inc or dec (12 sc)
Rnd 7: *sc first 2 st together (dec), sc in the next st* repeat from * to * around (8 sc)
Rnd 8: work even, no inc or dec. (8 sc) ss in next st, and fasten off, leaving a long tail for closing and sewing.
ARMS (Make 2)
Start 6 sc in a magic ring. (6 sc)
Rnd 2 - 6: work even, no inc or dec (6 sc)
Rnd 7: *1 sc in first 2 st, 2 sc (inc) in second st* repeat from * to * around. (8 sc)
Rnd 8 - 9: work even, no inc or dec (8 sc)
Rnd 10: *sc first 2 st together (dec), sc in the next 2 st* repeat from * to * around (6 sc) ss in next st and fasten off, leaving a long tail for sewing.
EARS AND SPINES (Make 5)
Start 4 sc in a magic ring. (4 sc)
Rnd 2: *1 sc in first st, 2 sc (inc) in second st* repeat from * to * around. (6 sc)
Rnd 3: *1 sc in first 2 st, 2 sc (inc) in second st* repeat from * to * around. (8 sc)
Rnd 4: *1 sc in first 3 st, 2 sc (inc) in second st* repeat from * to * around. (10 sc)
Rnd 5: work even, no inc or dec (10 sc) ss in next st, and fasten off, leaving a long tail for closing and sewing.
Weave long tail through the last row of two of these pieces and gather, these are the ears.
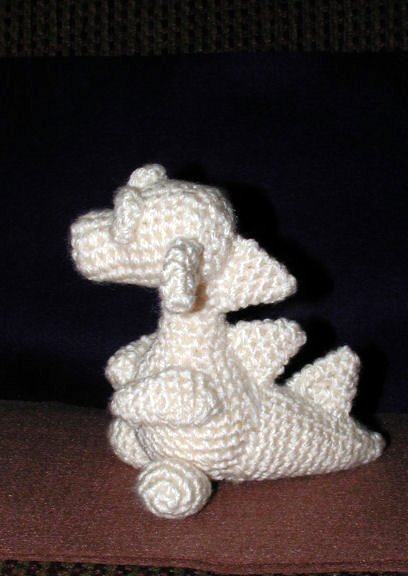
The other 3 pieces fold flat (to look like a triangle) and are sewn on the back for the spines.
EYELIDS (Make 2)
6 sc in a magic ring. This is the exception to working in spirals. At the end of this round, chain one, and turn
Rnd 2: sc in each st around (6 sc)
Fasten off, leaving a long tail for sewing
ASSEMBLY DIRECTIONS:
It's easiest for me to pin my body parts into place before sewing them, to make sure they're balanced and in the correct position.
Sew eye lids into place on the head, then attach eyes. Stuff head, and weave yarn through last row of stitches in the back of the head, gathering to close. (I run the yarn down the back of the head to use to sew the head to the neck) Set aside.
Stuff body and neck. Weave yarn through last row of stitches on the bottom of the body, gathering to close. Fasten off, and weave in end.
Stuff feet, and weave yarn though the last row of stitches to gather closed. Use remaining yarn to attach feet to the bottom of the body.
Stuff tail, position on the back of the body, and sew into place.
Stuff only the bottom of the arms, and sew into place on the body. (I positioned them folded across the belly of my dragon to pose him, and sewed them into place.)
Sew head onto body. Position ears on head and sew into place.
Sew spines in a line down the back of the dragon.
A good tutorial for making a magic ring can be found here:
http://crochetme.com/Dec_Jan_0405/reads_round.html
If you're not comfortable with using a magic ring, you can also start with the traditional method (chain two and work appropriate numbers of sc into second chain from the hook) but I find it leaves too big a hole for my tastes.
Tutorial on assembly can be found here:
http://www.quizilla.com/users/MarjorieCrochets/journal/
Enjoy your baby dragon!