HOW TO USE GLITTER FILLS
I will show you the way to use glitter fills using either PhotoShop or PhotoImpact. My personal preference is PhotoImpact, but either program works. In my opinion P.I. has way less steps than P.S.
Regardless of what program you use, you will need some glitter fills to work with! I have TONS of sites bookmarked but here are a few that I use the most!
Glitter Fills & Animated Backgrounds
Glitter ~*~ Fills
Glitter Index
You may also find them by just searching on search engines. Using key words like "Free glitter fills", etc.
GETTING YOUR FILLS READY TO USE
1. Open your GIF Animator program.
2. Browse to locate the fill you wish to use and open it.
3. Go to FILE and click SAVE AS and select IMAGE FRAMES. It will ask you to name the fames, keep it short and simple and click ok.
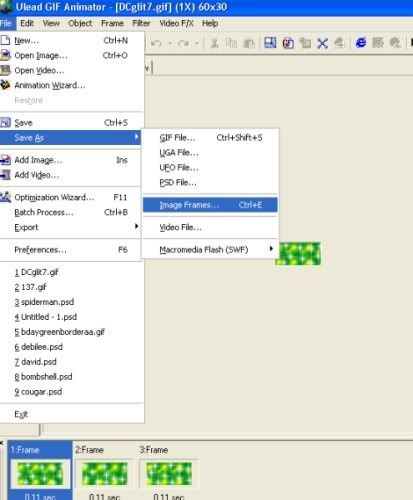
4. Notate the properties of the fill (the delay and removal method).
You will need to get your fills ready regardless of what program you wish to use!!
Now you are ready to begin!
PHOTOSHOP INSTRUCTIONS
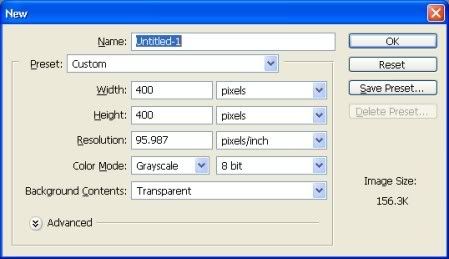
1. Open a NEW Transparent image.
2. Using your text tool, type your text using the font of your choice. Keep in mind the fill you want to use. If it is something that has an image, say like balloons for example, you will want a chunkier font so that you can see parts of that image. If it is simple, any font should do!
3. Crop around your text, so that it will be as you want it as a finished product.
4. Now go to file and select open and open ALL image frames of your fill. Note most fills will only have 2 or 3 frames but some can be as many as 20! In the beginning I suggest you stick to lower number of frames until you feel comfortable using them!
5. With your first fill frame selected, go to EDIT and DEFINE PATTERN. It will allow you to name the frame again or you can keep it as is. Click ok and repeat for all frames you will be using.
6. Go ahead and close the fill frames as you won't need them anymore.
7. You will need to rasterize your layer so it can be edited. Do this by going up to LAYER and down to RASTERIZE, select TYPE from the next menu.

8. With your text image selected go to your BUCKET FILL tool. Up top change the drop down menu from Fill: Forground to Fill: pattern.
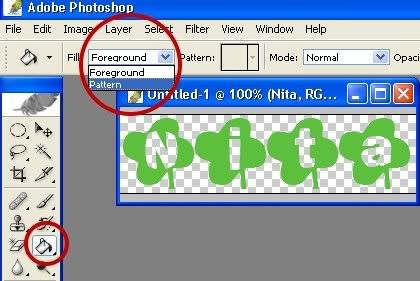
9. Select your first fill frame from the pattern drop down.
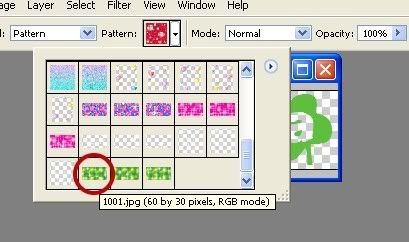
10. Now simply click in your text to "fill" it with your fill. Some fonts you have may to click various spaces to get it completely filled. Just be sure you get them all or it may look funny when done. If you need to zoom in, do so.
11. Go to file and choose SAVE AS and save it as a GIF file. I usually title mine "1", and the next would be "2".
12. Repeat steps 9 to 11 until you have enough text frames to complete the steps of your fill. My fill example is 3 frames, so I will need 3 files to work with.
13. Go to your gif animator and select OPEN. Open your first frame.
14. Click add frame and insert your next frame. Repeating until all frames are visible.
15. Select all frames, go to properties and duplicate that of your fills properties. In my example my fill properties are a delay of 11 and a removal method of do not remove.
16. Optimize (if needed! If you do it and your optimize image would be longer time than your original- hit cancel and don't optimize!) your image and then save it and your done! (If you need help with this step see my glitter name tutorial on how to do it).
NOTE:: For steps 13 to 15 you can use the animation wizard instead should you choose to do so.
Here is your end result:

PHOTOIMPACT
1. Open a new transparent image.
2. Using your text tool, type the words you want your graphic to say.
3. Crop your image to size.
4. I duplicate my text at this point, so that I have my word for each frame.
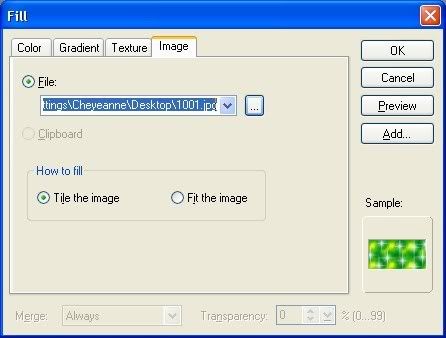
5. With your first name selected, go to EDIT and down to FILL (or use CTRL + F)
6. Click on the IMAGE tab and use the browse button to locate your first fill. Make sure the "How to Fill" radio button is marked as TILE the image. Click ok.
7. Repeat by clicking the next set of text and filling, until all frames are done.
8. Save your graphic as a PSD file.
9. Go to your gif animator and select OPEN. Open your psd image.
10. Click duplicate frame until you have all frames needed for your fill.
11. Click each frame and make sure to uncheck/check appropriate items for each one. IE- frame 1 should ONLY be first name, frame 2 should only be 2nd name, etc.
12. Select all frames, go to properties and duplicate that of your fills properties. In my example my fill properties are a delay of 11 and a removal method of do not remove.
13. Optimize (if needed! If you do it and your optimize image would be longer time than your original- hit cancel and don't optimize!) your image and then save it and your done! (If you need help with this step see my glitter name tutorial on how to do it).
Here is your end result:

Email
Home

