Here's a mount for a heavy bag. It is suspended from the center of two 2 x 6's laminated one atop the other and mitred to fit atop the two frames constructed of 4 x 4 posts with 2 x 4 top and bottom plates. The bottom 2 x 6 is abutted up against the 2 x 4 top plates and the upper 2 x 6 sits on top of the top plates and is held in place with bolts through the top plates. The ends of the bag support are centered over the 4 x 4's on either side. The frames are joined with hinges at the corner. The pulley system shown allows the bag to be quickly raised and lowered for various uses. Rings can be preset on the end of the pulley rope or cable to designated bag heights.The 2 x 4's and 4 x4's comprising each of the two frames are glued and screwed. Either wood or steel bracing should be applied to each of the four corners on both frames.
The bag support can be removed and the two frames can be folded together for storage.
This unit could be set in a corner and wall space could, to some degree still be utilized.
A pipe could be laid across the top between the two frames for chinups.
The frames of the unit shown are 6 feet long by 7 feet high, and the 4 x 4's supporting the bag support are 4 feet from the corner.


This inexpensive and easy to make heavy bag was built by phxbigdog
Click on the link below to go to phxbigdog's web site to see how it was made, as well as for tips on Martial Arts knife fighting and strengthening wrists and forearms:

I'm calling this Aikido Grip because this device will build tremendous tensile strength in your fingers as well as ripping your forearms to shreds in the process. Ideal for Martial Artists involved in the grappling arts! This device will build those finger and forearm muscles that are directly used in grappling. Great for building pinching strength! What you do with this device is to is take hold of the handles with your thumbs and finger tips and twist them back and forth in opposite directions. This thing is the ultimate in "Jar Twisting"!
The materials and mechanisms used for the Hand-Held Wrist Roller found on the Grip I page are perfect. I applied the same mechanism to this device. Unlimited resistance! You can tighten this baby up 'til the cows come home! It will not lose rsistance while being utilized, and it will not slip or bind

The device seen being demonstrated in the above picture is an older version. The new Aikido Grip is a vast improvement!
|
|
|
The dowels are held however your art dictates holding a knife. For us it was in a diagonal grip across the palm, either forward or reverse grip. Start with just 1" or so of dowel sticking out and gradually move it out.
You do it two ways: trying to stand the dowel on its end like a thrust, or more at an angle to simulate the force exerted on a blade bya slash. You can do supports or pushups for reps. One or two hands.
The idea here is that most people who practice cuts have no idea what it's like when a blade hits something harder than air. Like a button, buckle, zipper, bone, gristle... the amount of leverage exerted by a knife is substantial and you can easily have it torn out of your hand or (even better) find your hand sliding down over the blade, regardless of whether it has a guard or not.
- Contributed by Jeff from NC


It takes a tremendous amount of wrist and grip strength to perform pushups with these "Iron Crosses", as demonstrated by Master Isidro Archibeque!
Log onto Iron Crane Dojo to see how these are made and utilized.
In keeping with my ideal of designing devices anyone with a minimum of skills and tools can build, I put together the following "Iron Crosses":
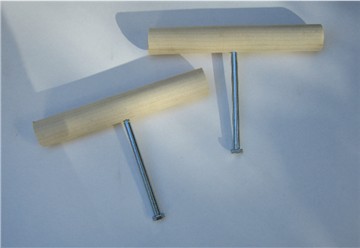
I drilled 9/32" holes an inch into 1 1/4" hardwood dowels and then tightly screwed 5/16" x 5 1/2" bolts into them. The reason I used a thick dowel was so that there would be a significant amount of bolt imbedded in the wood for structural stability. For this, the holes must be drilled straight!
The handles on my version are quite a bit wider than those shown in the demonstration above, but using a thinner dowel wouldn't allow enough support. Just think of mine as Fatbar Iron Crosses. Try doing a few pushups with these and just see how difficult they are! In fact, I would recommend using shorter bolts to start out with.
Now, the narrower handles would focus more stress towards grip strength, although my version is anything but negligable.
Great Nipples of Isis! Those things are hard!
- GoDogGo!
On the upside, my handles cost about a dollar each and take 10 minutes to make. You could throw a pair together and then see where you want to go from there.

Here's a pair of Iron Crosses made by Jeff from NC. He cut a 5/8" x 12" pipe in half, and drilled and tapped the centers through for 5/16" bolts. After screwing in the bolts and cementing them with JB Weld, he ground down the excess bolts sticking out the tops of the pipes and smoothed and finished the surfaces.
|
|
- Contributed by electronicimage
You really did a great job. I also like your variation of the crosses, have tried something like that in the past (using fence railing). Works the muscles differently, as you clearly indicated...again...great stuff.
- Bill McCabe

Set a Full Stirrup Post Anchor into a large steel bucket of cement. Set the anchor so that it is plumb and level and the bottom flat portion of the actual post holder is level with the surface of the cement. Tape a Pool Noodle (see the Miscellaneous page) to the post for a striking pad. If the post should, at anytime happen to break, it can be easily replaced.
Navigate:Questions? Comments? Discussion? Contributions? visit