
This is what my Deluxe Double-Fisted Gripper & Wrist Roller looked like at 8:30 this morning. By 10:45 it was done. I had bought everything I needed
all at once, with the exception of rope and 3/4" PVC which I already have. I actually assembled half of it right there in the hardware store, making a few design changes as I went. And the total cost? - $78.48. A bit pricey, you may say? Consider that it comes with a lifetime waranty and free maintenance - a once in a lifetime investment. Imagine how much a machine of this nature would cost if you bought it Professionally made - precision tuned, perfectly balanced, endorsed by fitness experts worldwide, blah, blah, blah.......
Note: I recently found out that I could have saved money by using black pipes. Well, ya live and learn.

This extremely effective exerciser is attached to the side of the grip machine pictured at the top of this page. You could, in fact, attach it to anything - a home gym, a Smith machine, etc. It may look makeshift and rickety. It is not. It is as solid and smooth-working as any machine of its nature that you will find in a gym. The combination of rubber and webbing enables the compression of resistance to where this puppy cannot be budged, and the action remains smooth and unbinding. The magic ingredient here is Webbing - the one material I have found that will not bind against PVC.
My machine is fast becoming a veritable forearm factory!
|
|
- Shenandoah
|
|
I am lucky that I live close to an industrial surplus store that sells hardware $1 a pound (for all types of bolts, washers, pipe, etc.). I was able to make a Heavy Handle and a Rolling Thunder for less than $5.

I started with a clamp...I think it is used to hold conduit and piping. I used 2 3/8" PVC pipe for the grips. I used the top part of the clamp for the
heavy handle and the bottom for the Rolling Thunder.
 For the Heavy Handle, since the upper part of the clamp did not have much finger room, I had to offset the bolt. I used an old hollow dumbbell handle,
pipe foam and a 2" pipe for the inside of the handle. I used some fuel line for the bolt to run through and used some extra set time epoxy to firm the handle up. I cut a small notch on each side of the handle to give it more strength. I used 3/4" PVC pipe and a hardened bolt for the plate pin. I used a short piece of 1 1/2" PVC pipe for the weight plate to rest on.
For the Heavy Handle, since the upper part of the clamp did not have much finger room, I had to offset the bolt. I used an old hollow dumbbell handle,
pipe foam and a 2" pipe for the inside of the handle. I used some fuel line for the bolt to run through and used some extra set time epoxy to firm the handle up. I cut a small notch on each side of the handle to give it more strength. I used 3/4" PVC pipe and a hardened bolt for the plate pin. I used a short piece of 1 1/2" PVC pipe for the weight plate to rest on.


I painted the metal handle parts with Rust-Oleum's hammered paint:

I used the lower part of the clamp, a 2" PVC pipe for the larger 2 3/8" PVC pipe to roll on, two large washers so it would not rub against the handle,
an old hollow dumbbell handle, pipe foam, and 250 pound rated eyebolt. I used some extra set time epoxy to firm the handle up. I cut a small notch on each side of the inner to give it more strength and to keep it from rotating:

- contributed by Biggerfoot
|
|
|
|

Monster Gripper - the fittings used are Kee Clamps
-Contributed by Henk

Contributed by Fred Hutchinson
ALTERNATIVE: Likewise to that idea you can cut down a small piece of those pool noodles and slide it over the dumbbell handle. You might need a little dish soap to get in on there or cut it lengthwise.
Contributed by CaptKronos
Note: Pool Noodles are discussed further down on this page.

The vertical handle is a �� (i.d.) x 7� pipe wrapped with �� thick sheet rubber and mounted to the plywood in the same manner as the rear support assembly.
The �� x 10� pipe handle attached to the weight-lifting assembly, also wrapped with �� thick sheet rubber, is attached by drilling a 1� hole through a 20� long 2 x 6, forcing the pipe through the hole, and screwing it into a flange which is mounted to the 2 x 6 with 1-�� wood screws.
On the other end of the 2 x 6, drill a 1� hole partially through, 4� from the end of the 2 x 6, for a �� x 6� pipe. Weight plates are stacked on this pipe.
The weight-lifting assembly is mounted on the rear support assembly with two �� steel pipe clips attached to the 2 x 6 with 1-1/4� wood screws.
The front support assembly consists of two 2 x 6�s screwed together to form a �T�, and screwed to the plywood from underneath with 2� flathead screws. The front support assembly is situated to create a desired angle for the weight-lifting assembly. The graphic above shows the weight-lifting assembly at a 20 degree tilt.

The weight-lifting assembly, vertical handle, and rear support assembly should all be situated so that when the handles are closed, they meet flush as shown in the side view above. The rear support assembly is not shown in this view for clarity. The steel pipe clips mounted to the underside of the weight-lifting assembly show where the rear support assembly would be located in relationship to the other items.

ok. So, here's what you can do when you have the resources, the skills, the knowledge, the equipment, and an entire family to help you. This outstanding gripper was made by electronicmage and his Father-in-Law, painted by his wife, and upholstered by his Mother-in-Law.

Use 3/4" pipes and connectors. Lengths of pipes can be determined by personal preference. The graphic depicts 12" pipes for the extension of the weight assembly and 6" handles. The device is about 14" wide. The weight assembly is held against the support assembly by U-bolts. The U-bolts rest on the tops of half cut 1" PVC pipes either laminated or taped to the backs of the vertical pipes on the support assembly. You'll want to replace the nuts that come with the U-bolts with stop nuts. The lengths of the PVC pipes determines the angle of the weight assembly. You could also use a 1" utility hose for this purpose, which could be cut with a utility knife as opposed to sawing a PVC pipe lengthwise. And, in lieu of U-bolts, you could simply wrap some heavy bailing wire around a few times at each connection and tighten it with a pair of wire lugs. When it comes to homemade fitness equipment, makeshift is a time honored tradition.
The beauty of this exerciser is that very little skill and time is required in putting it together. It's just mainly a matter of assembly. One trip to the hardware store and you could have this fine piece of equipment set up and ready to go in an hour, or so.
The reason for using a tee and the same size pipes on the rear portion of the support assembly as are used on the weight assembly is to insure that the distance between the handles on both the weight assembly and the support assembly is the same. You can also use thread tape for a tight fit. Super tight fitting isn't crucial here, as all the components are opposed to each other. So it's alright if you turn some of the piping back a quarter turn or so to square everything up.


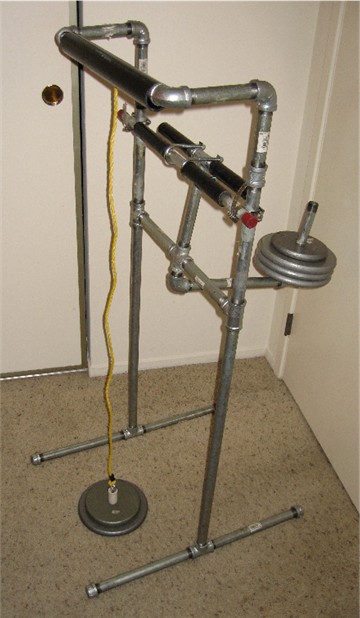
This ingenious machine designed and built by perrymk with scrap wood from the garage combines a wrist roller with a gripper. Dimensions are about 48" high by 24" wide. The most expensive item on this machine is the wrist roller which came from SFS Strength Sports Equipment and which is shown by itself in the first picture depicting the wrist roller set-up. Other than that, the entire setup cost just over thirty bucks.
The next picture shows the gripper set up on the machine, and the bottom picture is a close up of the gripper. The gripper is made of two 1/2" pipes, the top one supported on the vertical 2 X 4's, and the lower one suspended from the top by U-Bolts.
perrymk has emphasized that his machine is a work in progress and that improvements are likely. But I gotta take my hat off to him for the brilliant concept. That gripper set-up is great! Looks like you could grab it with both hands.
|
Take the edge of a blanket between your thumbs and finger tips, and begin gathering the blanket into your hands, using your fingertips and tensing your fingers as you go. Once you have your hands full of blanket, squeeze the blanket as hard as possible for 10 seconds. Rotate your hands outward and squeeze for 10 seconds, and then inward and squeeze for 10 seconds. |

This bending device can be made harder or easier to bend depending upon the size of copper tubing used. The Bending Rod shown here is comprised of a 2 foot length of 1/4" copper tube encased in a 2'+ length of 3/4" (1" o.d.) vinyl tubing. When bending this device, make long, sweeping bends of a partial nature. If bent too far, the copper tube will kink and will no longer be of any use.
- contributed by Doomfarer 1

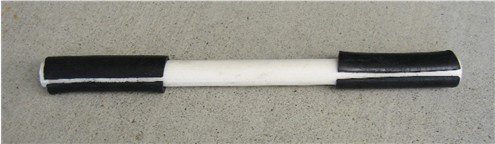
Cut a 24" length of 1/2" (13/16" O.D.) white PVC pipe. Smooth the edges with sandpaper. Slip a pair of thick, rubber bicycle handles over either end (coat the insides of the handles with vaseline or cooking oil).
Perform the exercises shown below, bending as forcefully as possible, and holding each exercise for a slow count of 10.
|
|
|
|
|

|
|
This wrist roller was made by simply attaching a rope to a steel pipe and slipping it over a steel bar which rests on a power rack. A length of PVC could also be used. The lower end of the rope attches to a weight stack as shown.
-bigbear41 Big Bear's Drug-Free Weight Training
Grab hold of the handles and squeeze as you rotate the handles in opposite directions. The harder you squeeze, the more difficult it is to rotate the handles. You are, in essence, working your grip and flexors and extensors all at the same time.
The cost of this powerful piece of forearm equipment: +/- $1.50
You can also wrap the hose arounde wider pipes for a wider grip; 1", 1 1/4". For a super-wide grip, you can get wider utility hose - 1 1/4", 1 1/2" - to use around wider pipes.
|
|


The assortment of grip tools shown here just goes to show that some of the most effective homemade exercise equipment doesn't have to be expensive or difficult to make. Here we see assorted pinch exercisers, a wrist roller which is nothing more than a rope attached to a length of PVC, and a handle - simply a rope tied through a length of PVC - every bit as effective as a fifteen or twenty dollar handle you'd get from a fitness outlet. The large flat board with the eye screw makes for awesome leverage exercises. The high-tech looking piece of equipment on the upper right is a length of thick rope folded over four times and wrapped in duct tape for doing chins. I just happen to know where he can get one of those - Professional, perfectly balanced, precision tuned, endorsed by bodybuilding experts worldwide - for a mere $259.00.
This arsenal of homemade exercise equipment was put together by BLOBERT from over at Power & Bulk .

What are Pool Noodles? Pool Noodles are embarrassingly inexpensive 60" long, 2 3/4" dia, closed cell foam toys with a 1/2" hole through the center. For two or three bucks, depending on where you get one, you will be the proud owner of a true forearm wrecker!
Grab hold of a Pool Noodle and wring it as forcefully as possible and hold it for a count of ten! Squeeze it! Cut two 5" lengths and force them over either end of a 14" x 1" wood dowel. Now grip the Noodles as tightly as possible while rotating them back and forth until your forearms scream!
You can pick up Pool Noodles at Walmart, some sporting goods stores, or from the Internet.
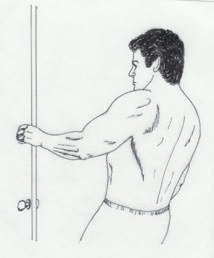
This easy to make device will give you a rock-solid grip on a door, and the wide, pliable expanse will further develop the tensile strength in your fingers. Great for practitioners of the grappling martial arts! Just slip it around a door and pinch it as you lean back.From a sheet of 1/8" thick rubber cut a piece 5" x 10" and eight pieces 4" x 5". Laminate a stack of four of the 4" x 5" pieces together onto one end of the 5" x 10" piece. Do the same for the other end of the 5" x 10" piece. If the sheet of rubber you are using is ribbed on one side, laminate the top 4" x 5" piece so that the smooth side is facing out. The smooth side should also be facing out for the 5" x 10" piece. The smooth side of the rubber works best against the surface of the door and your finger tips.
Contact cements usually specify that you coat two surfaces that are going to be joined with glue and then let them sit for 10 or 15 minutes. Don't bother. You'll drive yourself nuts. Just spread the glue on one surface, stick a piece on, spread the glue on that piece, stick the next one on and spread the glue on that, and so on, until your four pieces on each end are glued to each other and to the long piece. And then set a heavy weight on the completed contraption and let it sit for a few hours.
Non slip yoga mats are useful - eg cut some small pieces & you have a substitute Delux Door Grip. They can be used in other ways to enhance the grip.


Take a 6" or 7" ball, stick a pump pin in it and deflate it. Then fill it with water using a water syringe and fill it through the pump pin. A bit of a tedious task, but well worth the effort. You now have a gripper that you can squeeze with your finger tips, building tensile strength in your fingers. Take hold of the ball with your finger tips and fling it overhand up into the air and then catch it. Do that a few times and see how your forearms feel! This is a great forearm exerciser!
Finger Gripping
For finger lifts 2" webbing is best. Slip one end of the webbing through barbell plate(s) and secure, and create a loop on the other end of the webbing (see the "Miscellaneous" page for webbing) . Place any number of fingers thru the web loop palms up & "curl" your fingers - likewise for palms dowm : "reverse curl" your fingers. Static holds are also appropriate here.
- gruntbrain
Grip/Biceps Builder

Here's a simple, easy to make, and effective device for building grip and arm strength, built by John Brookfield. Go Here to see how this exerciser is made.
- Contributed by gruntbrain
Katana Flail

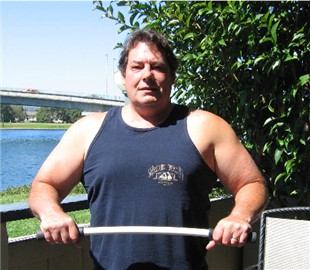
Here's a device that will not only give your forearms a grueling workout, but will also work the muscles of your arms, shoulders, back. You take hold of the handle as though grabbing hold of a two-handed sword and then start spinning the weight around the shaft. Spin the weight first one way and then the other. Switch hands and repeat. It takes a tremendous amount of effort to get that weight spinning, and the Katana Flail will build strength in every muscle that comes into play when sword fighting. So, if you're into Kendo, well.........
The Katana Flail was influenced by Fred Hutchinson, author of THE MODERN SWORDSMAN - Realistic Training for Serious Self-Defense, and LOW KICKS: Aiming Low For Maximum Punishment In Unarmed Combat, who made a similar device that was featured in Milo, June 2005. Fred is seen above demonstrating his Katana Flail which is comprised of a two foot long chain attached to the end of a two foot pipe by way of a bolt running through the end of the pipe.
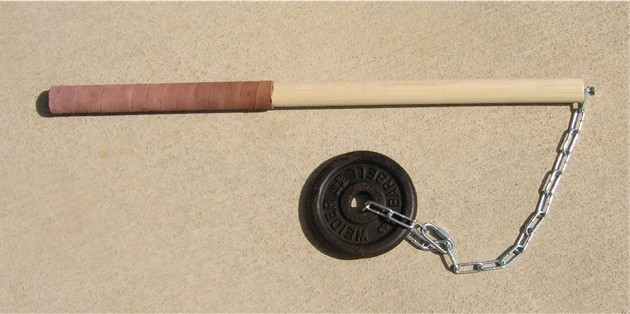
In the version shown at the top, the handle is a two foot pipe. For a grip, I used rubber pipe insulation (Home Depot is the only place I can find rubber insulation) and wrapped it tightly with twine. I find the wide, squishy grip makes this device even more difficult to maneuver. You've really got to grip it tight! The tee is a 1" to 3/4" reducer tee with the 1" portion rotating around a 3/4" x 4" lg. pipe. All other pipes and fittings are 3/4".
Not as sexy, but inexpensive, easy to make, and just as effective:
Drill a 3/8" hole through the top of a 1" PVC cap. Thoroughly deburr and then sand and round out the edges on both sides of the drilled hole. You'll have to tightly roll up a piece of sand paper to get in there. Cut a 30" length of 1" PVC. Thoroughly sand down and round off the edges, inside and out, on the end from which the rope will spin. Feed a tight-woven, polyester, 3/8" thick rope through the PVC and then through the inside of the cap. Tie a knot in the rope on the outside of the cap. Smear some glue around the outside surface of the pipe at the end where the cap will be, and then force the cap on. Tie a weight to the other end of the rope, leaving anywhere from 12 to 24 inches between the weight and the pipe.
The rope should last a very long time, but it would be a good idea to frequently check the rope for excessive fraying on bothe ends, and then replace the rope as needed.
Note: On all versions of the Flail, the closer the weight is to the pipe, the easier it is to spin. Too much distance between the weight and the pipe makes the device too cumbersome. Just find a happy medium.
Yet Another Katana Flail
On this flail, the end chain link spins around a central axis - a 1/4" X 3" hex head wood screw that is screwed into the end of a 27" long 1 1/4" wood dowel. The weight is attached to the chain with a quick link. For a grip, I used a 3/4" wide strip of 4 oz. leather, rough side out. Gives the Katana Flail a real old-world feel. I had the leather on hand, but had no leather dye, and I couldn't find a leather retailer in my area, so I got some brown fabric dye from a fabric store for about a dollar, and for my purposes, it worked just fine. With the exception of the grip, the materials for this world class exerciser came to a staggering $10.02.
Katana and Bastard Flail
These came from Fred Hutchinson's Katana Flail idea, a very neat piece of equipment. I call the little one a Bastard Flail just to get some European sword tradition in here.
I used a 5' standard weight bar that I picked up at a yard sale for $2. For the long piece I cut off the end of the bar at the weight stop then cut the bar again so the short piece also had a weight stop. I ground the ends smooth and used sanding sponges to clean the bars. I then cut 2 lengths of 1/4" chain and added a big snap link at one end (big enough to slide around the bar) and a smaller snap link at the other end to each length of chain.
I slid the big snap link up each bar to the weight stop and added a standard collar that I'd fitted with a bolt instead of a thumbscrew. I left just enough space for the snap link to rotate freely then tightened the collar down with a wrench small side up.
The long bar is 28" long with 33" of chain and snap link. The short measures 16" with 31" of chain.
Once the chain is threaded through a weight plate the snap link can hook to a variety of links to lengthen or shorten the chain.
I use the Bastard Flail one handed and prefer to spin it over my head with the chain/weight moving like a helicopter blade. It is unnecessary to scream "I'll crush your head like a grape!" while doing this movement but I find it soothing to do so.
Handles could be added but I like the feel of the raw steel.
- Contributed by Wanderer
Dremel Power

I realize there are those Powerball gods out there who can get a Powerball spinning with just a flick of a thumb, but for mere mortals who need a kick starter, a Dremel type rotary tool works beautifully. I took one of my dremel bits and wrapped athletic tape around it. Gets that gyro spinning to the max. So, if you're tired of wrapping that string around the gyro, pull your dremel out of your tool box. An electric drill would work as well.
<<< Back to Grip I
Navigate:Questions? Comments? Discussion? Contributions? visit