
3/4" PVC and connectors, and pipe insulation for the handles all cost under ten dollars, and this pushup exerciser can be built in a half an hour. You don't even need glue - just tap the parts together with a hammer. The handles can be rotated for preferred positions and are set at a desired distance apart. The PVC is cut to the following lengths; (6)extensions: 3", (4)posts: 2", (2)handles: 6"-7" as preferred, (1)connector: 18"-24" as preferred.
After cutting the PVC lengths, don't smooth the edges. Just brush away the excess and then jam the cut lengths into the connectors. The reason the handles are connected is so that the handles will remain at a pre-set distance from each other. You could, if you wanted to, make individual dipping bars by eliminating the connector and adding a fourth extension to each of the handles.

I made this with 1" PVC and fittings. The central PVC is 9" long with 45 degree elbows glued to each end, making the centers of the handles 21" apart which is just right for me. With this design, the handles are locked in at 45 degree angles. The PVC for the handles are 7" long, making the exposed PVC about 5 1/2", with foam piping insulation cut to fit. The PVC connecting all of the components of the handles are each 1 3/4" long so that the ends of the elbows, tees, and caps will abutt each other.

All components shown above are glued together. The only places where there is no glue is where the handles connect to the central pipe. This way the stand can be taken apart and packed for travel. When first gluing the handles together, I was very careful to make sure that the supports underneath the handles were perpendicular to the handles to insure their 45 degree positions. I did this by eyeballing the components as I glued them together, twisting the supports a bit one way or the other until they looked just right.

Attach the handles to a ninety degtee elbow, and you've got a knuckles-in triceps stand.


Made of 3/4" PVC. This stand can be used against the edge of a counter, table, dresser, chair, etc. The handle unit rotates within the elbows on either side. 3/8" foam on a 1 x 4 provides a cushion to rest your hands against while gripping the handles. This device keeps you firmly in place while performing triceps pushups.

- gtmcfarland
This set of pushup bars is made of 3/4" piping with piping insulation for the handles. Dips with feet elevated can also be performed on this. The handles can be rotated for any desired angle.
An 18" pipe was used for the width, but any desired width can be obtained by combining any two lengths of pipes with a connector.

Mini tennis balls are cut and slipped over the ends of the pipes to protect the floor.
- contributed by CW

A combination pushup and reverse pushup stand

A triceps pushup stand.

A power triceps pushup device. Good luck with this one.
A bench dip stand
|
|

The Strap. The handles for this strap gym were made with 3/4" PVC pipes and old dog collars.
|
|
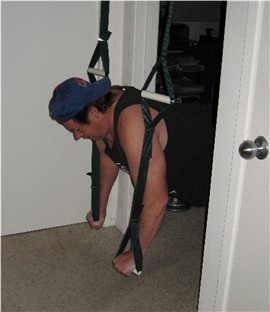
Doing pushups on suspended straps is more difficult due to having to stabilize the movement. Make sure to suspend the handles just above the floor and to hang them wider than in these pictures so that they do not touch the arms; otherwise they become too stable and defeat the purpose. They are narrow here because of where I had to take the pictures.
You can also do dips on them if you adjust the height, and also chest flyes if you can set them widely enough. Also pike pushups, raised-feet pushups, etc.
The straps are a heck of a lot easier to make if you have one definite place to use them. You can make them a fixed length and call it a day.
An alternative to nylon straps is using chains and 'biners to hang handles, like they do at Wake Forest University's weight room.
- contributed by Jeff from NC
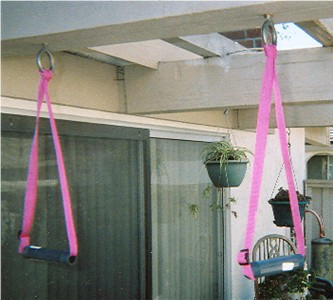
Jeff from NC Has vastly improved his Webbing Blast system as seen above. Instead of meticulously fiddling with sliders to adjust the heights of the handles, Jeff has incorporated evenly spaced loops in both of the two straps, and all he has to do now to adjust the lengths is to secure matching loops from each of the straps to carabingers as shown in the pictures below.
- Shenandoah

I just rebuilt the same one I had, adding a series of spaced loops which you can clip to a steel snaplink at the top. Presto: an immediate, easy, reproducible change in length!

Here's a pic of how it works, just the top part, so you can see that the unneeded length just doubles up and hangs loose.
Now, if I had rebuilt the whole thing from scratch I wouldn't need that metal slider anymore (it's actually sewn in place now). Also there's no point in having the dog collar addition to hold the PVC handle; I just scavenged that from an old expander I made. And finally, the loops shouldn't be quite like the one I built. They should be in a "up and back" teardrop shape so that the pull comes straight across the bar tacks instead of trying to pull them apart. So the final one would look like this (pardon the quickie diagram):

I took my TUSHES for a ride today. Quick and easy height changes let me go from pushups/flyes to leaning back rear flyes, to L-sit dips.
- contributed by Jeff from NC

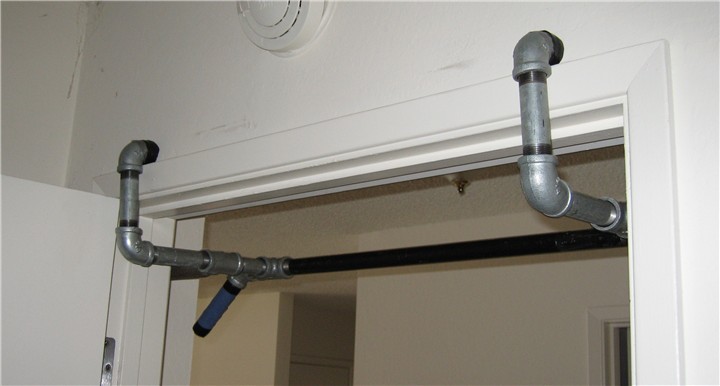
This chinup bar is assembled from 3/4" steel pipes for a cost of just over $20. It slips into a doorway and is held in place by gravity. The pipe lengths shown are for a 30" door and a standard 2 x 4/sheetrock wall. Make adjustments in those lengths for different conditions. Wrap a few layers of duct tape aroud those ends of the top elbows that rest on the sill to protect the door sill. Tuck the excess duct tape into the elbow threaded holes. Place pipe insulation over the 6" lengths that brace the door frame. The 24" pipe generally comes with protective plastic covers on the ends. You can remove these and use them on the ends of the 45 degree handles. Otherwise, cover the ends of the handles with plastic or rubber tips.
Assemble the pipes and connectors together as shown and then tighten them up and square them off. Tighten the pipes as securely as possible. Use the adjacent pipes as leverage to tighten the others. Use leverage - your bodyweight, the floor, stand on one pipe while pushing down or pulling up on another. Use the 24" pipe temporarily in the top elbows to tighten up the side configurations. I would even go so far as to suggest picking up an additional 12" or 18" pipe just to be used for leverage. You can always return it, or hold onto it for future uses. Now square off the assembled pieces. Because all parts oppose each other for strength, don't worry if you have to turn a pipe back a half a turn, or so, in order to square the structure.
Caution: When you mount this chinup bar, make sure that it is the duct taped ends of the elbows that are resting on the door sill, and not the bottoms of the elbows.
See the Miscellaneous page for handle grip ideas.

I wrapped a few layers of electrician's tape around the ends of the elbows for further cusioning and to secure the duct tape
|
|
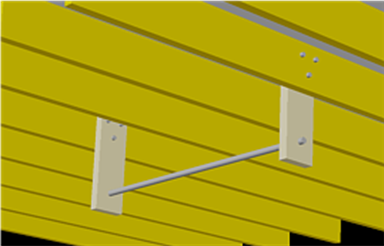
This solid setup uses adjustable cargo straps and PVC handles. A fraction of what a commercial suspension trainer would cost!


- contributed by CW

1) I did not use outer 45 degree angle handles, because they would have been just too far apart.
2) I used 6 inch lengths of pipe for the "stop" pipes wrapped with different sized tubing, so that they formed a 'step' in order to follow the slant of the trim.
3) I put two latching hooks on the bar to attach the strapping to.
4) To keep the latching hooks from sliding, I bought a little rack that holds shovels, brooms, and other long handled tools. The rack had four spring loaded clips. I slid the clips off the backing and I put one on either side of the latching hook to keep it from sliding. It works like a charm.

5) I bought 3/4 inch 'plugs' for the pipe elbows that go up against the wall over the doorway. I had a machine shop weld 5 inch by 1 3/8 inch pieces of metal to the plugs and cut off about 4 threads to make it a more snug fit. I then took felt with adhesive backing (for furniture legs so that they don't mar floors when moving the furniture) and placed it on the 5 inch metal. These plates evenly spread the pressure of the bar, and prevent any mars on the wall above the doorway.
This set-up was a little more expensive than the other one pictured on this site, but still cheaper than the models sold over the internet. And, they don't make one that will fit my door opening.
- Matt Crider

Here are is a twist on the rope exerciser theme utilizing a pulley. Opposing limbs can be used for resistance.
|
|
The same setup utilizing a carabinger and webbing which can increase resistance through friction. See the Miscelaneous page for info on webbing and hardware.
|
|
|
|
|
|
|
|
Filled with sand, this keg weighs 80 lbs. Weight plates can also be added.
|
|

Use your own bodyweight for resistance on your wrist roller. Just attach the end of your wrist roller to something - a chinup bar, a hook in the wall, or simply slip the end between the hinged side of a door and jamb, and then close the door on it. Make sure that there is something on the end of the rope or webbing to ensure that it won't slip through the door. Tying a knot would work. Take hold of your wrist roller, lean back, and then roll yourself up, hand over hand, to an upright position. You can do overhand and underhand wrist rolls.
- gruntbrain
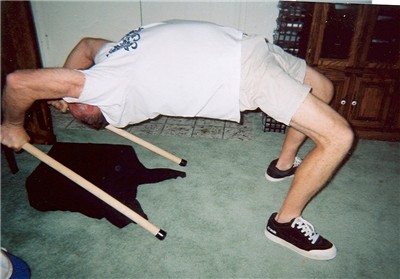
Here are a couple of easy to make, quality pieces of exercise equipment that will allow you to perform a myriad of exercises ranging from the very difficult to the next to impossible. The exercise poles pictured here are made from 1" dia, 3 foot wooden dowels with 3/4" PVC tees for the handles, and rubber stops on the bottoms. Wrap some electrician's tape around the ends of the dowels for a snug fit in the PVC tees.
|
|

Exercise Poles can be made in all lengths and widths. Here's a couple of twelve-inchers being used for triceps push-downs. The ends of the exercise poles can also be braced against someting, like the bottom of a wall.
- gruntbrain

I once built this Free Standing Chinup Bar out of 2 x 4's at a cost of about twenty five dollars. I used a lat bar I have for the bar. You could just as easily use a 1" pipe and attach 45 degree connectors to the ends of the pipe and then connect 1" x 6" pipes to those if you wanted handles that dip down. The stand is 24" wide x 80" high, the top supports extend out 18", the bottom supports extend out 24" in front and 12" in back. Each corner is braced with 45 degree cut 2 x 4s. All four corners are jointed, all parts are glued and screwed, and clips hold the bar in place.
The base for this chinup bar is made of 2 x 6's, screwed and glued; 4' on the side, centered under the flanges which connect to the upright posts, and approximately 5' across the middle, on top, with a 2 x 6 support underneath. The upright posts are 1" (1.333" O.D.) x 6' steel pipes screwed into flanges which are bolted to the base. The chinup bar is a 3/4" (1" O.D.) x 4' steel pipe connected to the 1" pipes with 1"-3/4" reducing elbows. 6' is a standard threaded pipe length. If a different height is desired, custom pipes cut and threaded to specifications can always be used.
A plywood platform could also be used for this chinup bar, which could accomodate other uses; hooks and eyebolts attached for strand or isometric exercises, pushup handles, etc.

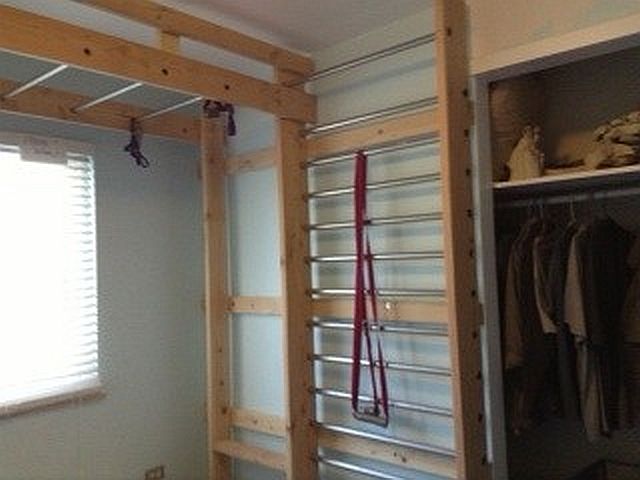
1. It's all 3/4" black pipe except for the Main Bar which is 1" (I wanted no flexion on this bar). (I get a little flexion on the Chin-up/Pull-up Bar - I'm about 180-185 lbs.)
2. The Main Bar (about 2" from the ceiling) is for hanging without my feet touching the floor. It's also used for attaching chains via large spring hooks installed on the 1" pipe prior to assembly. I also wrap a towel around this bar for an additional hand position for pull-ups.
3. Attached to the chains are more spring hooks at about 6" intervals. Gym Rings are attached to the spring hooks for body rows.
4. The Chin-up/Pull-up Bar is about 10-12" below the Main Bar and allows me to grab the bar with arms out stretched while standing flat-footed. From there I don't need to bend my knees much when performing chin-up or pull-ups. I use padded bicycle hand grips for padding on this bar.
5. Flanges attach the rig securely to the wall. I also used flanges on the bars to be able to easily reconfigure them without having to take the whole rig off the wall.
I don't have the SoloStrength rig, but got some ideas from viewing the product on their website.
To build mine - All of the piece parts were purchased at Home Depot except for the Gym Rings which I found on amazon.com.
Shenandoah's Note:
Clark_Kent's use of flanges is an innovative idea which will allow for a multiple of creative designs not possible by simply screwing pipes into elbows and tees.
And, of course, here are a couple of the most simple and cost effective homemade chinup setups of them all:
|

Ever see commercial assists like these going for a hundred dollars a pop? Oh, c'mon! Slip a couple of lengths of webbing through a couple rolls of paper towels, and you can do leg raises 'til you're blue in the face. You can tie the ends of the webbing directly to the bar with slip knots or to large S-hooks to hook around your chinup bar for quick removal.

These grip assists were made by sewing some webbing together as shown. These can be used for any heavy pull, including ISO's - you'll pull harder & longer with assistance.

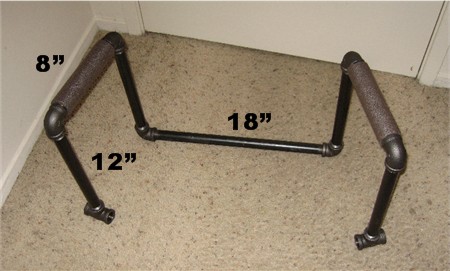
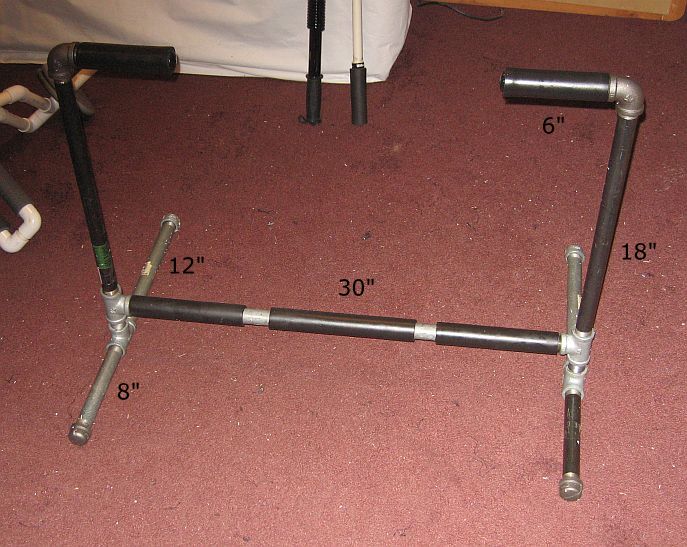
This formidable looking piece of exercise equipment is for back rows. You could either stretch out and grab hold of the bar or the handles. The handles allow for various heights to be used and for different grip positions. This is a great example of how a quality exerciser can be easily made by simply screwing a few pipes together.
Actually, this design has potential for a chinup bar. Extend the lengths of the vertical pipes, and add a support bar at the bottom to prevent the bottoms from spreading out. See the Useful Info page for right angle couplers with which you would attach a horizontal bar at the bottom. In fact, some 1 1/2" webbing drawn tightly with sliders between the upright pipes would work just as well. Using 1" pipes as opposed to 3/4" pipes would also be adviseable. The chinning bar, itself, could be a 3/4" pipe attached to the 1" uprights with 1"-3/4" reducing elbows.
- contributed by austini

Use 1" pipes and connectors. Lengths of pipes are according to preference. The graphics shown above displays dimensions of 2' wide, 3' high, and 3' long. If width is of great importance, you can always combine two pipes of varying lengths.
I'm calling this the 15 Min. Door Gym because that's about how long it takes to make it.
|
|
|
|
Slip the rope assembly through the webbing loop, hold the loop, flattened out, on the top of a door, and shut the door tightly. Make sure that it latches.
Now you're ready to do a whole myriad of exercises! Grab hold of the handles and slde down bracing your feet against the bottoms of the door frames, and do some back rows. I personally include this exercise in my workouts.
Don't be fooled by the simplicity and inexpensiveness of this exerciser. It is actually a very powerful exerciser. You can do back rows, curls, pushups, flyes, triceps pushdowns, wrist curls, chest expansions. Look around this site and find gruntbrain demonstrating some of these exercises. You don't have to worry about whether or not handles are evenly spaced. You do the quick adjusting for eveness when you grab hold of the handles.
Here's how you can quickly modify your Door Gym for various resistance levels:
1. Attach one of the handles to one end of a rope as described above.
2. For the other handle, slip about a 20" length of rope through the PVC, tie the ends into a square not, and slip the square knot into the PVC:
|
|
3. Double up the end of the rope without the handle and tie a simple knot creating a loop as shown below.
4. Tighten the knot and then tie more of the same kind of knot at intervals up the rope. These loops you create will be your resistance levels.
|
|
5. Slip the rope of your handle through a loop, then slip the handle through that, and then tighten it as shown:
|
|
You're all set! Just unloop and detatch the handle and move it to any of the resistance levels.
|
|

Experiment with slide objects appropriate to the surface you're using - i.e., towels or T-shirts on hardwood or vinyl floors.

I cut a six and a half foot length of 1" webbing, singed the edges with a flame to seal them, and sewed the ends together, overlapping 1 inch. I always put a dab of Super glue on webbing to hold it in place while I sew. If you're going to get into webbing heavy duty, the only way to go is to sew with a $12 awl.
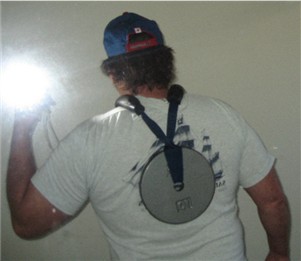
For shoulder padding, I cut two 10" lengths of rubber pipe insulation, slipped them over the webbing, and taped the edges with electrician's tape.
Then you simply loop the webbing through a couple of plates as shown, and your ready to do dips, chinups, or hindu squats. I don't think this would work too well with jogging.
The easiest way to get this bad boy on is to hoist it up to one shoulder with both hands and then lift it overhead while spreading the webbing apart, and then lower it onto your shoulders.
|
|

|
|
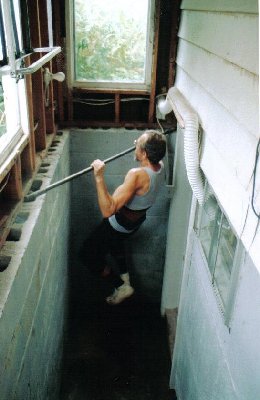
Based upon suggestions from TD and gruntbrain, I threw together a webbing strap contraption with handles on either end and draped it over my chinning bar, the handles being placed at such a height that I have to reach way up to grab them while in a squat position. From there I can do squats and chins at the same time, equally distributing the effort between my arms and legs. As well as working both the standing and pulling muscles, this is also a great aerobics exercise. While going up and down, I can also transfer the effort back and forth between my legs and my arms, placing the greater stress on either. If it is difficult for you to do either squats or pullups, this a great way to build the strength needed to do them.
visit