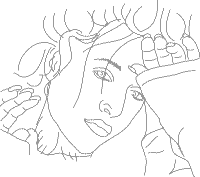
Site hosted by Angelfire.com: Build your free website today!

Painting Gillian


I found this picture of Gillian Anderson on the internet and decided to try painting it.
(Originals have been reduced and compressed to reduce file size/download time).

First thing I did was make a sketch of the basic shapes based on the photo.
(I use Xara X, but it can be done in any program).

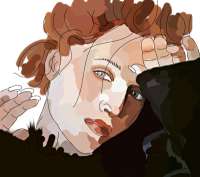
In Photoshop, I opened the line art and promoted the background to a layer.
I changed the blend mode to Multiply and added a layer
*beneath* the line art layer... which I then blocked in with color.

Using the smudge tool, I smoothed out the colors on the bottom layer a bit.
Once I had the basic shapes blended pretty well, I deleted the line art layer.

I decided to change the hair and take out the hand on the left side
(I call it artistic license *grin*). Then I continued to smooth out
the colors with the smudge tool and add color detail as necessary.

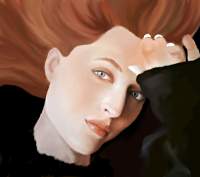
Final details to the fingers and sleeve were painted in and smoothed out.
I then dragged some strands of hair from the hairline and black streaks
onto the neck with the smudge tool and added my signature. Finally, I
added an Overlay layer to paint in highlights and shadows to the hair
(using the airbrush set at low opacity with white and black).

Send questions or comments to Jess at namaste1973@hotmail.com