
Your source for online Yoshin Ryu Ju-jitsu intruction
Here is the place where your webmaster will teach you some of the very same martial art that he practices in, the legendary art that was designed to take down armor wearing sword baring samurai, with using nothing more than your body and using as little strength as possible in taking them down. Credit for these moves it do to The American Federation of Ju jitsu for these online instructions. If you are of this federationa and stuff, do not sue, I am not getting any money out of it, and I did give you credit, just look above, thank you.
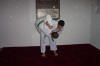
HIP THROW-OGOSHI
The hip throw is found is every style of Jujitsu and in many other arts. The throw consists of the basic principles of a throw. Kuzushi- off balance, Tsukuri- entry and Kake- execution. A basic right handed throw is as follows; You off balance your partner to his front (weight on his toes), you pivot 180 degrees while bending your knees, your right arm passes under his left arm while your left hand controls his right arm or sleeve. You roll your partner over your hip (which is extended slightly out to your right), he flips over you and lands with a left side fall. Two major pivots can be used. The first pivot is used when your partner is stationary or moving to his rear. The standard forward pivot is- With your right foot step diagonally forward to the right, pivot on your right foot as you slide your left foot into position. The second pivot is the rear pivot. The rear pivot is used when your partner is moving forwards towards you- Slide your left foot in a circular movement to your left rear corner and step through with your right foot. This will create a very smooth throw. Most artist know the hip throw because it is the foundation for all standing forward throws. We should always strive for maximum efficiency and minimum effort. The biggest mistake when demonstrating this throw is to pivot too close to your partner and use too much hip thrust to finish the technique. Give this a try- pivot halfway between you and your opponents feet as you stay low (your belt lower then his) You will feel like you are to far away from him to throw. Use your upper body in one unit to bring him close and roll him over your hip (no thrusting lift). You will double your speed and double your partners impact. (don't abuse your partner, it's hard to practice by yourself). Master Moore
 PHOTTO
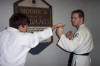
HAND GUN DISARM This is a quick disarm that will eject a gun 6 feet or more away from the attacker. If at all possible during a gun threat, give the attacker what he wants, if this is futile, you must perform with confidence and commitment. For this description we will have your partner hold a fake gun in his right hand, threatening you at face level. Never practice with a real gun even if it is unloaded. This disarm is not used for a two hand grip. From a natural stance, your arms at your side, raise your hands (like a stick up) and act compliant. Move your head to the left out of the line of fire, as you strike his right hand which is gripping the gun on the knuckle line with your left palm. With your right wrist, not your hand, strike inside his forearm several inches above his wrist. Your right palm should face him during the movement. This chopping motion should happen at the same time with both your hands while you move your head towards your left. When finished properly his wrist will hinge, and the gun will eject from his grip. Immediately subdue or incapacitate your attacker. This biggest mistake when practicing this technique is striking the inside of his wrist with your right wrist. This will jam the hinging motion and stops the disarm, you must strike several inches above the hinge point. This technique should be practiced until it is automatic. It is extremely fast and effective. Please don't try kicking a gun out of an attacker's hand, his hand is smaller and faster then your foot, but as a trained Martial Artist your hands will be faster then his. Master Moore
 PHOTO
PHOTO
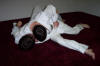
KESA GATAME, SCARF HOLD DOWN After you have thrown your opponent to the ground with a right handed throw or takedown, wrap your right arm around his neck. Sit with your right lower side of your back to his right ribs just below his right armpit. Spread your legs to make the hold stable. With your left hand, grip his right arm against the front of your body. Lower your head towards the right side of his head to protect your neck and face.
 PHOTO
From this hold there are three good submission techniques.
The first, if he frees his arm and tries to push at your face, take your left hand on the outside of his right elbow and push his own right arm across his neck. Press your head against his arm and form a noose around his arm and neck by grabbing your right wrist with your left hand a squeezing. For extra pressure you can go from a sitting position to a semi- kneeling position. Place your right knee against his right hip and drive your body weight into the arm/necklock that you have secured with your grip.
PHOTO
From this hold there are three good submission techniques.
The first, if he frees his arm and tries to push at your face, take your left hand on the outside of his right elbow and push his own right arm across his neck. Press your head against his arm and form a noose around his arm and neck by grabbing your right wrist with your left hand a squeezing. For extra pressure you can go from a sitting position to a semi- kneeling position. Place your right knee against his right hip and drive your body weight into the arm/necklock that you have secured with your grip.
 PHOTO
The second, if he frees his arm and tries to straighten it away from his body, secure his right wrist under your left knee. Using the underside of your left knee bend your leg to squeeze his right wrist and with your leg pull his arm like your trying to pull it out of the shoulder socket. Then bend your right leg and place it under his right elbow, just above the joint. Break the arm by applying pressure upwards with your right knee which is under his elbow and downwards with your left knee, which has his wrist secured. Your right arm will still be around his neck, and for additional pressure place your left hand on his shoulder and press down.
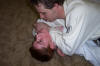
The third, quickly release his arm with your left hand. Place the outside edge of your left hand across his throat. Squeeze upwards with your right arm, which his wrapped behind his neck and downwards with your left hand, which is on his throat. For extra leverage, roll to your right onto your stomach and spread your base, like you are trying to smother him with your chest. All of your body weight will press your chest against your left hand into his throat. It will be a fast submission.
Master Moore
PHOTO
The second, if he frees his arm and tries to straighten it away from his body, secure his right wrist under your left knee. Using the underside of your left knee bend your leg to squeeze his right wrist and with your leg pull his arm like your trying to pull it out of the shoulder socket. Then bend your right leg and place it under his right elbow, just above the joint. Break the arm by applying pressure upwards with your right knee which is under his elbow and downwards with your left knee, which has his wrist secured. Your right arm will still be around his neck, and for additional pressure place your left hand on his shoulder and press down.
The third, quickly release his arm with your left hand. Place the outside edge of your left hand across his throat. Squeeze upwards with your right arm, which his wrapped behind his neck and downwards with your left hand, which is on his throat. For extra leverage, roll to your right onto your stomach and spread your base, like you are trying to smother him with your chest. All of your body weight will press your chest against your left hand into his throat. It will be a fast submission.
Master Moore
 PHOTO
PHOTO
SHIN ROUNDHOUSE KICK This is one of the most effective kicks found in Martial Arts. You use a roundhouse kick but instead of kicking with your foot you make contact with your shin. Your target area is the outside of the attackers thigh, halfway between his knee joint and his hip socket. For visualization, imagine the attacker wearing blue jeans, you try and place the kick directly on the outside seam of his jeans. It will have more power if you use your upper shin. It can be practiced using a kicking shield. Make sure you keep your guard up as you practice and try to follow through with your hips. The nerve that you are attacking is very exposed for lack of muscle coverage. This nerve gets pinched between your shin and his own leg bone (femur). When attacked, this nerve will temporarily paralyze the leg, it can last several minutes. This kick can be delivered at any time during a fight. You probably have noticed that if you kick towards anyone's groin they will have an automatic reaction to block. Unless a person is trained to leg check this kick, he will have no auto response for defending himself. One good way to practice this kick in a training drill is; As soon as the Attacker assumes a fighting stance, deliver the shin roundhouse kick to his lead leg, outer thigh area, as you lean upper body back out of striking range. This drill will help you to respond to the initial threat of a fighting stance. It also teaches the principle of becoming the aggressor at the beginning of an attack and prevents you from freezing during an initial attack, and also instinctively trains you to recognize different zones, the kicking (long) and striking (short) distances. You are destroying your attacker ability to move, fight and also chase you in the event you are trying to run away from the situation. Which, by the way, is the first course of self defense or more accurately, self preservation. Master Moore
 PHOTO
PHOTO
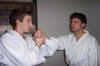
THE MOST PAINFUL WRISTLOCK Be careful when you practice this lock, it hurts. Remember to let go after two taps. As your opponent reaches towards your face with his right hand (with his thumb up), use your right hand to grip his hand by reaching over the top of his hand. His knuckle-line on the back of his hand should lay against the palm of your hand (your fingers will wrap around the bottom knife edge of his hand, your thumb will wrap the top of his hand). The key is to control the knuckle line, his thumb will be free. Next, twist his right hand clockwise with your right hand so that his thumb is down (about 7 O'clock) and his little finger is up (about 1 O'clock). With your left hand strike the inside of his elbow to bend it. Once his arm is half bent, snake your left hand (which is at the inside of his elbow) up to his fingers to reinforce the lock and grip his fingers of his right hand which will be starting to point straight up. The left hand grip should be an all finger grip which wraps around all of his fingers.(The inside -palm side of his fingers should be against your left palm.) From your angle you will see your right thumb followed by left index finger, middle finger, ring finger and little finger all stacked in a column applying pressure to his index finger. Pressure for this lock should be towards the opponent face, just like you are trying to touch his nose with his own fingertips. I hope you can understand this description, it is actually a very easy lock once you practice it. It will break a person down to his knees and there is no escape. You will be in a prime position to kick your opponent. Master Moore
 PHOTO
PHOTO
STANDING MOVEMENT
It is easy to understand the basic concepts of how to move, but it challenges many new students. No matter what technique you are working on, you will have to move. You may move in linear, diagonal or curricular patterns. These are the basics:
1. Stay relaxed when you move.
2. Move as upright as possible.
3. Try to keep your feet under your shoulders.
4. Keep your feet close to the ground.
5. Always move so that all your weapons (strikes, kicks locks and throws) are available at any time.
If you are ridged it is hard to counter any lock or throw. If you bend forward at the waist and crouch you are setting your self up for a sacrifice throw (one where your opponent will fall to throw you). If you keep you feet under your shoulders it is impossible cross your feet. When you cross your feet a good opponent will take advantage and throw or trip you. Also don't spread your feet much wider then your shoulders, it really slows your mobility. A good test, is to spread your stance very wide and low. Have your partner sweep one of your feet as fast as they can. You try to move your foot to keep from being thrown. Now, relax your stance, stand upright and spread your base to the width of your shoulders. Try the same sweep. Notice how that you can now move twice as fast. And finally, don't walk as you do in everyday situations. Keep your feet close to the ground, even sliding them on the surface at times. Never swing your centerline back and forth in front of an attacker as you move. Watch a person on ice. They perform all of the above principles to maintain optimum balance (except for being relaxed). Think of moving your center as do techniques. (Your center is about 2 inches below your navel, near the knot in your belt).
Master Moore
FINGER LOCKS Finger locks are very effective because a small frail person can control a much larger and stronger person. There are two basic types of finger locks, a straight finger lock and a bent or compressed finger lock. The easiest to learn is the straight style. The most efficient number of fingers to control at the same time is 2. If you try and lock 1 finger, many opponents can twist themselves free. If you try and control 3 or 4 fingers at the same time, a larger opponent can power his way out. By holding 2 fingers at the same time, you can prevent the opponent from twisting free, and also 2 fingers are manageable if your hand is smaller. Take your right hand and grab 2 adjoining fingers on your partners left hand. Bend his fingers back. Your opponent can be moved about by a finger lock. He will move in the direction of his palm. To make him go face down, his palm should move towards the floor while bending his fingers back. To make him stand up, turn his palm upwards will bending his fingers back. You can also make a person move sideways using this same principle. If you want your opponents arm to remain straight, the main focus of your leverage should be to pull his knuckles out of his hand. If you want your opponents arm to bend, the main focus of your leverage should be in bending his fingers back. Either one of these motions is very subtle. The finger lock makes a good transition technique in between other techniques. Remember to communicate with your partner and tap out if the lock is to painful. Master Moore
 PHOTO
PHOTO
CLOSE THREAT WITH A LONG GUN This is a disarm for a rifle, shotgun or even a submachine gun. The attacker is at close range with the gun pointed towards your chest or head (facing you). He can be holding the gun under is arm or mounted in his shoulder and he is gripping it with both hands. For this description we will assume he is holding the gun in a right handed grip. Start with your hands down at your side. Raise your hands swiftly, bringing your right wrist under the barrel of the gun (it looks like an overhead block) pushing the barrel up and towards your right above your own head level (while you tilt to your left) as your left hand grips over the top of the gun just in front of his right hand (this will be directly above the trigger area on the gun). With a smooth continuous motion, drive the gun barrel (where the front site is) over the top and into his face while pulling with your left hand down and towards your left hip. As you do this back away to gain space so you are not grappling for the gun. You will be holding the gun in a left-handed position with the stock under your left arm. Learn to feel comfortable in a left-handed shooting position, avoid the urge to switch the gun to a right hand grip. If you want to feel comfortable disarming guns, go to a shooting range with a firearms instructor and learn to shoot every firearm you can. It is important to learn how different guns function. At one seminar (after making sure all guns were clear of ammunition) I demonstrated this disarm on every style of long gun, hunting rifle, shotgun, assault rifle and machine gun. We had a firearms instructor bring all of these styles of guns for this reason. I do not let students do this with real guns. We had one talented student make mock guns out of wood or can use a toy gun. DO NOT USE A REAL GUN. Master Moore
 PHOTO
PHOTO
