EzPad 3.0 Tutorial
EzPad 3.0 Tutorial
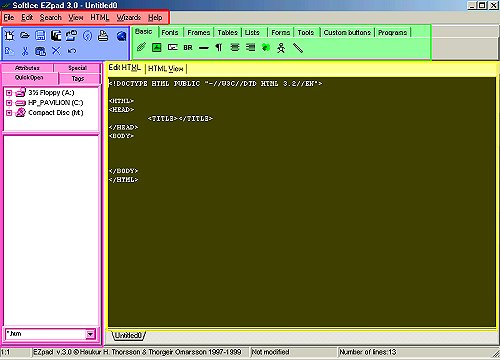
 : The red area on the main frame for the purposes of this tutorial will be known as Toolbar 1.
 :The blue area will be known as Toolbar 2.
 : The green area will be known as the Action Bar.
 : The pink area will be known as the Directory.
 : The yellow are will be known as the Work Area.
Ok, let's skip all the technical workings of EzPad. And get right to making a web page. :o)
The buttons below are from the Action bar:
 : Link button: This is where you add a link to your page by clicking on the button, another box will pop up.
 : Image Button: This button is for putting images on your page.
 : Email Button: This button is for putting an email link on your web page.
 : Break: The break button is for putting a space between pictures, text..etc...It also seperates lines of text.
 : Horizontal Button: This is for putting a horizontal line bar on your page.
 : Paragraph Button: This is for putting a paragraph on your web page. It seperates paragraphs from paragraphs.
 : Center Button: This is to center your text or pictures on your page.
 : Right-Align Button:This button is to position text or pictures on the right side of the page.
 : Color Selector Button:This button is to choose a color for text..etc. It brings up a box with the different colors to choose from on it.
 : Body Wizard Button:This is a very important button. It allows you to choose the background color or image. Text color, Link color.
 : Comment Button: This is to use at the top of your page. Its to put keywords for search purposes.
Page 2

