There is quite a lot more to playing a chromatic harmonica effectively than initially meets the eye (or mouth).
It is an encouraging feature of the harmonica that a beginner can simply pick one up and be able to play recognisable notes that sound okay,
this is certainly an affirmative way to begin playing an instrument.
However to develop good tone; to learn to execute different techniques effectively;
and to master different tonal & musical effects requires a lot of effort and time.
With the Playing Chromatic Harmonicas page I hope to arm you with the knowledge
you need to put into practise and master as a harmonica musician.
Make no mistake the playing techniques on this page are all beginner material and are neccessary to play the harmonica properly.
None of them can be considered advanced or special techniques
noun. Music. a. the correct application of the lips and tongue in playing a wind instrument.
To obtain good clean clear notes from the harp starts with good technique, followed by a lot of practice.
 On this page there are three embouchure techniques discussed:
Tongue Block, Pucker & U-Block.
On this page there are three embouchure techniques discussed:
Tongue Block, Pucker & U-Block.
Of all the embouchures tongue block has a number of tangable advantages over the rest.
Like all other techniques all tone control & bends are available to the player.
With your tongue on the mouthpiece,
it is feeling a number of holes and you can keep track of where you are more easily.
It also opens up the door to a lot more techniques,
such as corner switching which any chromatic player can learn easily enough,
octaves and quick tongue slaps with minimal effort.
Having said all this, I do not recommend tying yourself to one embouchure,
learn the others, find what works for you overall, keep an open mind and give it a chance,
they all take time to learn and become familiar with.
My recommendation is to aim to get to the stage where you seamlessly slip from one type of
embouchure to the next as they are required in the music piece you are playing.
Eventually you will get to the point where you no longer think of tongue block,
pucker or U block, it becomes your...
EMBOUCHURE.
To start with hold the harp and place your mouth over four holes. Your lips should form a relaxed seal around the holes so air going through your mouth should only come in and go out through four holes each time. Practise playing four hole chords.
If you are having trouble with air escaping or not quite getting all four notes try gently pushing the harp further into your mouth, relax your lips a little, they should be gently touching the covers.
Shift around the harp playing different four hole chords using this embouchure.
You may find that your lips drag a little on the mouthpiece. Let off a little when shifting, and it can help to use a little saliva to wet the mouthpiece occasionally so that you can slide more freely.
Now try this only covering three holes, simply reduce the spread of your mouth to acheive this and practise playing only three notes at a time.
Thanks to both Richard Martin & Douglas Tate for their advice and input on this section.
Having achieved a good embouchure you are ready to start playing single notes.
With your mouth over the harp place your tongue against the left most holes and leave only the right most hole clear to play a single note.
This known as right tongue block because you play through the right side of your mouth.
Now again with your mouth over the harp place your tongue against the right most holes and leave only the left most hole clear to play a single note.
This known as left tongue block because you play through the left side of your mouth.
In either tongue block, if you find you are straining to pull your jaw or mouth away from your tongue,
then stop straining, instead practise pushing your tongue to the correct spot,
and get it used to sitting in the correct position.
Be patient, and relax.
Being able to play out of both sides of the mouth using flexible tongue blocks although not immediately necessary simply opens up more range in playing style, techniques and can allow you to play faster and smoother later on. Being able to switch from one side of the mouth to the other quickly allows for quicker note changes that are a distance apart, and is essential for quick corner switching and playing couter point.
On a personal note: after playing exclusively right tongue for several months, I found learning to play tongue block on both sides a fustrating process. To begin with I simply struggled to stop myself playing right TB, eventually I broke the habit, its an ongoing exercise to become familiar with playing both sides, since I can "fall back" on what I'm used to. However I can see this is severely limiting me from playing in many other techniques (for corner swithching for instance). In my opinion it is a good idea to start learning to play both sides as soon as possible and become equally adept at both techniques to give true flexibility. They are no more or less difficult than each other. Its the individuals experience and preferences that make a difference.
There are variations on how to go about tongue block.
The following descriptions are given in regards to right tongue block for practicality.
Please apply it to left tongue block as well.


With many techniques there are a number of ways of achieving the end goal and just as many schools of people who will take various stances on their usefulness or validity.
I recommend you try out the various techniques, find the ones that work for you in different situations and stay open & flexible in your approach.
Tongue blocking needs to be done in a relaxed fasion, if its not coming together simply start again with the basics and perhaps shift your mouth and tongue around a bit to see what feels more comfortable and works for you.
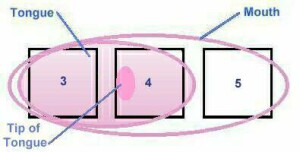
Using right tongue block try blowing and drawing clear clean long notes from hole 4 while blocking holes 2 & 3.
As a starting exercise simply draw 4, blow 4, then shift right one hole so that you have holes 3 & 4 covered with your tongue and play through hole 5... draw 5, blow 5, shift back to your original position draw 4, blow 4. And repeat until you can do it comfortably.
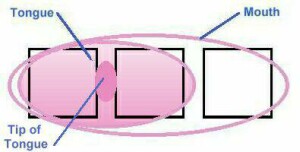
Using left tongue block try blowing and drawing clear clean long notes from hole 4 while blocking holes 5 & 6.
As a starting exercise simply draw 4, blow 4, then shift left one hole so that you have holes 4 & 5 covered with your tongue and play through hole 3... draw 3, blow 3, shift back to your original position draw 4, blow 4. And repeat until you can do it comfortably.
There are a couple of traps with using tongue block.
If you find yourself favouring one side, purposely favour the other until just as comfortable with it.
When you're starting to get single notes, its time to start thinking about breath control and developing it. See the "Exercises", "Breathing Exercises" for more on this.
Finally comes tone. If you strain, if you are tense, if you are fighting with the instrument, you may find your tone is tinny, thin or strained.
The trick is to Relax your tongue, your mouth, your jaw, your neck, your chest and stomach. Relax your shoulders, drop your arms, loosen your elbows, wrists and hands.
If you are standing bend your knees slightly, and loosen up your ankles & feet. Relax
Lift your head high, straighten your back, open up your throat like your head is lifted by a puppet string from the sky, and play from your gut. Be patient, it takes lots and lots of practise, so enjoy the ride.
Feel the notes rising from your toes, all the way up through your body, resonating in your chest & head, flowing through your throat, your mouth, over your tongue, out through your harp & hands !
Also known as lip block, this is another popular embouchure for playing harmonica. Simply think of blowing and sucking through a straw. Place your lips around the hole (or holes if you are playing chords) and blow or draw on the hole. Also the holes are not as small as they may seem as you have the divisions between the holes to place your lips around.
Some people find pucker easier to use to begin with. Myself included. You can open it up to include more notes when playing chords or partial chords. As the tongue is free in the mouth some find this an easier method for learning how to control tone and bend notes down. However when it comes to using techniques beyond this, tongue block becomes more appropriate.
A side note from the Harp-L archives:
4/9/98:
>>Pucker - The lips are pursed and the harp is pushed
>>deep back into the mouth.

>But not as deep as for tongue blocking or U-blocking.  Notice
>the teeth. For pucker and lip-block, the harp is in front of the teeth.
>For [tongue block] and [U-block], it is loosely between the teeth, jaw
>open.
Thankyou John Thaden, for your permission to use your material.
John is a strong advocate of Groove Tongue.
After reading his material I saw his point.
Only marked sections are direct quotes, the rest are my words.
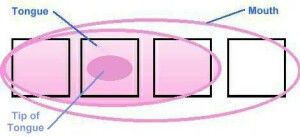
This embouchure is also known as U block or tongue roll.
You can play single notes by placing the tip of your tongue underneath the played note,
in other words using a U-block. Your lips usually enclose three holes.
The played note is usually centered and the outside notes blocked with the left
and right edges of the tongue, which form a U shaped groove.
The tongue tip is on the lower coverplate or just
under the reedplate edge under the hole(s) to be played.
Push the relaxed tongue forward so the inside of the cheeks "u" it up to block the side holes.
The U shape sort of naturally happens when the tongue is pushed forward slightly (and perhaps upward),
because the tip stays anchored below the played note.
As with tongue blocking, the key is relaxation and light pressure on the harp.
The following quotes are from a variety of emails and responses by John Thaden, I've tried my best to keep them in context and true to his meaning. They were sourced from Harp-L archives
"the reason I [John Thaden] prefer that name (or Leo Diamond's term, groove tongue) to tongue roll, is because in fact you don't have to have the genetic gift of tongue-rolling to be able to do it, at least the looser roll, or U version that I use. It is the inside of the cheeks that support the tongue's U shape, as it is pushed slightly forward. I've taught two people U-blocking who cannot roll their tongues at all."
"As with tongue-blocking, the teeth are opened enough so the harp fits between them. The lips cover anywhere from 3-5 holes. The cheeks generally are not permitted to 'pooch' out and in as you breath, and in fact as you'll see, it is the inside of your cheeks that actually help the tongue form the 'U' shape. The tip of the tongue is below the mouthpiece, under the hole or holes to be played. Try some variations: Sometimes I have the tip just beneath the mouthpiece or exposed reedplate edge, sometimes further down onto the lower cover plate. Sometimes the tip is between the lower front teeth and the harp, sometimes inside the teeth. See what works for you.
"Push the relaxed tongue slightly forward. Because it basically has no place to go and because the tip is 'trapped' under the mouthpiece, the edges of the tongue will contact the inside of the cheeks, be forced up into a shallow U, and block the outer holes. That's all there is to it. The end result you should strive for is a very relaxed embouchure with very light pressure of the tongue on the harp, so you can easily move on the harp, and do tongue slaps and chording.
"If the above description doesn't get you there, then try this modification: With the harp and mouth positioned as described, tip the harp so the mouthpiece rolls down against the top surface of the tongue and all the holes are blocked. (This may force your teeth slightly further apart, but don't worry about it -- this is only a learning exercise.) Now roll the harp back slightly and notice which hole sounds first. It may well be the center one. If so, you are on your way to U-blocking. You are really there when you can do it with the harp level, both side-to-side and front-to-back, which is how I hold it."
"...it's advantages as being speed and accuracy, low fatigue factor, rock-steady bends, and identical harp position to tongue-blocking, resulting in both a tone more similar to tongue blocking than puckering, and quick, easy switching to tongue-blocked corners and octaves."
"... The key to both U-block and tongue-block bending is controlling the size and position of the opening (aperture) dividing the cavity of your mouth/upper throat from the rest of your airway. In other words, the action happens back in the throat. Exactly where depends on the note being bent and the tone you want, but concentrate on those areas where you would form the 'k' sound, the hard 'g' sound, and where you would clear your throat or cough. A combination of aperture control and airflow control is what forms the bend; the tongue is therefore perfectly free to maintain the embouchure, do slaps and chords, articulate notes, or -- with very subtle changes in shape and position --fine-tune the bend and embellish it with vibrato and effects. The word 'solid' somehow describes bends done in this way.
"... Articulation is the way one note is divided from the next. The available methods while U-blocking include the glottal 'minicough' championed by Douglas Tate, the consonant sounds 'g' and 'k' and 'L', 'modified' consonants 'd' and 't' (but using the center instead of the tip of the tongue against the upper hard palate), the badly-named 'bite' technique (where the upper lip leaves the harp to break the air seal), and of course changing air direction, and moving from hole to hole."
"[with] u-blocking ... you can do switches. With it and standard tongue-blocking, you now have three positions among which to switch (more actually because the u-block can itself be swept across several holes). Specifically, the left, center, right legato move ... requires no motion of the harp in my mouth when the center hole is open in a u-block. If I play it with a pucker (spit), I have to pull the harp out of my mouth a little from the tongue-block, which is too slow."
Many beginner's have trouble playing a clear note on Draw Hole 2
When you have this problem you are unintentionally pre-bending the note, for
some reason on most diatonic and chromatic harmonicas draw hole 2 is the most
prone to this problem.
Harmonicas are heavily reliant on your mouth for their tone and shaping notes.
Its tempting to want to fault the instrument, however every instrument has
typical beginner problem spots, eg. saxophone beginners find the bell notes "flubber"
until they learn how to shape their embouchure and use breath support for good clean
low notes. Its not much different for learning to play clean draw notes at the bottom
end of your harmonica. The lower the key of your harmonica, the more important it is
for you to learn how to control your embouchure.
A way to show yourself the notes are working fine is to play chords including the notes you are having trouble with. Another way is to use your index fingers to cover the surrounding holes leaving hole 2 open, place you mouth over your fingers and draw air to play the note.
To work towards obtaining clean notes you need to become aware of your embouchure, your mouth, your toungue (not just in your mouth but down your throat), your larynx, everything. Make a point of feeling what is going on back there as you try different things.
BREATH the notes gently, rathering than blowing and drawing them actively and trying to force the note out. The air should come from and go to your diaphragm and chest, not from your mouth.
Block or pinch your nose and try playing the note that way. If that doesn't work try letting a little air through your nose. You eventually want to be able to play while not letting air through your nose, but by manually blocking your nose and/or by letting a little are through you are involuntarily shaping the back of your throat and tongue to a shape more condusive to playing a clean note.
Try playing while shaping your entire mouth with an "EEeeee" and then again with an "Ohhhhh", then "Uuuuuuu", while keeping a good embouchure on the hole. This is about shaping your mouth, not your lips after all. Experiment changing the shape of your embouchure (your mouth), the back of your mouth and your lanrynx. Go gently, patiently, slowly, observe any changes, try to feel whats happening inside you.
As you feel whats going on you can work out how to reproduce that shape and feeling without having to pinch your nose. Learning to control your breath and uvula will help with this. As with anything practise and more practise will get the results you want.Once you understand how to hold and play the chrom you need to practise and work on getting clean clear single notes.
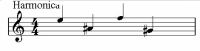
Start out by simply playing single notes across the harmonica. The C major scale is the simplist of scales to play on a C tuned chromatic harmonica.
(The number is the hole to play. + for Blow, - for Draw)
C Major Scale.
5+ 5- 6+ 6- 7+ 7- 8- 8+
Click on score to play scale.
While learning and practising the chrom, start learning tunes to make it more fun.
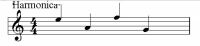
The first song I ever learnt to play was Oh When the Saints in key of C Major.
Oh When the Saints.
5+ 6+ 6- 7+
5+ 6+ 6- 7+
5+ 6+ 6- 7+ 6+ 5+ 6+ 5-
6+ 6+ 5- 5+
5+ 6+ 7+ 7+ 7+ 6-
6+ 6- 7+ 6+ 5+ 5- 5+
Click on score to play along to the tune.
It takes a bit of co-ordination to play with the slide button on a chromatic harmonica.
When the button is pressed in it raises the notes a semi-tone.
The one exception is when drawing on the right most hole, where it raises the note 3 semitones giving an extra high note at the very top end of the harp.
Practise pressing the button while changing notes, making sure the slide is all the way in or out before blowing or drawing the note.
Watch your tongue when using the slide ! You will learn quickly to keep your tongue out of the holes when the slide is moving.
At this point if you are having difficulty getting smooth easy motion with the button, you can try using the pad of your index finger between the first and second knuckle.
The A major scale is played as follows.
(The number is the hole to play. + for Blow, - for Draw, ^ means push the slide IN.)
A Major Scale.
3- 4- 5^+ 5- 6+ 6^- 7^+ 7-
Click on score to play scale.
Try playing Oh When the Saints in A major as an exercise in button control as well as getting used to different sequences of holes to play the same tune.
Oh When the Saints. (A Major)
3- 5^+ 5- 6+
3- 5^+ 5- 6+
3- 5^+ 5- 6+ 5^+ 3- 5^+ 4-
5+ 5^+ 4- 3-
3- 5^+ 6+ 6+ 6+ 5-
5^+ 5- 6+ 5^+ 3- 4- 3-
Click on score to play along to the tune.
One of the most important fundamentals of playing harmonica is learning to control your breath. Two parts of your body that aid you is to use your diaphragm to control your breath, and learning to control your uvula which is the gate to your nasal passage.
Good harmonica playing relies on good breath control. Your lungs are your air bellows, but the chest muscles & lungs by themselves are slow and cumbersome. However your diaphragm, the muscular membranous partition roughly between your chest and stomach, can be used to fill and empty your lungs rapidly.
To gain precision and control over your breath you need to develop your diaphragm. You need to become aware of it, to practise controlling it and to develop its strength, while also increasing your breath capacity to give yourself the best chance to become proficient at harmonica.
For exercises that increase your breath capacity and develop your diaphragm strength go to the Exercises page.
When playing the ideal is to maintain a gentle pressure from your diaphragm so that it is supporting your breath at all times. This way it is ready to respond in drawing or expelling air from your lungs as soon as you ask it to. If it is not kept ready it takes more time to first pick up the slack. Another benefit is that when you support & breath from the diaphragm, as your playing develops so does your tone. You learn to resonate with your instrument, your diaphragm can act like a sort of drum skin drawing you into the music in a very real way as you vibrate with your music.
This is about learning to control air through the nasal passage. Some people can do this straight off. If you can play harmonica without air escaping in and out through your nose, if you can choose to let air through your nose when playing then you don't need to give this a second thought. If you haven't got this control then thats what you need to learn to do:
You need to control your Uvula. The picture here is an open mouth with the pink tongue, at the back is the Uvula in red. The dangly flap at the back of your throat that blocks or opens access to your nasal passage. Look in a mirror when its dangling free your nasal passage is open and you can breath through your nose. While looking in the mirror say "Ahhhhhh..." just like at the Doctors, it should recede back and up - now it is closed. That is what you want to learn to do voluntarily.
An exercise to learn to do this is to balloon your cheeks out. Keep the pressure on them by gently pushing from your diaphragm and lungs. Don't just by block the pressure at the back of your throat. You will know you are doing it right by simply relaxing your lips to let the air go, doing this means you will immediately exhale most of the air from your lungs, without anything shifting at the back of your throat.
If you can do this then you are successfully blocking your nasal area with your Uvula. This is because the pressure that wants to escape from your lungs has only two ways to go, your mouth and your nose. Do it a number of times, practise.
A further exercise is to balloon your cheeks, breath out through your nose, stop the air out your nose making your lips balloon immediately. Feel whats going on at the back of your throat as you're attempting this. If you can do this you're well on your way.
If thats working you're well on your way. then balloon your cheeks, without forcing the air, gently let a smidgin of air out of your nose, then stop it, your lips & cheeks will momentarily relax then balloon again if you do this right. When you succeed at this, then you're ready to do the same when you are playing harmonica.
Try the same techniques when playing harmonica,
When you can choose when to let air through your nose, then you gain control over your tone and become much more efficient with your air. When your lungs begin to fill up through the course of a musical passage, on the blow notes you can leak extra air through your nose. While if you are getting short on air, when you come to a draw note by opening your uvula you can draw more air in. With practise and active awareness through your early years of practising harmonica you will be increase your ability to maintain a comfortable level of air in your lungs to negotiate increasingly more demanding music.
This technique is based on tongue blocking and enables a harmonica player to play across several holes with a minimum of effort and movement.
Simply put corner swithes are when you are playing from one side of your mouth to playing from the other side of your mouth. They can be done by:
When you've practised this technique long and hard enough, muscle memory & habits will set in making it easier to move around the harp, that is when all the hard hours of practise and effort will begin to reap rewards.
I find tongue switches useful for:
A couple of little exercises I use once I could play smoothly just as well
using left or right tongue block, is tongue switching every note up and down
scales in a single register. Quickly switching sides, and either staying on the same hole,
or moving to the next hole whatever is required.
Try chromatic scale runs up and down the chromatic harmonica, one note per side up and down.
Lastly try different corner switches for one hole, two hole ... up to five hole changes, and back again.
Even try playing scales in the lower and upper register counterpoint,
low note left side, same note an octave higher right side, next note left side, same note right side (octave higher) etc.
Playing one note is dead simple, its the next note thats the killer.
This is where you start to really think about how you're going to approach the next note in your tune before you get to it, you need to get to the point that you are thinking one, two, and eventually many more notes ahead of what you are doing. By the time you are playing a note, its a done deal, its too late to think about it anymore, you should already be planning what you are going to do next.
A mantra you need to be working on is:
Consider this short example:
If playing with a fixed single note embouchure like pucker or
sticking with right tongue block, this looks like pretty formidable
little piece and requires three moderate leaps.
However using both left & right tongue block with a bit
of practise it becomes a lot easier to do with a small shift of the mouth:
The left, right, left rolling motion as you do this is something to
work on and develop, as you bring the slide into this movement you want to
include the same feeling of rolling side to side.
For example:
One last example to hit home the principals of corner switching and
thinking about how you approach "the next note".

Go slowly through this exercise until you get it, and practice until you can play it smoothly at an even tempo, every note should be the same length, and the changes should be very quick. Remember the rolling motion. With practise this will come true.
This certainly isn't the ONLY way to play this piece. But it demonstrates a number of techniques which I'll explain.
The point of the last example was to raise your awareness to the many considerations there are to playing the chromatic harmonica properly.
Added to all of this you should have perfected your embouchure, keeping time, your tone, articulation, phrasing, tonal expression, remembering your parts and/or reading the music score, possibly watching for queues from band members or even possibly your section of the orchestra and the conductor.
What I haven't included above is places where pucker and U block could be used.
It is possible with practise to play all the notes clearly and easily across five holes
with a minimal amount of movement of the harp or your mouth, by using your tongue.
Hint: use 4 hole, 3 hole left and right tongue block and U Block for the center hole.
Its a long hard road to getting it right, and even more so if you want to be reasonably good, playing an instrument needs to be something that comes from the heart, and you can really truely enjoy doing because if it isn't your passion, you may as well sell your harps.
You now have the basics to playing the chromatic harmonica.
Its up to you to keep practising regularly (little doses lots is better
than big doses not often), quietly and patiently teaching yourself and
your body as you explore your instrument and grow familiar with its
landscape and the relationship of the notes to each other and how to
navigate smoothly among them.
There are many Chromatic Harmonica Techniques you can learn to increase your vocabulary of self expression.
Read up on Exercises which will get you underway with practising what you are learning.
Why not make a start on Music Theory I and embark on the four week music reading course?