The following descriptions of how to disassemble and reassemble various Hohner & Hering brand chromatic harmonicas,
but should cover most of today's available models.
These descriptions are mostly based on my experience with some additional help from other chrom owners.
I suggest keeping your harmonica fully assembled and only disassemble it when you are ready to work on it,
always putting it together when you are finished this way you will avoid losing or damaging parts.
I recommend before disassembly that you arrange a clean flat surface to work on, devoid of dust, dirt and rubbish.
Have your tools easily at hand. A tidy workspace will make your job that much easier and will help avoid extra hassles.
Keep screws grouped together (I use the harp's case for this), and designate space for each part.
The more care you take, the less likely you will lose or damage your instrument.
If you are unfamiliar with the inside of a chrom start by reading Inside the Chrom in the contents
Two wood screws hold the three or four piece assembly that makes up the mouthpiece & slide assembly. When removing the screws and taking apart the assembly be careful.
Simple enough, usually a nut and bolt at each end of the harmonica hold both covers on.
Avoid letting the screwdriver head slip as this will inevitably end up with a scratch on the cover.
I do this by holding the screwhead & screw driver between my fingers while working the screwdriver.
There are four metal struts inserted into the back of the harmonica, gently pull these out without wiggling and put somewhere safe.
These hold the covers up and stop them being deformed by hand pressure.
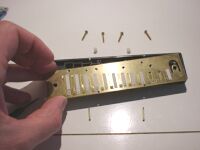
Use a wide blade pocket knife to remove nailed reedplates.
Work along the back of the harmonica from end to the other avoiding the cells of the comb. Use a long smooth firm action.
This is to avoid damaging the cell partitions.
Gently pry off the reed plate, being extra careful not to damage the comb.
You can help matters by starting at each end so as to loosen the nails,
then use a pair of side cutters to pull each nail out.
Damaging the comb creates leaks which is not a good thing.
Keep the reedplate nails in a safe place.
The bottom reedplate covers the spring pin's big tip, sometimes this can
slip out easily so take care.
I take off both reedplates at the same time, and reinstall them at
the same time so if the comb swells or shrinks it remains basically flat.
There is a thick blunt metal pin that keeps the slide spring in place. It is located on the right hand end of the comb. The pointed end of the pin goes into the hole first. Remove the spring from the exposed mouthpiece side of the comb, you can use small flat face pliers to do this, it should slide out easily.
Place the spring in, longest leg to the outside of the comb.
Have the comb right side up and line the spring's hole up with the pin hole.
Replace the pin through the bottom hole, pointed end first and push until the end is flush with the comb face.
Replace the bottom reedpage first.
Be careful to line everything up properly and place each nail part way in while
lining everything up. Use a gentle but firm approach.
Using a small hammer and a 2mm punch, work from the center nails to outside nails.
You want a good seal and you don't want to damage the comb.
Make sure the slide assembly parts are the right way around in the right order.
Point the spring's extended leg into the slide, place the mouthpiece over the lot,
ensure the plastic stoppers are properly installed on the screws, and screw the assembly into place with care.
I find replacing the moutpiece and slide assembly a circus act.
So this is how I approach it:
Two bolts hold the three piece assembly that makes up the mouthpiece & slide assembly. When disassembling the mouthpiece.
Simple enough, usually a nut and bolt at each end of the harmonica hold both covers on.
Sometimes the nuts look like bolts and the heads have matching screw head.
Avoid letting the screwdriver head slip as this will inevitably end up with a scratch on the cover.
I do this by holding the screwhead & screw driver between my fingers while working the screwdriver.
There are four metal struts inserted into the back of the harmonica, gently pull these out without wiggling and put somewhere safe.
These hold the covers up and stop them being deformed by hand pressure.
There are a number of brass screws that go from the top reedplate and screw into the bottom reedplate. The main thing is to take care to use a tight fitting screwdriver to avoid slipping and damaging the screw heads. Avoid using unnessary force. A good approach to undoing bolted plates is to lightly loosen all the reedplate bolts then finish undoing them working from the middle out leaving the corner bolts to last so that the reedplates are held in place until you finish. Put the bolts somewhere safe.
There are two bolts slotted into the comb which the mouthpiece screws bolt into. These are easy enough to take out.
It is located on the right hand end of the comb.
The spring is easily accessed after the reedplates are removed.
It is fitted tightly around a plastic pivot from the comb.
It isn't neccessary to remove the spring, and as this is tricky to replace its probably best to only remove it if absolutely necessary.
To remove the spring from the comb you can use small flat face pliers and simply pull it up and and out of the channel lifting it off the pivot.
Be very careful to avoid letting it spring free.
Not only is it a hassle trying to track it down, but its a risk to the eyes.
Put the spring somewhere safe.
Place the spring into place longest leg to the outside of the comb.
The difficulty is how to get the spring in place and get it inserted around the pivot as these springs
are strong and push hard against the comb walls.
Generally put it in legs first so it can extend out the front of the comb, being careful not to bend the pins.
By placing it just so one should be able to manuever the apex of the spring over the pivot.
This is easier said than done, I recommend using flat face curve nosed pliers and a lot of patience for the task.
Put the two bolts back where you found them from.
The bottom reedplate has screw threads so its easily identified.
Start by lightly screwing the four screws into place so the reedplates are held in place.
Then start installing the screws starting with the middle two screws (front & back), then the screws on the left, then on the right and so forth working from the center out.
Don't tighten any of the screws properly.
Once all the screws are in place, start tightening the screws working in the same middle to outside pattern.
This is to encourage the flatest fit to the comb to minimise airleaks.
Please if you have a better method.
Make sure the slide assembly parts are the right way around in the right order.
Point the spring's extended leg into the slide, place the mouthpiece over the lot,
ensure the plastic stoppers are properly installed on the screws, and screw the assembly into place with care.
I find replacing the moutpiece and slide assembly a little tricky.
So this is how I approach it:

Hold the harmonica upside-down, the back plate facing you.
The bottom of the slide button is a seperate strip, that can bend inwards slightly.
This strip should be depressed a little (1-2 millimeters) without excerting pressure on the slide button itself. The ideal way is to squeeze the strip by placing one finger on it and one finger on the opposite of the slide button.
Depressing the strip releases the catch that holds it inside the cover housing.
While squeezing gently pull the slide button outward. Once the button is free from the housing, pressure can be released. The slide now should come out easily.
You can clearly see the coiled slide action spring now.
Slide the entire slide assembly out of the housing and set it aside.

On the backplate there are two holes that are roughly 1.5 centimeter from either side of the plate.
Hold the harmonica mouthpiece-down in one of your hands, the mouthpiece resting in your fingers and the thumb of the same hand on one of the holes.
Place your other thumb on the other hole, resting some fingers of the other hand on the mouthpiece.
Now press both thumbs down firmly, forcing the back plate down at both ends as far as it will go.
Carefully slide the back plate to either side of the harmonica.
The catches that normally hold the plate in the cover housing will come free at the end you are sliding away from.
Now gently release the pressure on the plate. Be careful not to scrape the loose end of the plate along the inside of the cover housing. If the small amount of plastic there damages, there is a chance the holes break outward, rendering the housing and thus the entire harmonica unusable.

The body of the harmonica is still seated in the cover housing.
It is held into place by the four plastic struts you see protruding from the back of the comb.
Holding the harmonica in one hand, mouthpiece turned towards your palm, gently tap it on a flat surface (a table top is just fine) with the open end. Be sure to hold the harmonica level with the surface you are tapping on, so that the force of the tap is devided over the entire edge of the open end as evenly as possible.
Lifting the cover housing you will see the body resting on the table top.

When you lay the back spring in front of you on a table top, the word "HOHNER" up, you see two shallow depressions machined out on either side of the spring, where it is supposed to catch under the housing material in the holes there.
You will notice that the edges of the depression are square and slightly rough with 90-degree corners. These square corners damage the material of the housing any time you slide the back spring in and out of its recesses, weakening the material until the holes finally break out. As stated before this will damage the housing beyond repair and leave you with a useless harmonica.
 FYI: replacement housings are available from Hohner, but they are expensive and take ages to be delivered.
Using a precision file, carefully round the corners until the shape of the recesses matches the curve of the inside of the housing ends. Take care only to remove the material from the edge of the recesses, not from the flaps that are a result of them. That would weaken the material of the flaps with results just as destructive as a broken housing. By doing this carefully, you will damage the housing less next time you remove or replace the back spring.
Carefully clean the spring from iron residue before using it again.
Your harmonica is now disassembled and you can clean the housing under a running tap if you want to.
Be sure to let it dry thouroughly before reassembling the harmonica.
Do not clean the housing with agressive cleaning stuff or attempt to clean it in a dishwashing machine. This may cause irrepairable damage to the housing.
The body, free of its housing, shows the reedplate screws. These can be removed the same way as any other reedplates, freeing the inside of the plates for windsaver maintenance.
Also the slide can be cleaned now.
If you choose to clean the slide in water, you may want to remove the slide spring.
This is over a small white rod inside the button.
It can be removed without excessive strain.
If you need strain, don't remove the spring lest you damage it.
Just carefully wiggle it until it comes loose.
Do not attempt to remove the black plastic button from the metal part of the slide. It is not possible and it would serve no purpose anyway.
If you do not want to go through the trouble of getting the "Hohner" on the back the right way around and still not look like a fool on stage, you can choose to remove the brand name from the back spring with sandpaper or paint stripper at any time it is out of the harmonica.
But do not do this when the spring is installed, unless you want the risk of iron chafings or paint stripper inside your harmonica.
For the same reason, carefully clean the strip after working on it!

When the body rests on the table, holes facing up, you see the end where the slide button normally goes in. There is a small white T-shaped piece of rubber there. This is the slide bumper. Be sure that it is seated firmly and does not fall out. It can be removed, but that does not serve any purpose. If it is not seated well, use a small object like the tip of a flat screwdriver to reseat it properly. Once it is out, the slide will not realign with the mouthpiece holes properly once the harmonica is reassembled.
 Note: in the recess for the slide button the + shaped plastic strut that is facing the side of the slide. This is the slide spring guidance strut. When replacing the slide the spring should circumfere this strut, or you will not be able to get it in properly and the slide action will not work the way it should.
On the edges of the front end (with the holes) of the body you will see two pairs of notches roughly at the same distance from the edge as the wall between the first and second holes next to the slide button recess. These notches catch single corresponding notches inside the housing.
Replacing the housing forcefully the wrong way will damage the notches, making alignment with the housing more difficult. Therefore correct alignment is very important. To assist in that you will notice that the struts at the back of the comb that support the housing are corresponding with small recesses in the housing. Be sure to align every thing very carefully and without using any force excess of normal gravity before excerting any pressure on the body inside the housing. If you are sure everything is aligned correctly (and there is only one way!) gently push both ends of the back of the comb and you will hear the body snap inside the cover housing. Do NOT excert excessive pressure here, the force needed here is only very small. If you feel you need more, it means you have to realign.
Of course you also have to take care the recess for the slide button in the comb is on the same side as the hole in the cover housing for the slide button.
Hold the back spring, that is curved along the length of it, with the sides curved outward from the harmonica.
Carefully insert one end of the back spring in its holes in the cover housing and align it with the comb as much as possible.
Now use the same grip you used removing the back spring and hold down the inserted end with your thumb on the hole as firmly as you can, keeping pressure away from the holes in the housing.
With your other hand, grip the extending end of the back plate with your thumb on the hole and depress it as far as it will go.
Now gently slide the back plate into the opposite holes in the side of the cover housing. Ideally this move is exactly the opposite of removing the back spring.
Be careful not to slide too far, lest the end you first inserted slips out again.
Before putting any pressure on the back spring, you may want to check the word "HOHNER" on it is not upside-down when you play the harmonica later on.
So turn the harmonica, mouthpiece facing you and make sure the slide button hole is on your right hand side.
Then turn it again and check if you can read the word correctly.
Holding the harmonica mouthpiece down in one hand and the slide with the metal strip on the bottom side and the coiled spring on the top side:
Align the metal strip of the slide with the two slightly wider recesses in the button hole in the housing.
Gently slide the strip inside. This should be possible without any force. If you feel you need force to get the strip inside the housing, you have misaligned. The front end of the notch holding the slide inside is slanted, enabling it to easily click in place. Be careful the slide spring is as straight as possible here, so that it catches on the guidance strut inside the comb at once.
Once the catch reaches the cover housing, carefully excert some pressure on the slide button until it snaps in place.
Turn the harmonica over and check the slide operation.
Remove the slide immediately and check your reassembly work if the holes seem misaligned, but allow for tolerances in alignment.
They probably were there all the time without you noticing them.
One Hering Chromatic is pretty much like another apart from the comb material and number of holes. The mouthpiece bolts thread into the comb, and the reedplate bolts thread into the bottom reedplate through the comb.
Two bolts hold the four piece assembly that makes up the mouthpiece & slide assembly. When disassembling the mouthpiece.
Simple enough, usually a nut and bolt at each end of the harmonica hold both covers on.
With Herings the nuts look like bolts and the heads have matching screw head.
Avoid letting the screwdriver head slip as this will inevitably end up with a scratch on the cover.
I do this by holding the screwhead & screw driver between my fingers while working the screwdriver.
There are four metal strut pins inserted into the back of the harmonica's comb with rubber mounts around them, gently pull these off the rubber mounts.
Then if absolutely neccessary the metal pins can be removed from the comb.
Put all of these somewhere safe.
These hold the covers up and stop them being deformed by hand pressure.
There are a number of brass screws that go from the top reedplate and screw into the bottom reedplate. The main thing is to take care to use a tight fitting screwdriver to avoid slipping and damaging the screw heads. Avoid using unnessary force. With the Hering design there are two very thin small screws at the mouthpiece, start by removing these first. Then approach the remaining bolts by lightly loosening them, then finish undoing them working from the middle out leaving the corner bolts to last so that the reedplates are held in place until you finish. Put the screws somewhere safe.
It is located on the right hand end of the comb.
The spring can be removed after the reedplates are removed.
It is fitted around a plastic pin which is part of the comb.
It isn't neccessary to remove the spring, its probably best to only remove it if absolutely necessary.
To remove the spring from the pin you can use small flat face pliers, you'll have to jimmy it up the pin bit by bit and then pull it out of the channel by the shorter leg.
Be very careful to avoid letting it spring free, brace it with your fingers to stop it flying away.
Not only is it a hassle trying to track it down, but its a risk to the eyes.
Put the spring somewhere safe.
Place the spring into place longest leg to the outside of the comb and through the mouthpiece hole for it.
gently push it into the channel until the apex & pin hole line up, then you'll need to use the flat face plyers to coax the shorter leg into place as you mount the spring onto the pin.
Be gentle but firm as you push it into place.
The bottom reedplate has screw threads so its easily identified.
Start by lightly screwing the four screws into place so the reedplates are held in place.
Then start installing the screws starting with the middle two screws (front & back), then the screws on the left, then on the right and so forth working from the center out.
Finish with the two smallest screws that go at the front by the mouthpiece.
Don't tighten any of the screws properly.
Once all the screws are in place, start tightening the screws working in the same middle to outside pattern.
This is to encourage the flatest fit to the comb to minimise airleaks.
Please if you have a better method.
Make sure the slide assembly parts are the right way around in the right order.
Point the spring's extended leg into the slide, place the mouthpiece over the lot,
ensure the bumper is properly installed on the right screw, and screw the assembly into place with care.
I find replacing the moutpiece and slide assembly a little tricky.
So this is how I approach it:
Firmly push the covers so the front edges meet with the slide assembly, then give the two cover bolts a final tighten to hold everything fast.