
Please wait while this page loads


One of my favorite Christmas Projects is making decorations. And my favorite is an old standby.
SALT DOUGH DECORATIONS
 For Recipe for Salt Dough!
 Use only part of the dough at a time; keep remaining dough covered.
 Complete ornaments one at a time--don't use the assembly-line principle.
If the surface of the basic shape dries out, it will be difficult to work
with.
 If desired, dough can be tinted by dividing into several parts and kneading
a different food color into each part. (paste food color is more vivid.)
After baking, seal as directed for painted ornaments.
 Indications for clothing, features and texture can be marked with
a sharp knife or wooden pick. The wooden pickis best for small details.
 Small appliques add a nice touch: a star on Christmas tree, a heart on a
teddy bear, holly on a place card. Roll a small portion fo dough very thin
(about 1/16 inch thick). Cut out all appliques at one time using small
canape cutters or sharp knife. Put a dab of water on ornament where applique
is desisred, then top with applique. Baking well "cement" the applique in place.
 When adding small molded pieces (arms, legs, hats) to a three-dimensional ornament, always put a dab of water in the spot where the piece is going to be added. As with appliques, baking will "cememt" the piece in place.
 When cutting dough around a paper pattern, use a sharp knife.
 To make tiny ropes of dough for curls or texture, put dough through a garlic
press. Work on a lightly floured surface to keep the tiny ropes from sticking.
 Form larger ropes of dough by hand-rolling.
 If making a complicated ornament, work right on the cookie sheet to
minimize handling.
 If using a craft-wire loop to hang ornament, be sure to spread the ends before inserting in the ornament. This adds support.
 Small hairpins can also be used to hang ornaments. Spread ends apart and insert in ornament.
 If using a plastic straw to make a hole for hanging, be sure the hole is at least 1/4 inch from any edge.
 After baking, smooth any rough edges with fine sandpaper. An emery board will also do the trick.
 Remember to paint the sides and backs or ornaments.
 When adding painted accents, be sure the base color is dry.
 Giving a ornament as a Christmas present? It's a nice touch to add your name or initials and the year on the back.
 Larger ornaments can be hung on doors, in windows or in the center of a
wreath. They make nice holiday paper weights too.

2. Cut out or form head and shoulders; press gently onto wings.
3. Form small rope of dough and fit behind head for halo. Put dough through garlic press or hand-roll small pieces to form curls.
4. Form 2 flat circles and press lightly onto face for cheeks. Make indentations for mouth and eyes; notch wings with sharp knife.
5. Insert wire loop or make gole for hanging.
6. Bake as directed in SALT DOUGH RECIPE. Paint as desired. Let dry and seal.

SNOWMAN
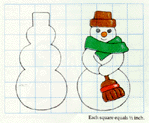
1. Roll dough 1/8 inch thick. Cut out basic shape with sharp knife.
2. Form hat brim and arms. Use piece of wooden pick for broom handle.
3. Overlap 2 pieces of dough for scraf.
4. form broom and attach to handle. Make indentations for broom straws.
5. Insert wire loop or make hole for hanging.
6. Mold dough around piece of wooden pick for nose. Use small pieces of dough to form eyes or paint on after baking.
7. Bake as directed in SALT DOUGH RECIPE. Paint as desired. Let dry and seal.

SANTA'S HEAD
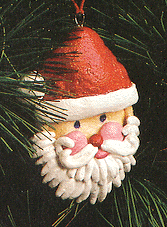
1. Form dough into oval shape, about 1/4 inch thick, for head. Hand-roll dough into rope, about 1/4 inch in diameter and fong enough to fet atound oval (this will provide the base for Santa's beard). Wrap rope around oval and join.
2. Form hat and place on head. Form hat band. Use a small ball of dough for pompon.
3. Form a small ball for nose and place on face. Mark details for eyes. Form 2 flat circles and press lightly onto face for cheeks.
4. Hand-roll small ropes of dough and arrange one by one to form beard and mustache. Use shorter ropes to overlap mustache on beard.
5. Insert wire loop or make hole for hanging.
6. Bake as directed in SALT DOUGH RECIPE. Paint as desired. Let dry and seal.
NOTE; to make a Christmas Elf, follow directions for Santa's Head except--make the head narrower, make the hat pointed and form a long nose.

SANTA IN SLEIGH
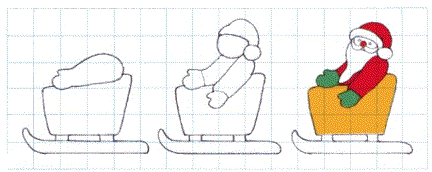
1. Form dough into basic shape of sleigh, about 1/4 inch thick.
2. Form runner and attach with 2 small "legs" of dough. Form body and 1 arm as a unit; attach to top of sleigh.
3. Form a ball and flatten for head. For other arm and hat. Form a small ball for pompon.
4. Insert wire loop or make hold for hanging.
5. Form band for hat. Use a small ball of dough for nose. Mark details for mustache and mouth. Form beard.
6. Bake as directed in SALT DOUGH RECIPE. Paint as desired. Let dry and seal.
MOUSE WITH CANDLE
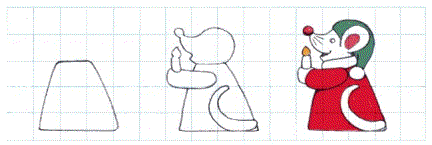
1. Form dough into body shape, about 1/4 inch thick.
2. Form head and attach to body. Form arm and candle. Hand-roll a piece of dough for tail.
3. Form hat and place on head. Use a small ball of dough for pompon. Form collar.
4. Insert wire loop or make hole for hanging.
5. Form a small ball of dough and flatten for ear. Form a smaller ball and flatten for inside of ear. Use a small piece of dough for eye.
6. Bake as directed in SALT DOUGH RECIPE. Paint as desired (don't forget the wiskers). Let dry and seal.
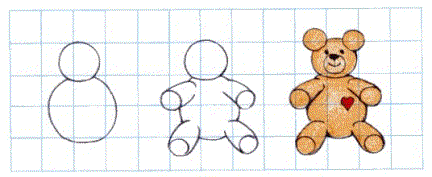
TEDDY BEAR
1. Form dough into 1-inch ball for body of bear; flatter one side slightly for back. Form a smaller ball for head.
2. Form 4 small rolls, each about 3/8 inch long, for arms and legs; taper on end of each roll and press onto body.
3. Form 3 small balls of dough; press onto head for ears and snout.
4. Form a tiny heart; press onto chest.
5. Insert wire loop or make hole for hanging.
6. Bake as directed inSALT DOUGH RECIPE. Let dry and seal.
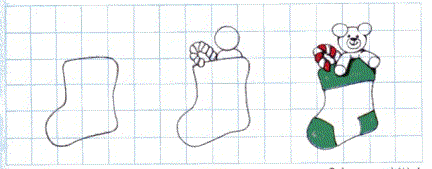
FILLED STOCKING
1. Roll dough 1/4 inch thick and cut out stocking shape, or form shape by hand.
2. Form 2 small ropes of dough, 11/2 inches long and 1/8 inch in diameter; twist together to form candy cane. Press one ent of candy cane to back of stocking; curve other end over top of stocking.
3. Form head and shoulders of bear; press together. Press base of shoulders against back of stocking.
4. Flatten 3 small balls of dough slightly and press onto head for ears and snout. Form 2 small rolls for arms; taper one end of each roll andd press onto sholders. Mark details for cuff, toe and heel.
5. Insert wire loop or make hole for hanging.
6. Bake ad directed in SALT DOUGH RECIPE. Paing as desired. Let dry and seal.
ROCKING HORSE
1. Roll dough 1/8 inch thick. Cut out basic shape with sharp knife.
2. Form saddle and place on horse. Add strap. Form tail.
3. Insert wire loop or make hold for hanging.
4. Hand-roll small pices of dough or put through garlic press for mane; use 1 piece to shape stirrup. Use small pieces of dough to form eye and nostril.
5. Bake as directed oin SALT DOUGH RECIPE. Paint as desired. Let dry and seal.

BRAIDED WREATH ORNAMENT
1. Hand-roll small pieces of dough into 3 ropes, each about 6 inches long and 1/4 inch in diameter.
2. Moisten one end of each rope and pinch together; braid loosely. Moisten remaining ends;pinch to seal braid.
3. Moisten ends of braid and carefully curve to form wreath; pinch to seal.
4. Insert wire loop for hanging.
5. Decorate with holly leaves and berries or bow cut or formed from dough.
6. Bake as directed in SALT DOUGH RECIPE. Paint as desired. Let dry and seal.

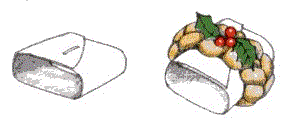
BRAIDED WREATH NAPKIN RINGS
1. Cut strips, about 2 1/2 inches wide and 4 inches long, from bottom of aluminum foil pie pan or cake pan. Shape each strip into a ring staple ends together to for "mold."
2. Follow Steps 1 and 2 as directed for Braided Wreath Ornament.
3. Moisten ends of braid and shape around "mold", pinching ends together on top. Decorate with holly leaves and berries or other shapes cut or formed from dough.
4. Bake as directed in SALT DOUGH RECIPE. Remove molds. Paint as desired. Let dry and seal.
PLACE CARDS
1. Roll dough 1/4 inch thick. Cut into rectangles, 2 1/4 X 1 1/2 inches.
2. Cut triangles from dough to make stands. Make slightly shorter than height of place card and taper to form an angle less than 90 degrees.
3. If using appliques cut and place on front of place card before haking.
4. Bake as directed in SALT DOUGH RECIPE. Attach triangle to back of place card with craft glue. Paint on names and decorations. Let dry and seal.

GIFT TAGS
1. Roll dough 1/8 to 3/16 inch thick. Cut into tag shapes, about 2x1 inch.
2. If using appliques, cut and place on front of tag before baking.
3. Make holes large enough for string or ribbon to go through.
4. Bake as directed in SALT DOUGH RECIPE. Paint on names and decorations. Let dry and seal.


 CLICK HERE! To return to: Homemaking Ideas