
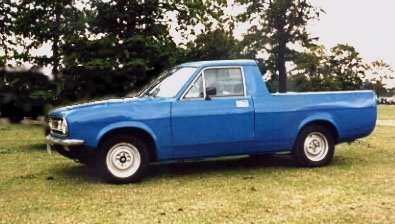
The restoration of my Marina pickup truck was pretty much an accident, my MG Midget was great fun but not very practical for shopping or trips to the local builders merchants. I decided on a small pickup as a second vehicle. It had to be cheap and with spares readily available. I first thought of a Morris Minor pickup but these were either too far gone or overpriced.
The Marina on the other hand was not very sought after, even though there seemed few trucks about. I eventually settled on one for Ł500, it had just had an engine overhaul and mechanically was very sound. The only obvious faults were that a wooden tailboard had been fitted and the bed had been lined out with ply. This appears to be a good idea, but the amount of protection that it offers against bangs and scrapes is fairly minor compared to the rust created by the moisture it traps.
I drove it about for a few months, during which time I could only put about two gallons in the petrol tank due to a small leak in one side. I decided to take it off the road for the winter in order to make repairs to the floor and replace the tank. This was the sum of the work envisaged.
At the time my garage was a lock up several streets away; anyway this was needed for the Midget. I decided to back the truck up to the rear of the house and build a shelter of polythene and thin exterior plywood over it. This gave protection from the elements, access to light and power but no heat, in what proved to be the coldest winter for several years.
My son Graham and I removed the ply lining the back. The extent of the rust was far worse than I had feared, floor was rusted and repaired in so many places that only a very little of the original remained. The repairs were very rudimentary, patches of 16g sheet steel had been overlapped in all directions and the rust extended up the inner walls of the bed especially the back of the cab.
Undaunted we decided to cut it all out and weld in a new floor. Only the rear section was available as a replacement panel so Graham suggested instead that we remove a floor from a scrap van in a local breaker's yard. These are the same design as the pickup truck and being in a closed in vehicle are not so subject to wear and tear. We spent about three hours with hammers and bolsters cutting up a van in a nearby yard and came away with the complete lower rear quarter for only Ł10.
Again using hammers and bolsters we cut out the floor of the truck. We also removed the wall between the bed and the cab. It was eaten away along its bottom edge and I did not see how we could hope to match the ribbing on the panel. This wall is not vertical; the bottom edge is about eight inches further forward than the top, following much the same angle as the seat backs. I had not started this with any idea that it was to be restored to original specification, so I decided that if on replacement I made it vertical I would gain useful storage space in the cab and replacement of the bottom edge would be that much easier.
On removing the floor more rot was found. Beneath the front half is a sub floor, which in the saloon versions forms the rear seat pan. This too was holed in several places. It is also the point where the rear chassis members join the front floor pan. To avoid complete collapse we worked on one half at a time with the underside of the truck supported in as many places as possible. Cutting out about a ten-inch width revealed the chassis leg end, the rear jacking point and the front hanger to the rear spring. All needed replacement, along with the rearmost ten inches of inner sill. For all this work we resolved to make as many of the parts as possible. The reasons were twofold; cost and the fact that as newcomers to restoration work we just did not know how to get hold of some of the parts.
Using the originals as patterns and by bending sheets between wooden formers I made new spring hangers, rear jacking points and repair sections for the chassis. I did all the cutting and bending while Graham did all the welding. After replacing these sections on both sides of the truck we then had the centre of the seat pan to replace. This was cut from a saloon in the breakers yard, where we became well known over the following months.
With all the banging the truck was taking, several rust holes had revealed themselves. We next tackled replacing the inner and outer sills. Working on one side at a time we cut out the sills and sections of the floor pan. New footwells were purchased and parts cut from a donor van for the area behind the seats. We also replaced the front jacking points, this time buying them.
In order to repair the front end of the sill we cut off the bottom of the front wings and temporarily re-fixed them, after making new bottoms to the A posts. Over a year passed before we did any other work forward of the doors. Every box section that was opened up during our work on the truck was packed tight with sand. Graham scooped out several buckets full. We hosed each area out and after any repairs rust proofed and painted them.
At last we came to fix the rear floor. Graham had to shorten it by eight inches due to the relocation of the cab wall and I made a new crosspiece for the back below the tailgate. We also at this point cut out and renewed the rear wheel arches and made repair pieces for the inner wings. We made repairs to the lower rear corners, again fabricating our own as they are not available for the van or truck and although we bought some intended for a saloon, could find no easy way of making them fit.
After a few patches to the rear valance we ready for a tailgate. Before this was done however we wanted to use the truck on the road for the summer. It passed its MOT first time, the examiner was very interested in the work we had done and gave us a few pointers to look for when we eventually got around to the front end. We taxed the truck and took it to our first Marina Owners Club Rally, where we delighted to get the award for the most improved vehicle. It was several different colours and parts from seven vehicles had been used in the work so far. The photographs we had taken while doing the work told the story.
After a summers use we took it off the road once more, rebuilt our primitive shelter and work recommenced. I made wooden formers to bend the outside frames of the tailgate, which were spot welded together. These each followed a curve. The centre was filled in with square section tube fitted flush with the inner face. I was determined that it would not bend when any load was put on it.
As the outer face was curved in two directions we needed a pre curved piece of steel from which to make the skin. We matched up the templates I had made for the framework against several roofs in the breaker's yard until we found one that was near enough the same in both directions. Accordingly the tailgate of our truck was once the roof of a Mini. The inner face was made from the back of a Marina estate rear seat.
I purchased new tops for the inner wings, outer wings, inner and outer front valance and headlamp mounting panels. Yet another car provided a bonnet and a slam panel. After cutting off the old wings we were able to make a more thorough examination of the inner wings. Both chassis legs had been crudely patched and covered in underseal, so much for the MOT. The extent of the rot meant both had to be replaced. Fortunately I was able to buy some cheaply from a fellow club member. By marking lots of reference points and taking many measurements we replaced one side at a time without removing the engine. Merely blocking it up and taking off the engine mount.
The front suspension had also been removed and after cleaning and painting was re-fixed before the outer wings. At the same time the brake callipers were replaced with good used units as both bleed nipples had been broken off and their removal proved impossible.
When fixing the outer panels the bonnet was put on and the panels arranged around it. Several hours of moving and clamping elapsed before welding took place. Most of this was done with a borrowed spot welder with home made extension arms. We then fitted new halogen light units and the bumper and indicators from a mark three estate. Spring arrived so after another MOT the truck once more hit the road. The doors were now re-skinned. Each took a weekend and did not mean any loss of use of the truck. This last task made a marked improvement for minimum effort But with hind site I should have done the doors before fitting the wings as the gap on the drivers side increased due to repairs that had at some time altered the size of that door.
I said at the beginning that the truck seemed in good mechanical condition and that proved to be mostly true. However the restoration of the body has taken three years and the truck has seen a lot of use in between work sessions so a number of mechanical repairs have taken place as and when they became necessary. These include replacement of propshaft universal joints, centre bearing and pinion oil seals. Front and rear shocks, front wheel bearings and steering joints. New timing chain, alternator and starter motor.
Another summer came, I re-seeded the by now ruined lawn and in came the builders to put up a double garage. A bit late in the day but now any other work could be done in comparative comfort. After three years of a rather dodgy synchromesh the gearbox was finally replaced. It seemed no sooner was it installed than the oil consumption increased tenfold. Examination of the engine suggested a rebore was in order. Just then there was a flood of 1300 very cheap Gold Seal Ital engines came on the market. Mostly in the hands of Morris Minor specialists. I purchased one and for about six weeks it remained in the back of the truck. A spell of back trouble put me off trying to install it.
Eventually I took the plunge. This consisted mainly of Graham doing the heavy work and me shouting advice from the sidelines. We found that a height restriction in our garage was no problem in removing the engine and gearbox together, we simply lowered them onto a low trolley then lifted the truck up high enough to pull them out from below. I took the opportunity to paint out the engine bay and also to make repairs to the rusted scuttle.
This entailed removal of the windscreen and patching the scuttle around the wiper area. The holes on both sides had pop riveted on patches, where rust has enlarged them. Parts cut from a second-hand scuttle; a tinted windscreen from the same source and a new rubber completed this. The screen I hoped would now be watertight for the first time in three years. The truck had been plagued by minor leaks around the screen. Nothing new to Marina owners. There is a small drain tube to take off any water getting under the rubber. Rusts soon eats around the side of this and water quickly find an easier route to escape. I took the drastic step of doing away with the drain tubes and using a sealer on the new rubber, in the hope that now water will not get this far in the first place.
The truck had been fitted with opening quarter lights. Water also came in around these but replacement rubbers have proved impossible to find. Strangely enough they are still available for the fixed lights. I decided to swap the quarterlights for fixed ones from a pair of the many spare doors I have accumulated during the course of this project.
Suddenly I find myself with a vehicle that has no parts left to weld, no mechanical components left to replace. All it needs now is a really good paint job. All the time the work has been going on I have given each new piece of work a spray with an aerosol just to stop it looking like Jacob's coat. A full respray is not something I think I can manage myself, so as this will be the biggest single expense it will have to wait a while. I have already fitted the interior from a HL saloon. Another club member located a glass fibre canopy for me in a local breakers. At Ł25 it was a bargain though it was four cars off the ground!
The four years working on the truck were more fun that they sound. I made many new friends in the Marina Owners Club, continue to attend various rallies and I've sold the MG! Well I had not seen a Marina convertible before. Open top motoring with room for the shopping as well, but that's another story.
DISCLAMER: This worked for me, but no liability can be accepted for loss, damage or injury caused by any misinterpretation or by errors in or ommisions from the information given.
Top