Advertisements are put on site by the website service provider.


Lots of Goodies!

This page has it all--fun things to make for your dolls, their dogs, and even hair makeovers! (Note: I set up this page long before official Only Hearts Club merchandise existed, other than the dolls. Only Hearts Club will be coming out with great accessories and furniture for the dolls this summer! You can catch a sneak-peek on the company's official website at onlyheartsclub.com)

Things for the Girls

Here are some fun things you can make to keep your Only Hearts Club dolls happy!

Adirondack Chair

This chair was made with instructions from Martha Stewart Kids magazine, Late Summer 2004 edition. Believe it or not, it's made entirely from Popsicle/craft sticks!

Area Rug

To make an area rug, you will need:
  • Textured felt
  • Textured felt comes in many colors...some are specifically teddy bear colors. If you want it to look more like a "fun" rug (not a fur!), use a pastel or bright color.
    To make the rug, simply cut a shape from the textured felt. Some ideas include:
  • Butterfly
  • Circle
  • Flower
  • Heart
  • Oval
  • Rectangle
  • Square
  • Star

  • Textured felt doesn't fray, so there's no need to hem anything. However, you can get fancy by doing a close zig-zag stitch by sewing machine around the outer edges of the rug. Use a different color than the rug if you'd like!
    To make a rug similar to this one, cut a pink flower approximately 6" diameter. Cut a smaller circle out of blue textured felt. Zig-zag embroider the circle into the middle of the flower shape. Then zig-zag around the outer edges of the flower. I used bright thread (lime and purple).

    Beanbags

    These beanbags are very easy to make...and by making them you won't need to look for a chair in the right scale! To make them, you will need:
  • Textured felt
  • Popcorn, peas, or lentils
  • Cut the textured felt into two "figure eights" (basically, two circles connected in the middle). The "figure eights" I made were approximately 8" long each. Sew these together, right sides together, in the same way a baseball is pieced. By sewing these together, you will make a sphere. Leave a small space un-sewn for turning the fabric.
    Turn the fabric right side out. Add unpopped popcorn, peas, or lentils for "beans." Don't fill the bag full. Leave it about half empty.
    Sew the opening closed.
    If sewing two "figure eights" together proves too difficult, you can make simpler beanbags by just cutting out two circles and sewing them together.
    If you prefer a different type of material, feel free to use it instead of textured felt.


    Anna and Lily enjoy sitting on comfy beanbags.

    Doll

    I made the doll seen in the photo of the rug and sleeping bag from a pattern for dollhouse dolls. If you can't find a pattern for dollhouse dolls, you can instead purchase one that is ready-made.

    Furniture

    Every girl needs a place to keep her things! Check craft stores for furniture. It will be difficult to find things in exactly the right scale, so stick to things that come in many sizes. This armoire and trunk, for example, are okay because armoires and trunks are available in "real life" in all sizes. Things like tables and chairs will be harder to find in the correct scale. These two items are great because they not only look cute in a scene, but they also provide useable storage space. Best of all, each item cost less than $1!
    To select an item, find one where the doors are a bit too small or a little loose. I didn't do this! The wood swells when it's stained, varnished, or painted. If you begin with doors and lids that already fit tightly, they will not even close when finished off.
    Finish the furniture to match your theme or decor. I made mine look "antique"y by doing the following steps: sanding, painting a solid color and letting this dry, paper-toweling "buttermilk"-colored paint (similar to the wood color) on top of the solid color and letting dry, covering with a clear finish. I chose girlish colors that matched other items, such as the dog mat and sleeping bag.

    Poster

    The poster seen in the photo of the area rug is made from a playing card! Check your decks of cards and see if any of them have an extra card (such as a card advertising the card company, or telling how to play the game). You can also make posters by cutting out room signs pictured in catalogs.

    Sleeping Bag

    Lily Rose can use this on her camping trips, or any of the girls can use the bag for sleepovers!
    To make a sleeping bag, you will need:
  • One sheet of craft felt (these are about 9" x 11")
  • A scrap of non-stretchy material, cut to the size of the felt
  • Two strips of cord, each 12" long
  • Embroidery thread in a complimentary color

  • Set the felt so that it is wider running from left to right. Pin the lengths of cord to the right-hand top of the felt, about 1 1/2" in from the corner. (Put the rough ends of the cord to meet the rough end of the felt...the cords will be sandwiched inside for a while. Make sure the lengths of the cord are not caught in the seam...you only want to catch the little bit of the ends on the raw edge of the felt.)
    Put the other piece of material on top, putting the right side of the material facing in.
    Beginning at the bottom, sew all the way around these two rectangles, sewing close (1/4" seam) to the edge. Leave a small gap (about 2") for turning. Make sure to sew extra stitches over the little ends of the cords so that they stay securely.
    Turn the rectangles right side out. Press. Optional: You can also sew some "quilting" lines over the bag through both layers, if you'd like...such as ovals or diamond shapes, squares or rectangles. (There are rectangles on the one pictured.)
    Next, fold the bag in half (felt inside) to make it skinnier and the shape of a sleeping-bag. It should now measure 5" x 8". Thread a needle with a long piece of embroidery thread (full width; do not remove any of the ply). Beginning 4" down, sew a blanket stitch around the side and bottom of the bag, going through all layers. A small blanket stitch will look more like a zipper. With the "V" shape left at the top side of the bag, sew a blanket stitch on either side...but do not connect these sides to each other (sew them separately). This will look like an unzipped section. At the bottom of this V shape (where the two sections meet) you can add a charm or bead to look like a zipper-pull (the one on mine is a pewter flower bead).
    To tie bag in a roll, fold it in half, roll it up, wrap one length of the cording around, and tie a bow. The sleeping bag can be seen rolled up in the photo illustrating the area rug craft.

    Tree Display

    You can make a magical Christmas tree for your dolls. Begin with a miniature tree. Many miniature trees are too wide for a good scale. You may need to trim it as well as fold limbs up or even back onto themselves. For this, you will want to get a tree with metal limbs that easily bend.
    You can find miniature lights (called "rice lights") to help add to the authenticity of the display. These lights are smaller than the small ones used on full-sized Christmas trees. If you can't find these, don't worry; normal-sized lights will work and resemble larger-sized bulbs.
    For ornaments, look in dollhouse sections of craft stores, look in the miniature tree department, and also make your own from beads. I used berry beads and miniature pony beads to make the ornaments most prominently seen on this tree. There are also store-bought balls (though plastic) and jingle bells.
    You can make the scene even more magical by putting the tree lights on a timer. This way you can set it to come on all by itself.
    The tree skirt is very simple: a circle cut from felt, with a hole in the center for the tree. There is also a slit in the skirt (in the back) so that it can be put on and off. You can embroider or applique Christmas designs onto the tree skirt if you like.

    Hair Makeovers

    Kids: These are only for Mom or Dad to do!
    Do you want to try something different on your Only Hearts Club doll? The hair is cut blunt on the ends of the two dolls I have (Anna and Lily), so I never really liked it; it looked too much like doll hair. Time for a change!
    Please note: I have only tested these styles on the dolls with straight hair. The styles are permanent and cannot be taken out of the doll's hair, even with water or comb. Before doing the whole head of doll hair, test on a small section and make sure you are not melting the hair or head or otherwise ruining your doll! (I didn't have any problems, but remember that styling products' heat levels can vary greatly.) Also, think it through carefully, because once they're done, the styles cannot be taken out.

    Textured Hair

    Depicted on Anna Sophia. This style is achieved by using a hair crimper. Take small sections and place them in the crimper. Heat times will vary; mine worked very quickly (in about five seconds). To complete the look, I cut off 1" pieces, cutting into the hair so that it was no longer a blunt cut. This isn't recommended unless you have cut doll hair before (remember, it won't grow back!). More than 1" isn't a good idea, since the hair might not stay down well.
    Once the hair has cooled, you can spritz and brush/comb it in order to blend the crimps you've made.
    The finished product resembles the hair on the dolls with textured hair (Taylor and Olivia).

    Curled Ends

    Depicted on Lily Rose. This helps make the hair look a little more natural, curling under as natural hair does. Using a small curling iron, take tiny sections of your doll's hair and place only the ends into the iron, rolling up only about one roll. My iron is one that doesn't get very hot, so I had to hold it 10+ seconds to get the wave in. Make sure that you check the doll's hair often and that it doesn't get too hot.

    To re-set either style after lots of combing, simply spritz it with water, and the waves/crimps should return. With the second style, it helps to curl the hair over a finger to help re-set the style in.


    Puppy Supplies

    Here are some things you can make to keep your Only Hearts Club puppies happy!
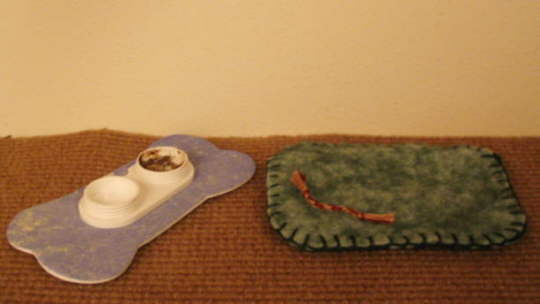
    Blanket/Mat

    To make a dog blanket or mat, you will need:
  • A scrap of felt (I pre-washed a non-washable wool/rayon blend. Doing so made it more "plush")
  • Embroidery thread in a complimentary color
  • Safety embroidery needle with a large eye
  • Cut the piece of felt into a rectangle measuring 3" x 4". After cutting the rectangle, round off the four corners of the felt.
    Next, take a long piece of embroidery thread (do not remove any of the ply). Sew a blanket stitch around the outside of the piece of felt. This is a very easy stitch to do...just pass the needle through each stitch you make; this makes a "line" of embroidery thread around the outside edge of the felt (like the way many blankets are finished off).
    That's it! These are very easy and fun to make.

    Bowls

    To make dog bowls, you will need:
  • Two matching lids off small containers (ones without writing on them are preferred) OR one contact lense cleaning container
  • Clear-drying glue
  • Cereal
  • Brown paint (optional)
  • To make a water bowl, add a bit of clear-drying craft glue to the bottom and let it dry. Don't put in too much or it will dry cloudy.
    The other bowl can be left empty, or you can add something small (such as dry cereal) for "dog food." Crunch up the cereal using your fingernails and fingers, and if it is not dark enough, you can add paint to darken it (I used paint in a chocolate shade). Then add some glue so that it will stay in the container.
    If you are using a contact lens cleaning container instead of two caps, just remove (and discard) the "L" and "R" caps from the container and use the bottom container as a two-sided bowl. For the contents of the bowls, follow the above instructions for two containers.

    Placemat

    To make a placemat, you will need:
  • One piece of the thinnest width fun/craft foam in your favorite wacky print

  • Cut the fun foam into a dog-related shape (such as a bone) that will accomodate both dog bowls.
    Alternately, you can use a white piece of fun foam and draw or paint on it with permanent materials. I did a sponge-painting on mine. But what about writing the dog's name on it? Or drawing a picture of him? It's up to you!

    Tug Toy

    To make a tug to you will need:
  • Embroidery thread in two complimentary colors
  • Cut the embroidery thread as follows: two pieces of one color, two pieces of the other, each measuring 5".
    Knot the four pieces of embroidery thread at the top. Tape this section to a table or book. Next, braid 1" with any fancy braiding technique you know (I did a round spiral stitch gimping/lanyard braid). After you have completed 1" of braid, knot off the bottom.
    Remove the tape and cut the top and bottom about 1/4" from the knot. Fray the ends.

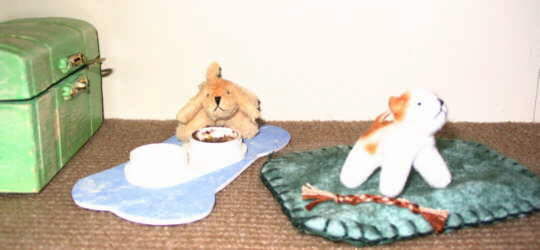
    Here are Bubulina and Cupcake enjoying all of their wonderful new toys:


    [Home | About the Site | The Dolls in General | Book Reviews | Anna Sophia | Briana Joy | Karina Grace | Lily Rose | Olivia Hope | Taylor Angelique | Shadow Box/Clubhouse/Room | Links]

    Please note: This is an unofficial, fan-related page started in June 2004 by Melissa Taylor. For the official Only Hearts Club website, visit onlyheartsclub.com/. Images and text on this site may not be used elsewhere.