Jin's Basic Custom Figure Painting Guide


Welcome to my newly revised painting guide! Let me take a moment to apologize to everyone who has used square-jar enamel paints on soft plastic and ended up with a sticky, never-drying, toxic mess. And to those of you who used Apple Barrel/Folk Art acrylics that are made for porous surfaces like wood or plaster and flake right off of plastic. I wish I could have gotten this guide out to you sooner. But don't give up! Read on and I'll set you on the right path to choosing the correct paints.

Perspective
Take a moment and think 'comic book' in your mind. Upon each page you'll see different shades of color, shadows, sparkling highlights, and all the details that the artists convey while drawing their characters. You're going to do the same thing but on a 3D object. Let's say you want to paint Deadpool's colors. Don't just think "I'm going to paint him red and black." Think about the different shades of red his suit would be in the comic. Remember you're painting something that's only about 6 inches tall so you won't get the shading and details unless you paint it on, just like you’re painting a picture on canvas.

Preparation
You can't just take a figure out of the package and start painting it. You need to wash your figure with warm soapy water first. When a figure is made in the factory they use an oily lubrication on the plastic so the joints don't lock up. This stuff will keep your paint from sticking to the figure and you need to remove it first. I suggest using Ivory or Dial liquid soap and a soft nail brush to get in between the joints. Remember your action figure was designed to withstand being flushed down the toilet by a 3-year old, washing it won't hurt it a bit. Your next choice is to primer the figure or just paint over the factory paint. My choice of primers are a type of clear automotive primers used on plastic. There's Bulldog Adhesion Promoter and Duplicolor Adhesion Promoter which can be used on any type of plastic except soft rubber like capes and stretchy material. They both stick great to soft PVC Marvel Legends plastic and hard ABS Transformers plastic. Do keep in mind these are automotive primers and therefore more toxic than normal primers! Use them outdoors and DO NOT BREATH THE VAPORS. Another note, Bulldog sprays a thicker glossy coat which ANY kind of paint will stick to, and I mean even the crappiest Apple Barrel craft paints. Duplicolor leaves a thinner matte coat that works best with Testors/Citadel/P3/Vallejo. It's also cheaper.

Brushes
Your best bet are soft, natural bristles. There's an amazing set of Detail Brushes on Amazon that I've purchased and love. Stay away from the shiny black plastic bristle with white handle brushes sold in the model aisle. Testors makes some nice paint brush sets but look at them and make sure they're quality. The brands I use are Artist's Touch, Artist's Loft, and Expresso that can be found at Hobby Lobby, Michael's Crafts, and sometimes JoAnn's.

Paints
Do NOT use enamel paints. They will leave your figure tacky as the chemical reaction dissolves the soft plastic over time releasing toxic fumes. You can use enamels in hard plastic (transformers in most cases) but they take a very long time to dry. Krylon Fusion takes seven days to cure to full hardness and Testors Enamels at least five. Never use them on Marvel Legends or anything with soft plastic parts. I use Testors Model Master Acryl, Tamiya spray Lacquers, and Formula P3 by Privateer press. These are probably the best paints for customizing figures out there and you can snag them online using the links below.

Buy Testors Model Master acrylic paints

Buy Formula P3 paints by Privateer Press

Buy Tamiya Spray Lacquers

Other paints you can use are Citadel/Games Workshop, Vallejo Model Color, and War Games paints. These need a primer coat (Bulldog or Duplicolor adhesion promoter) or basecoat of Testors/P3 for them to stick properly to bare plastic. You will also need to topcoat Games Workshop to keep it from wearing off. My choice of topcoat is the line of Mr Hobby Premium sealers that will magically transform the surface of your figure into a factory finish, no kidding. The flat will make the paint resemble a Figma/Figuarts high grade finish and the semigloss is indistinguishable from a factory plastic look. Before you buy them off my Amazon link try checking USA Gundam Store and The Spray Gunner because if you can catch them in stock (or have them send you an email when they receive them) they're waaay cheaper.

Games Workshop paints

Vallejo Model Color


Speaking of paints here's a quick rundown of the types and properties of the most common ones used.

PVC Chinese factory paints:
These are super toxic while in liquid form and banned in the USA paints. Oddly enough all of your action figures are painted with this type of paint because it's apparently harmless once dry (unless loaded with lead, hah). It's also the strongest, most durable figure paint but as mentioned next to impossible to get here. Can be painted on virtually all plastics including soft rubber. Acetone washup only. Cures in minutes but will kill you/cause cancer if you breath in the vapors or atomized paint. Must be a blast to work in those Chinese factories with this stuff eh?

Lacquer Paints:
Second strongest type of paint. The brand of choice is Tamiya Spray Lacquer with [For Plastics] on the label. (designated TS- then a number next to it) There's other lacquer brands out there but can have varying effects on plastics such as making soft parts sticky. Try them at your own risk. Lacquers cannot be used on soft rubber. Great for base color coats on a figure. Acetone/thinner washup only. Takes only 3 hours to fully cure and are the best for base coats for your Transformers.

Acrylic Paints:
Third strongest paint and the overall choice for customizers. Comes in the most shades/gloss sheens, can be mixed, airbrushed, hand-painted on, and all painting techniques can be used. Beware of cheaper brands like Folk Art and Apple Barrel as they are not meant for plastics and require both a primer and a sealer. Use only hobby acrylics such as Testors Acrylics and Formula P3 because stick great to bare plastic. (Games Workshop paints don't stick to bare plastic well unless you primer but they do have a great color selection) Water washup and CAN be used on soft rubber but you need a few drops of raw liquid latex for them to stretch properly. Takes about 2 hours to fully cure but dry to the touch in minutes.

Enamels:
Weakest of the paints, makes soft plastic and rubber sticky. Generally used only for styrene plastic model kits and polycarbonate RC car bodies. Only safe to use on the hard plastic torsos of action figures and hard plastic Transformers. Testors, Krylon, and Rustoleum spray paints take 7 days to fully cure and will pick up a lot of dust/lint during that time because they remain tacky to the touch. Use only if you have no other available options or want to cover a large hard plastic area at once, cheaply. Thinner washup only.


Now with that out of the way I'll turn you over to Spidey who will take you through the basic painting steps.

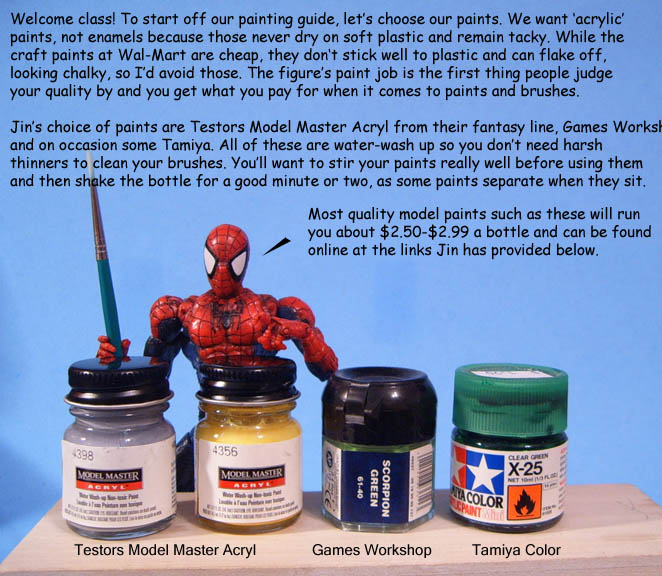
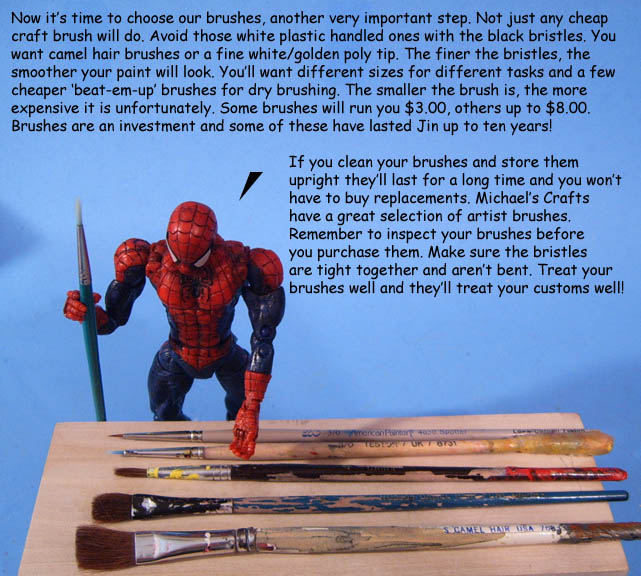
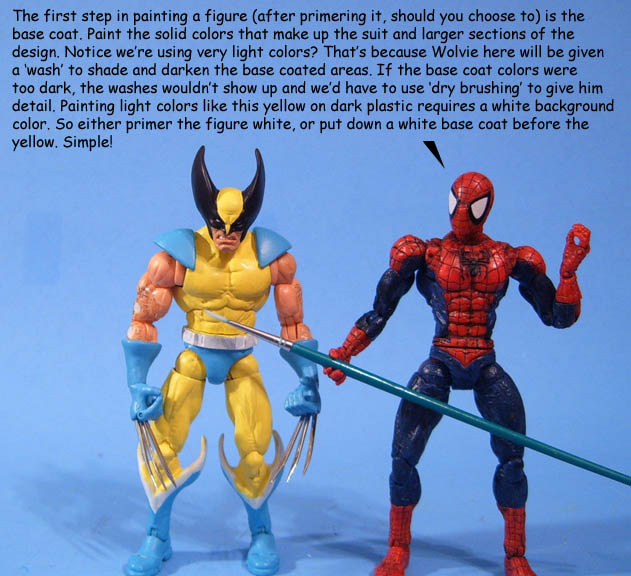
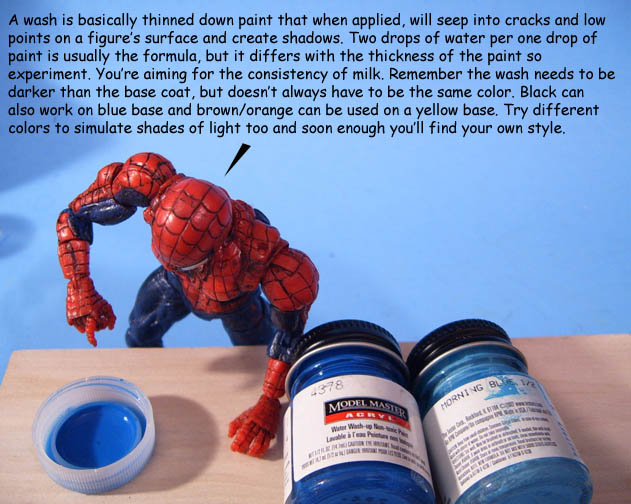
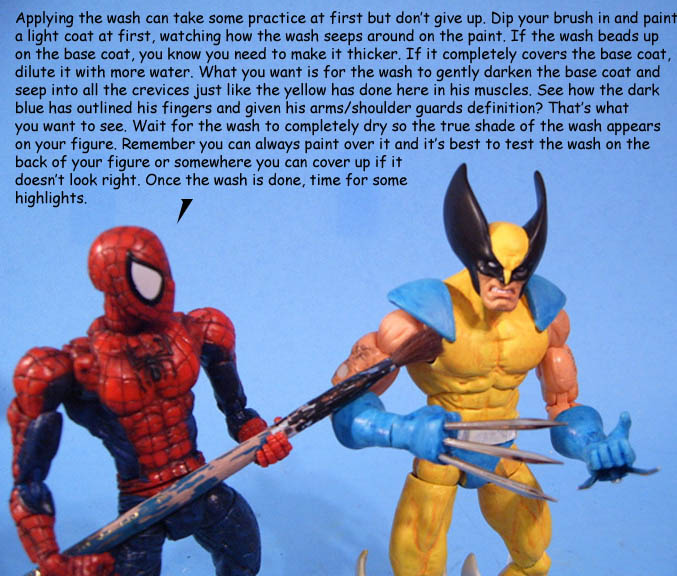
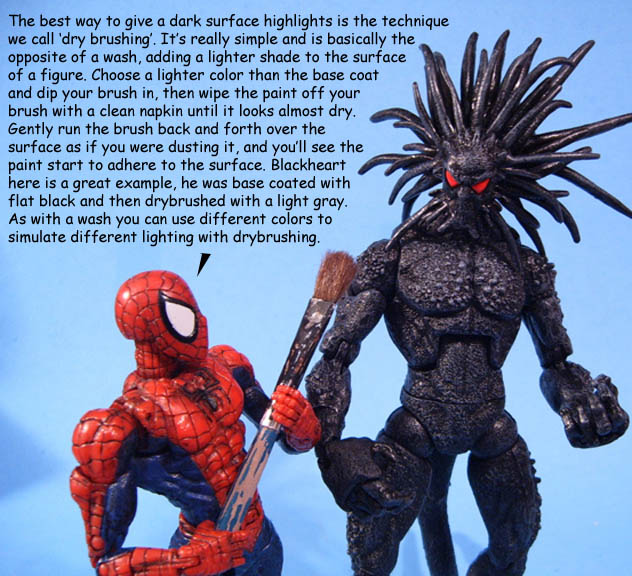
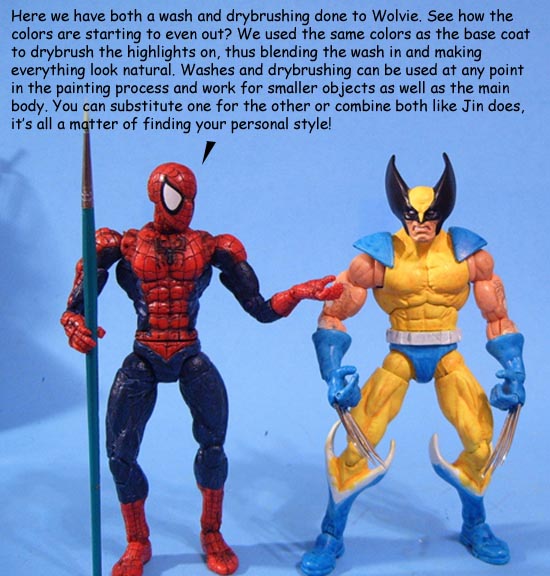
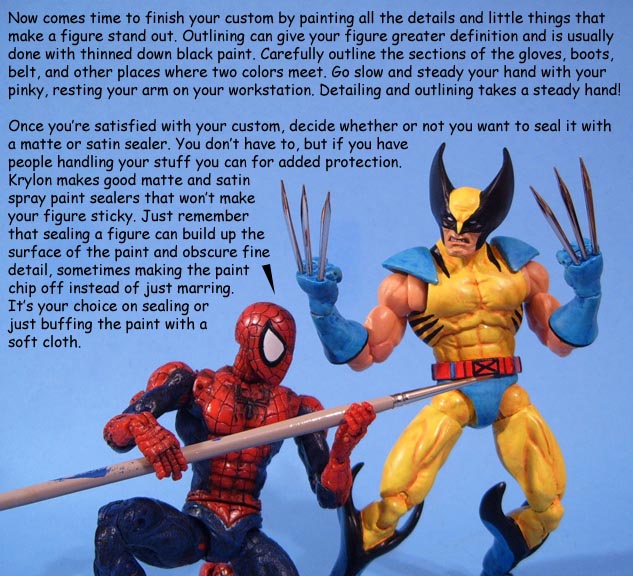
Important Painting Tips!

Use multiple thin coats instead of one thick coat. This not only gives a super smooth look to the finished product, it also helps with durability. Thinning your paint is easy, just add a few drops of filtered/distilled water and mix them up really well. I give all my figures 2-4 coats depending on how much the base color shows through. This will give you super clean paint applications too on details sections like eyes, lips, etc. Almost all my paints are thinned down in the jar before use.

Stir your paints well each time you use them if they become separated. I use the other end of my paintbrush with colors like skin tones, yellows, all metallics, and earth colors. Many testors base colors like black/white/red/blues don't separate easily, but I still give those a shake. Avoid shaking paints that you can see where they've separated and become watery. Stir those first and then shake them, otherwise you could end up with bubbles on your figure.

When using a lighter color than the base figure (say yellow on top of a black Bullseye body) put a couple coats of white down as a base coat or primer the figure white. Dark base color show up through the paint and unless you're going for a really dark shade of your main color, white or a light grey is the best base coat.

Normally I don't need to seal my customs but for those of you who want that extra protection against hand oils/dust I recommend 'Krylon Crystal Clear Acrylic' spray sealer. Either the matte or satin works but I find Gloss can be too thick sometimes. I use this on Transformers and Marvel Legends when needed. However do NOT use it on soft rubber! This means you need to cover up or remove all soft rubber capes, hoods, collars, etc. Every other plastic type I've tried is fine but it will make those soft rubber parts sticky. Tamiya also makes a spray Lacquer sealer that works great.

A small drop of rubbing alcohol in a wash can help the wash stick to the figure better if you find the wash is beading up on the surface. The alcohol helps break the surface tension of the wash so it adheres better in some cases. People often use a drop of windex as well.

When painting flesh tones use very thin coats. You can pre-mix skin tones or use the wash-method. For the wash start with a base coat of Testors Light Flesh (my favorite)and once dry do a wash of Testors Skin Tone Tint Warm over that. Another option is to mix some Burnt Sienna in with the original flesh tone and make a wash of that to put over the base flesh color. Either way you're looking to deepen the color of the flesh by use of a wash. Mixing some green in with the flesh helps with Italian skin tone, and some orange helps with a tan tone. I keep about 8 different flesh tones from Testors and Games Workshop on hand.


The 'Paint Wipe' technique

This is one of my favorite techniques to get a great unique look to your figures. You can read about the technique in my Paint Wipe Guide here.


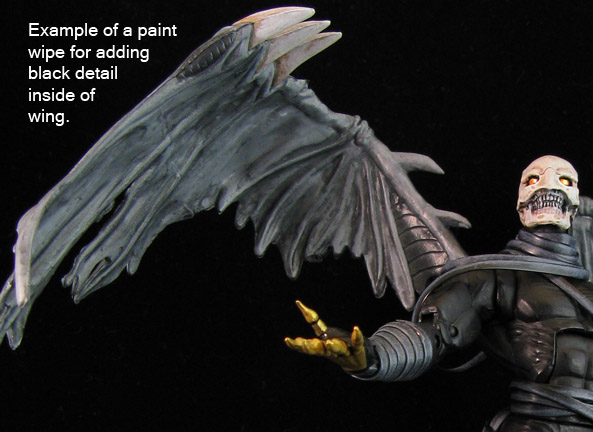
Metallic Colors

Here's a neat trick to getting glossy metallic colors. Base coat the figure all silver (I use Formula P3 Quicksilver or Tamiya Lacquer Chrome/silver). You can also do silver drybrushing or wash darker paint on beforehand so it has shadows. Once the silver basecoat is dry paint on a Tamiya clear color. Yellow will make gold and the other colors will turn out metallic letting the silver shine through as you see in the picture below.


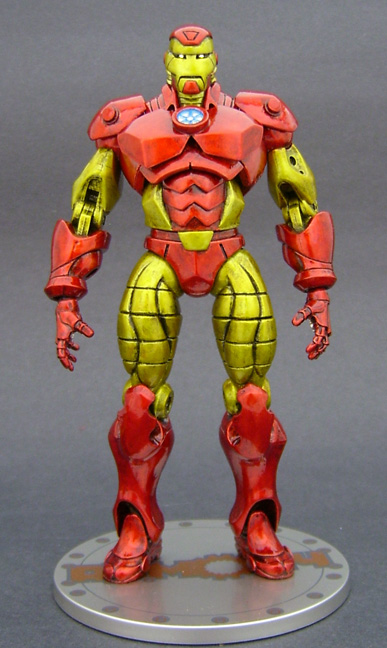
Remember all these techniques I've showed you can be used together to help you make your masterpiece. Experiment with different shades and effects. There's a million different ways to paint and you'll soon find your style.


Looking for other custom action figures made by awesome customizers around the world? Click your favorite series below to be taken to this week's offerings!

Email: jin@jincustom.com