

Links
Back to homepage
Work With Me! Instructions for Seraphina's Shawl
Getting started: instructions for beginning crochet
NEW!!!!--Mittens!
Okay, first off, I've been crocheting for about 23 years. I don't have that much to show simply because I give a lot of it away.
*************************************
In October of 2001, I taught a class at the Atlantian University. For those that don't know, this is a big to-do for SCAdians who are into the arts and sciences. This was my first time teaching it, and these are some of the pictures and materials I had available for use in the class. I hope that I will be able to offer this class again.
CROCHET IS NOT PERIOD!!!!
That being said, there’s a lot to say for crochet!
In the SCA period, knitting, nalbinding, needle lace, bobbin lace, and embroidery were all used to embellish garments, as well as to create delicate accessories. These methods take a lot of time and attention. While our ancestors may have had that time as they sat by the fire of a winter’s eve, few of us in the 21st century are able to take that much time to make accessories for this ‘game’ we play.
Does that mean we can’t have hand-made pouches out of hand-spun, period-dyed yarn? Of course not! Does that mean that we can’t have some nice delicate lace on our Elizabethan court gown? Definitely not. It just means you can’t enter that trim in A&S without a heck of an explanation!
Crochet is fast and fairly easy. I learned the art when I was only 7, and from a book, no less. I learned to knit at the same time, but crochet has always been my hand candy. It’s portable, and unlike knitting, if your hook comes out, you don’t have to cry and try to figure out how to stick the needle back in. There are few patterns that are difficult to master, and it’s fairly easy to turn out a decent project on your first or second try.
There are many applications for crochet in our medieval world, from delicate lace and swirly shawls, to blankets that ward off the October cold at an event without heated cabins. But what I’m going to start you with today is a simple bottle cover.
Whether it’s to carry various mundane items such as money, keys, or a soda pop bottle, or if it is to house a particular sewing project (I’d recommend lining it for that one!) this design is versatile and easily adapts to many different yarn and hook sizes. I’ve made these pouches with crochet thread and a tiny steel hook, adding beads as I went. I’ve also made it with a large aluminum hook and thick, hand-spun yarn. As a matter of fact, my first project with my very own hand-spun yarn was one of these bottle covers. I used it at Pennsic XXIX and have been using ever since. The use has changed from a carryall to a fiber pouch, which I lovingly dangle off my belt, just below my spindle frog.
No matter the use or the materials, the basics here will allow you, with some practice, to adapt this pouch to your own uses.
I have provided a handout of how to do the basic stitches used. Hopefully, by the time this class is over, you will have enough of the rudiments of crocheting to be able to turn out at least one decent pouch/bottle cover.
I am writing these instructions as you would find them in any crochet magazine on the market. I would like to be sure that everyone is on the same page as far as terminology. Also, this will enable you to start working on other projects in various publications as soon as you feel comfortable.
Enjoy!
*****************************************
Bottle Cover Sampler
Copyright 2001, Donya Beasley
MATERIALS NEEDED:
Cotton/wool yarn – I use the one pound cones of Peaches and Cream available at Walmart. I’ve also used my own hand-spun, as stated above, but to begin with, I’d recommend using something that is very uniform and easy to see. This will help you track the eveness of your stitches.
Size H aluminum crochet hook- As stated above, I use all different sizes of hooks and yarns. This one happens to work with this particular pattern, whether you crochet tightly or loose, as I do. If you are a tight crocheter, this pouch will be snug around your pop bottle. If you’re REALLY tight, it will fit loosely around a can or make a nice little license/money pouch.
OPTIONAL: Sewing thread and needle, unless you choose to attach your handle/strap to the pouch by crochet.
You will see two sets of instructions. The first set is how you would see this pattern written out in a book or pattern magazine. Below that, in plain English (or as close as I can get and still be speaking ‘crochet’) is the translation. I suggest reading through both, and taking the time to see how the ‘plain English’ version relates to the pattern terminology.
It takes a little bit of time to memorize the abbreviations, but with a little practice, you’ll get it.
Let’s begin!
Rnd 1: ch 4. Work 11 dc in 4th ch from hook. Join with sl st to top of beginning ch 4. (12 dc)
Round 1: Chain 4. (Make the first chain fairly loose, so that you will have room to put all the stitches in it.) Make 11 double crochets in that big loop. Now count the outside loops of your beginning chain. You should have 3 of them. Slip stitch into that 3rd loop. This will close your beginning ring, and give you a solid foundation to work off of. Now, when you count your stitches, the beginning chain 3 will count as one double crochet. When you count, you will have 11 stiches and the 3-chain bar. This counts as 12 completed double crochets.


Rnd 2: ch 3. Dc in same st as joining. 2 dc in each st around. Join with sl st to top of beginning chain. (24 dc)
Round 2: chain 3. This will count as your beginning double crochet. Now, in the same loop as the joining, work a double crochet. You now have two stitches in the top of the stitch from the previous row. This is also known as an INCREASE.

In the next stitch from the previous row, work 2 more double crochets.

Do this all the way around. When you get to the end of the row, count to be sure that you’ve only worked 24 double crochets (don’t forget the beginning chain in that counting!) Now, join the last double crochet to the top of the beginning chain 3, as you did before.

NOTE: Counting is very important! If you don’t have the right number of stitches to begin with, the entire pattern will be skewed. This is not as critical if you are using only one stitch, but if you choose to get fancy with shells or other patterns, having the right number of foundation stitches is crucial.
Rnd 3: ch 2. Hdc in same st as joining. Hdc in next st. *2 hdc in next st, 1 hdc in next st. repeat from * around. Join. (36 hdc)

Round 3: chain 2. Work a half-double crochet in the same stitch you just joined into. Again, this gives you a little V. Now work a half-double crochet in the next stitch. Work two half-doubles in the following stitch, and one in the stitch after that. Keep doing that until you’ve worked your way around. Now join as before. Seeing a pattern here?
You should now have a total of 36 stitches, including the beginning chain-2.
Rnd 4: ch 3. Working in the back stitch loop of each hdc, work one dc in each stitch around. Join with sl st to top of beginning ch.
Now we’re going to get tricky! This is where you stop increasing and just go straight up to form the sides of your tube. You don’t HAVE to get fancy with this part, but I like the affect.

Round 4: ch 3. Now look at the back of your stitches. You have the top two loops, which are what you normally work in. There’s a little bar right below the back loop on a half-double crochet. It’s a bit of getting used to, but once you’ve learned how, this creates a very nice little side-ways chain stitch. Now, wrap your yarn around your hook, just as for a regular double crochet, then insert your hook from the front to the back, through that little bar. Draw up a loop. Wrap around and draw through two loops, wrap around and draw through the last two loops on the hook.

Now look at your work from the front. See the little chain? That’s what you’re going for.
You’re still working a double crochet, but in a different place than before. Continue doing that around to the end. Join as before. You should now have 36 stitches.
If you don’t, either take one out, or look carefully at your work. You may have put a stitch in the beginning chain spot, making an increase there. No need to tear out your work. Just undo the last stitch made, then join. You’ll have a little space there, but that’s okay for a practice piece.

Rnds 5-8: ch 1. Sc in same st as joining and in each st around. Join with sl st to beginning sc. (36 sc each row)
NOTE: a single crochet is the ONLY stitch that you will put into the same stitch as joining when you’re NOT increasing. It can be confusing, but that’s how it works.

Rounds 5-8: chain 1. Work a single crochet in the same stitch as the joining chain. Now work a single crochet in each stitch around. Join with a slip stitch to the first sc. Join at the end of each row, but work a total of four rows in single crochet. This should give you some decent practice at single crochet.
Rnds 9-12: ch 2. Hdc in next stitch and in each st around. Join to beg ch 2 . Work even* for four rows. (36 hdc each row)

Rounds 9-12: chain 2. Work a half double crochet in the next stitch (not the same stitch as the joining!) Now work one half double crochet in each stitch around. Join with a slip stitch to the top of the beginning chain 2.
*’Work even’ means that you won’t increase or decrease for that amount of rows. You’ll see this a lot in patterns, which is why I am giving you a reference here.
Rnds 13-15: ch 3. Dc in next stitch and in each st around. Join with sl st to top of beg ch 3. Work even for 4 rows. (36 dc each row)

Rounds 13-15: chain 3. Work a double crochet in the next stitch, and then work one double crochet in each stitch around. Join to top of the beginning chain as before. You should have 36 double crochets, counting the first chain-3. Now do that for a total of four rows.
Rnd 16: (shell row) ch 1. Sc in same st as joining. Sk next 2 sts, 5 dc in next st. *sk next 2 sts, sc in next st, sk next 2 sts, 5 dc in next st. Repeat from * around. Join to beg sc. (6 shell groups, 6 sc)
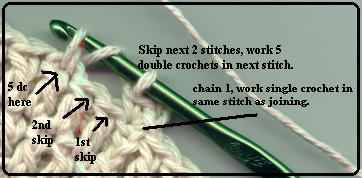


Okay. This is where it gets fancy. This pattern LOOKS like it’s hard to do, but actually it’s easy and fairly quick. It is impressive, though, which is why I use it. And as it’s a Shell, and that’s the Atlantian symbol… --grin-- I just like to use it a lot!
Round 16: Chain 1. Work a single crochet into the same stitch as joining. (this is not an increase, if you recall.) now leave the next two stitches unworked (skip two stitches). In the third stitch from the one you just made, work 5 double crochets. As you work them, they will fan out. NOTE: if you work these too tightly, the whole pouch will pucker here. Now skip two stitches and in the third stitch, work a single crochet. Skip two stitches, work 5 double crochets in the next stitch. See the ripple effect? That’s what you’re trying to do! Good job! Continue this around. Join with a slip stitch to the beginning sc. You should now have a total of 6 shells with a single crochet between each shell group.
Rnds 17-19: sl st to top of shell. Ch 1, sc in same st, sk two dc, 5 dc in next sc. *sk 2 dc, sc in top of shell, sk 2 dc, 5 dc in next sc. Repeat from * around.
Rounds 17-19: slip stitch in the next 3 stitches. This will put you in the 3rd double crochet of the shell, or the ‘top of the shell’. Now chain 1 and work a single crochet in this same stitch. Skip the next two double crochets, and work 5 double crochets, or a ‘shell group’ into the next single crochet. This fills in the little valley from the previous row quite nicely. Now skip the next 2 double crochets and work a single crochet in the next stitch. Continue this pattern around to the end. You should have worked 6 shell groups. Now slip stitch into the beginning chain-1 to finish this row.
Rnd 20: ch 3. Working in BLO of previous row, *hdc in each of next 2 sts. Sc in stitch at top of shell, hdc in next 2 sts, dc in next st. Repeat from * around. Join with sl st in 3rd ch of beg ch. (36 stitches) 
This is easier than it looks. Look at the top of the stitches from the previous row. Usually, you’re working each stitch under both loops of the ‘chain’. This time, you’re going to work only in the back loop of the stitch. This will leave a small ridge that makes a nice dividing line between pattern stitches. Be careful not to pull too tightly when working the stitches, or you’ll distort the row. 
Round 20: Chain 3. (This counts as your beginning double crochet. Notice that it is worked in the top of a single crochet from the row below. That’s important, because with this row, you’re going to be evening out the ripples to make a nice flat working area for the next row.) Now work one half-double crochet in each of the next two stitches. You should be at the top of the shell now. Work a single crochet into the stitch there. Work one half-double crochet into each of the next two stitches. This puts you at the bottom of the ‘valley’ between shells, and you’re going to work a double crochet into the single crochet there. See the pattern here? Double crochets get worked in the sc from the previous row, single crochets get worked in the top of the shell, and half-doubles go between. When you get to the end of the row, you should end with the last two stitches as half-double crochets. Join with a slip stitch to the top of the beginning chain 3.
Rnd 21: ch 2 . Working in BLO, hdc in next st and in ea st around. Join with sl st to top of beg ch. (36 hdc at end of ea rnd)

Round 21: chain 2. Again, working in the back loop only, as in the previous row, work a half-double crochet in the next stitch. Do this all the way around, and join with a slip stitch into the top of the beginning chain 2. You should have 36 stitches.
Rnds 22-25: ch 2. Working in back stitch loop of hdc on previous row, work hdc in each st around. Join with sl st to beg ch. (36 sts)

Rounds 22-25: Chain 2. Okay, remember what we did to start forming the sides of the tube? The pretty chain-like stitches on row 4? We’re going to do the same thing here. Work a half-double crochet in the bar in back of each half-double from the previous row. Work this around to the end. Join with a slip stitch to the top of the beginning chain-2. You should have 36 stitches at the end of each row.

Rnd 26: ch 3. Working in back stitch loop of hdc on previous row, work 1 dc in each st around. Join with sl st to top of beg ch. (36 sts)

Round 26: Chain 3. Remember this counts as your first double crochet. Now, working in the back bar like in the last row, work a double crochet into the back of each half-double crochet around. Join with a slip stitch to the top of the beginning chain-3. You should have 36 stitches.

NOTE: round 26 is the row you will weave drawstrings through, if you’re going to use them.
Rnd 27: ch 1. Sc in same st as joining. Working in BLO, one sc in ea st around. Join with sl st to beg sc. (36 sts)

Round 27: Chain 1. Now working in the back loop of the REGULAR stitch, work one single crochet in each stitch around. Join with a slip stitch into the first single crochet made. You should have 36 single crochets.

Rnd 28: sl st around. Finish off.

Round 28: This row is not absolutely necessary. I just think it gives the pouch a ‘finished’ look. Slip stitch into each single crochet around. At the last stitch, slip stitch to join, as you normally would. Snip the yarn a few inches past the joining, and then draw yarn through the last loop on your hook. You now have a loose end, and you can refer to the attached sheet to see how to weave it in.

Congratulations! You now have a bottle-cover! Or whatever.

Happy hooking!
*****************************************
By the way, if you would like to see another how-to for a shawl that I make, go to the Work With Me page. I have detailed instructions there for my favorite 'hand candy' shawl!
**As a result of this class, I now have really nice kits that include a detailed instruction booklet, hook, and enough cotton yarn to complete your own bottle cover as I've designed here. E-mail me if you'd like one of these kits!**
