Hi there! This is my first-ever IMVU tutorial, I hope it’s helpful! Today we’re going to be making straight hair textures using Photoshop Elements 3.0 (from what I’ve heard, regular Photoshop is pretty much exactly the same, so you non-Elements users should be able to follow along with us as well). First, download the IMVU Previewer and open your Photoshop…. Duh. Then find the product you’re going to derive from.
For this tutorial, we’re going to derive from a Taunt product, the Aiko. Why? Because it’s EASY and I SAID SO. After all, I’m the one writing this thing, so I get to have complete control… Muwahahaha! Megalomania aside, Taunt’s “Aiko” only requires one simple straight texture, which is what we’re learning today. Keep the hair page open- you’re going to need to derive from there later on! We’re also going to make our texture the dreaded *blonde*. The one that’s so hard for everyone to get right… I’m going to show you how I make mine. Blonde is a hard color to make- so once you’re through here you‘ll have the confidence to make any color you want!
Creating Your Hair Texture
Textures are the meat and potatoes of any mesh- no one wants to wear a wire frame on their heads instead of hair, right? In Photoshop, create a 128 x 128 (pixels, not inches). Select a pretty orange, that’s close to the red side.
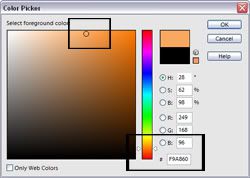
See the black boxes? Those are the ones I picked, and since I’m making a lighter mid-tone of blonde I want a medium-light orange. You would want it more to the yellow for golden and honey blondes, more light/white for platinum blondes, and more red/dark orange for strawberry blondes. Paint your 128 x 128 box with the orange you’ve selected.

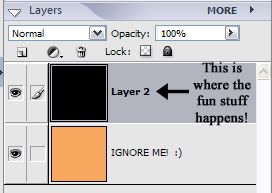
This is your background layer; you won’t do anything else with it unless you decide you hate the color and change it later. You can now safely ignore this layer for the rest of the tutorial- yay!
Now that we’ve made the background layer and are completely ignoring it, add a new layer over it and paint it whatever color your charming little heart desires- it doesn’t matter anyway because it won’t be that color when you’re done! To prove this, I’ve painted my second layer black.
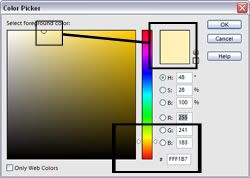
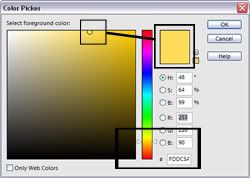
Now, you may be thinking I’m off my rocker- how in the name of the great lizard Larry can black and orange equal anything but a cheesy Halloween costume? Well, this layer is *where* the magic happens. Select two more colors: a light yellow and a dark yellow (mid-toned blondes); a light yellow and a medium red (light strawberry blondes); a medium yellow and darker red (dark strawberry blondes); light yellow and almost white grey (platinum blondes). Since I’m making a medium blonde, I’ve selected a light yellow and a darker yellow.
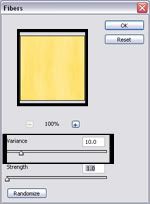
Make sure you are on your second layer. Go to your “Filter” gallery. Select “Render”, then “Fibers”. This is *how* the magic happens! The color in the top portion of your paint palette will be the foreground color, while the bottom portion will be your background color. I want my lighter color to be the foreground, so I’ll make sure it’s the top color.

After I’ve selected to render fibers from my Filter gallery, then I have to pick my settings. There are two: Variance and Strength, each with levels between 1 and 64. Variance will tell the Filter how much difference to create between your two selected colors. Depending on your colors, you should set Variance between 1 and 20 to get the best effect for hair. My colors are fairly similar, so I set my Variance at 10.
Strength, along with Variance, is essential to the look of your hair. You want it to look like straight hair, after all, and not a shag carpet! Strength is essentially like a magnet, telling the colors to line up straight and how far to spread out. The higher Strength that is selected, the more orderly your texture will look! For hair textures, depending on the look I’m going for, I try to keep Strength between 50 and 64 for the best highlights. Because my colors are similar, I’m going to need a higher Strength to make sure the hair looks like it’s supposed to, so I’m going to set it at 64.
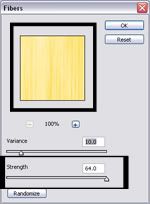
Your finished layer should look pretty similar to the picture above. When we’re done, it won’t look quite so cartoon-like, I promise!
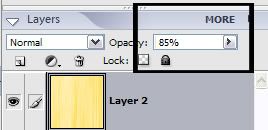
Now that you’ve finished creating Layer 2, it’s time to discover the use for Layer 1 (the one we’ve been ignoring for a while). Select Layer 2, and then go up to the Opacity selector to set the transparency of the actual fiber texture. I recommend between 70% and 88%- just enough to let the bottom layer tint the layer you’re working on! Because I have colors pretty similar to my original orange, I’m going to stick with 85% opacity this time.
From here we go back to the original Twiddler/Taunt instructional video. Create a new layer. Select a couple of shades lighter and/or darker than the ones you used to create the fibers on Layer 2 (which we can now ignore along with Layer 1). These will be your highlights and lowlights! Pull out your extra-soft paint brush (it’s the one with the high amount of blur/fuzz around the center- see?).
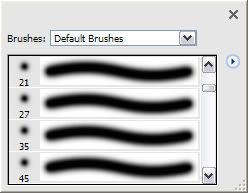
Make your new brush about 40 pixels large, and paint a horizontal line with either your highlight or lowlight about a third down on Layer 3. Change the brush to about 15-25 pixels (depending on if you prefer large high/lowlights or smaller ones) and do another horizontal line another third down.

Go back to your Filters and select Gaussian Blur from the Blurs category. I’ve found that, depending on your colors, it tends to work best if you select between 4 and 8 as your blur radius. Because I have such light colors, I’m selecting my blur at 8. Click OK when you are happy with the amount of blur. Your texture should now look something like this.

Now we select the opacity for Layer 3 like we did for Layer 2. You want it to be more transparent than opaque, so the best range is between 40% and 60%. Again, because I’m working with lighter colors, I’m going to select the middle range (50%) for the best look. Good work! Now that the hard part is done, you should have a texture that looks like this!

Don’t forget to save this texture! That way you can use it for anything you want to in the future and don’t have to make it all over again! I have saved mine in my Textures folder, under Hair/Aiko/TutorialAiko.jpg- look for the Tutorial Aiko hair in my catalog!
Deriving With Your New Texture
Remember that page we opened earlier? The product page to Taunt’s derivable “Aiko” hairstyle? That’s okay, if you already closed it just click here (but you shouldn’t have closed it when I told you to keep it open). Scroll down the page until you see the link that says “Derive from product”, and click it. That will launch the IMVU Previewer. You might need to download some product files- do it or you can’t derive from the product. It will pop up with a little button that says “Product signed (insert avatar name here)”. Click it, and then continue to the “Edit Textures” tab, where you shall be allowed to edit things.
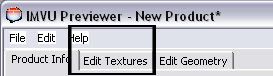
Once you are in the Edit Textures section, you will see this:

The part that’s shaded over is the opacity map for this hairstyle- this isn’t an opacity map tutorial, so… DON’T SCREW WITH IT! Okay? This is just a texture tutorial, so look at the stuff in full color inside the black frame. No, not the shaded bit. The FRAMED bit. Click the picture and browse happily about your computer until you find the texture you just made. Open it to apply it to the mesh (when you do this, the Previewer will update automatically). This is what my texture looks like! The submitted product will look pretty much exactly like it does in the Previewer.

Now that you’ve edited your texture, you have a product! Save the .clf file on your computer (mine’s under the “MyProducts/Hair/Aiko/TutorialAiko.clf). For your own good, do not EVER touch the Previewer’s built-in thumbnail generator. Your customers will make sure you’re drawn and quartered by morning. Okay, not really- but it looks like CRAP and no one will buy your stuff. Take the time to do justice to all your hard work! Hit ctrl+alt+print screen- for PCs only, sorry Mac users!- when you’re on the Previewer’s up-to-date previewing screen. Create a new file, paste, and edit it in Photoshop till it looks *hott*, and then resize the thing to 100 x 80 (IMVU thumbnail size). Your sales numbers will thank you! Your customers will like you better! Your dog will want to fetch your slippers! Okay, not that last one, but the first two for sure....
Since you’ve edited your texture, saved your product, and created your catalog icon, all you have to do now is hit the big red submit button that popped up after you saved- you can’t miss it. The submission page will automatically pop up for you when you hit the thing, I promise. When it does just slap a name on your product, describe it nicely, thank me (the charming intelligent and oh-so-lovely Basquiat) for helping you with this tutorial, thank Taunt for their darling and easy-to-use mesh, set your price, throw some keywords in, and make sure you uncheck the Derivable box. After all, you didn’t make the mesh, and I didn’t make the mesh- Taunt did! They deserve the credit for giving us something to put our shiny new texture on! Once you’re done with all that, hit the submit button on the submission page, and it will take you to the catalog page of your new item. You can make any changes you want to in the description and the price there by clicking your “edit settings” link. Voila! New product!
Sincere Thank You
This is for everyone who’s stopped by my website, everyone who’s stopped by my IMVU page, and my MySpace, and everyone who’s bought something from me on IMVU or from my CafePress store. You’re the reason I enjoy what I do, you give me the encouragement to keep going, to try new things, and to be the best I can be. Most especially, this is to Taunt for their great meshes and tutorials, without which I couldn’t have made this tutorial and wouldn’t have discovered new tricks! I appreciate all of you!
~*~Mousie & Melvin

