How to Get Your Own Original IMVU Stamp Club Card
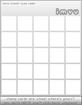
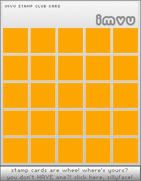
I know there are people out there completely unsatisfied with having the same thing that everyone else has. I know because I am one. I simply must express myself, and now you can too! How? Well, thanks to the wonderful IMVU Stamp Club! You can collect stamps that reflect your unique personality, and you can put them on a stamp card that you can make yourself, using this Photoshop CS3 tutorial. First things first, register with the stamp club by clicking here. Then go get yourself a copy of the stamp card template by clicking here. The original version will look like a larger version of the below:
Step One: Be a Boy/Girl Scout!
BE PREPARED. It was a good motto when I was a Brownie (an embarrassing part of my past, but I’m at peace with it now), and it will serve you well here, too.
If you haven't already, you will need to register with a photo-hosting server. I use Photobucket.com for all my photo-hosting needs- it's free, it works, and it lets me mark my albums private so no one rips off my hard work. There are others out there, some free, some not- find the one that works best for you! Once you have your photo server, you need to find the pictures you’re going to use for your site. It’s best to make your own, and then upload them into the photo server- no copyright issues that way, and unless someone jacks them, no way you’re gonna have the same page as anyone else! If you don’t have the skills for that, find some public domain art or art that you’re allowed to use for non-commercial purposes and upload that into your photo server. SXC.HU is a wonderful site for this option; it has stock photos and graphics that are free for public use as long as the terms and conditions set by each photographer are met, so bookmark this one. The third option is to beg a graphically-gifted friend to make you some and upload those. If you go with the third option, ALWAYS remember to place a thank you on your page where it’s easily visible so people know who did the work.
Step Two: Creative Explosions!
Now here is where we start having a ton of fun with this project! You have your template open in Photoshop CS3. You have an idea of what you want. Time to put it into motion and make your stamp card!
Choose your colors! In deference to Melvin, my sweet little head bunny, who absolutely adores carrots, I'm going to work in 2 saturations of green and 2 of orange, for a nice carrot-y feeling to my stamp card. I like to make a simple palette and save it to my computer, just in case I want to use the colors for other projects. For this project, here is my palette:

Part One: Squares
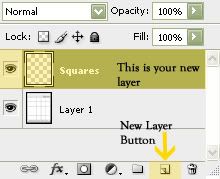
A good stamp card will use the principle of contrast to help both the design of the card and the design of the stamps stand out. In that spirit, I'm going to make my stamp-squares darker than the background (although you certainly could do a very lovely design the other way around, or using different colors, instead). To do this, I'm going to create a new layer and name it "Squares".
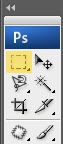
You're going to use the Rectangular Marquee tool quite a bit with this bit, so in case you aren't familiar with it, it's this one right here in the Photoshop CS3 Toolbar (look in your "workspace"- screen area- on the left).
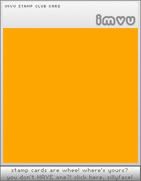
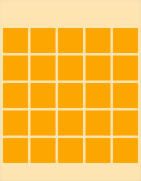
Now that you know where your Rectangular Marquee is, let's put it to work! Use it to select the entire area with the squares- that's right, all of em. For now, select the "Squares" layer and use the Paintbucket tool to just fill the entire area with color. It should look like the one below, just twice as big.
Change the opacity on the "Squares" layer to 50%. This will help us see what we're doing for the next few steps!
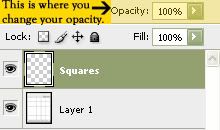
Now that we have a see-through square, as it were, we can go about defining the actual squares. Use the Rectangular Marquee tool to select the area between the first two columns, and on the "Squares" layer, hit delete. Simply keep the Rectangular Marquee tool on, and move it between the columns hitting delete. Boom! Half the job done, so do the same thing to the spaces between the rows and we'll have lots of pretty squares for our stamps. Then change the opacity back to 100% and we're done with the squares.
Part Two: Backgrounds and Text
Now that we have our squares set, we're past the hard part. Create a new layer called "Background" and use the Paintbucket to fill it with the color of your choice. Then move layer "Background" behind layer "Squares". Our card is starting to look like a real Stamp Card now!
Set layer "Background" to 50% opacity. This doesn't do much except allow us to line up our text with the text from the original card; every little bit helps when it comes to planning the space for your typesetting! Select a nice, readable font like Garamond, Book Antiqua, Arial- you get the idea. Decorative fonts can come in handy too, but be careful not to use them in small type- no one will be able to read it! Select the color for your type, and then proceed to type "IMVU Stamp Club Card" at the top so that people know what it is, and your own personal "click here" message at bottom. For this I used Fitzgerald Black at 14 points ("IMVU Stamp Club Card", bottom message), Jokerman at 36 points for the M in "Melvin", and Fitzgerald Black at 30 points for the rest of Melvin's name, then reset the opacity of "Background" to 100%.
And that's it for the background and the text! Now we get to the finishing touches that will make all the text readable and give a little added artistic flair to the project.
Part Three: "Plussing It"
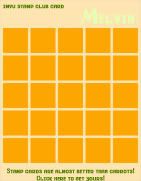
Walt Disney's Imagineers have a term that they call "plussing it". It's worked it's way around, and it just means adding little extra touches that make a project pop. You can do pretty much anything to fit the theme of your stamp card.... Since Melvin's carrots are my inspiration, I want to make my card kind of look like them! So, I'm going to add a green tree autoshape to the top of each column, and an orange triangle autoshape to the bottom, so that they look more like carrots. I'm also going to make the "Melvin" a little easier to read by adding a darker green drop shadow. That's done by copying and pasting the text, moving the darker text behind, and off-setting it from the original text, then changing the opacity to about 70% or below; I lowered the opacity to 50% because it is such a dark color. And of course, we have to use a few little carrot autoshapes to repeat the whole theme idea. If you were doing a stamp card based around flight, you might want to use images of airplanes or birds to plus your card instead. Anyway, when all is said and done, we have this:
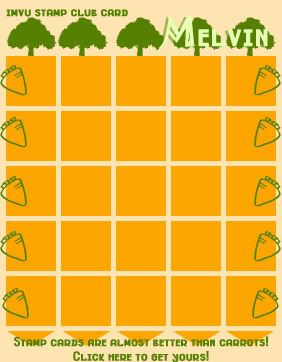
Yay! Our card is done and looks
swayn-kee! w00t! ....Well, that's uber-groovy and all, but how do we get the right code on our home page so we can display our peachy-keen creative skills (and our stamps!) to the public?
Step Three: Displaying your work
Once you have your stamp card done and saved on your computer, upload it into your photo hosting site. Then go to my Cool Home Pages Tutorial. (It'll open in a new browser window automatically.) This explains about how to input HTML and CSS into the various panels on your IMVU home page- I'm not going to waste your time or mine by repeating the instructions here.
After you have everything uploaded into your photo hoster, simply copy the code in the text area below, then paste it in
the section on your IMVU HP you want to display your stamps in. Easy! Just remember to change the "YOURPHOTOHERE" to the correct URL of your stamp card that was given to you by the photo hosting site, or your stamp card won't display properly. Boom! You are now done, and on your way to happy stamping!

