Cool HPs & How to Get One
I get a lot of people who, despite this being the era of MySpace, FindAGoth, IMVU, and myriad other social sites, still don’t know basic HTML programming. Thankfully, IMVU has made it easy for the even the most technologically challenged person to have a kickin’ HP without needing one of those fussy layout sites that don’t always have what a person is looking for.
I also get a lot of people going… “Mousie, your page is nice, I love it, it’s so cool, you have mad skillz!” (Okay- maybe not quite that far, but I do get a ton of compliments!) Then, invariably, they ask me how I did it. Well, I slaved over a hot Photoshop stove, then put the finished original graphics in the Photobucket cooling rack, and simply uploaded them into my page while humming Franz Liszt. It was actually REALLY simple, thanks to IMVU’s revolutionary system. Then, when I wanted music, I went into the ProjectPlaylist spice shop, found what I wanted, and copied/pasted the code into my music section- no biggie. And I’m going to show you how I did it, in this wonderful (and easy!) tutorial.
Step One: Be a Boy [Girl] Scout!
What do I mean? I mean BE PREPARED. It was a good motto when I was a Brownie (an embarrassing part of my past, but I’m at peace with it now), and it will serve you well here, too.
First, register with a photo-hosting server. I use Photobucket.com for all my photo-hosting needs. There are others out there, some free, some not- find the one that works best for you! Once you have your photo server, you need to find the pictures you’re going to use for your site. It’s best to make your own, and then upload them into the photo server- no copyright issues that way, and unless someone jacks them, no way you’re gonna have the same page as anyone else! If you don’t have the skills for that, find some public domain art or art that you’re allowed to use for non-commercial purposes and upload that into your photo server. The third option is to beg a graphically-gifted friend to make you some and upload those. If you go with the third option, ALWAYS remember to place a thank you on your page where it’s easily visible so people know who did the work.
If you want music, the easiest way is to find a music-hosting server that lets you create a playlist, then generates code for you. I personally use Project Playlist because it’s the easiest one I’ve ever found… simply search, preview, and add, then generate the player code and copy/paste into your profile. Boom- instant music player. If you only want one song, they’re fairly easy to add following the instructions found here: Tizag HTML Music Tutorial.
Step Two: The Easy Part
To edit your page, you don’t need to be logged onto the actual chat system, but you do need to be logged on to the IMVU website. You’d be surprised at how many people actually don’t know this! Anyway, now that you have your graphics, and your music, the easy, fun, and visually rewarding part comes in! Once you’re on your avatar page, you should see something like this:
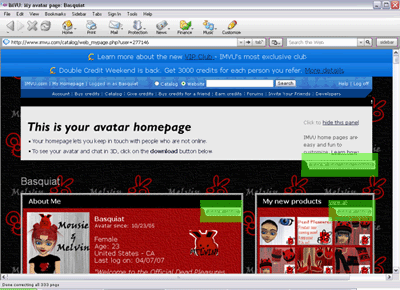
See the highlighted bits? That’s where you need to focus your attentions. These are the edit | help buttons for each panel.
Step Two, part One: Your page background
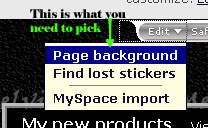
To make your background (the stuff behind all the panels) look spiffy, open your photo server in a separate window (or tab, if you have tabbed browsing). Find the picture you want to use for your background, and copy the URL (link). Then go back to your avatar page and click on the topmost edit | help tab- this is the one for the main page overall. (Shown below, highlighted)
When you click on the edit part of the topmost edit | help button, you’ll see a little menu pop up. Select “Page Background”. (See below.)
Now, another menu should pop up that looks like this:
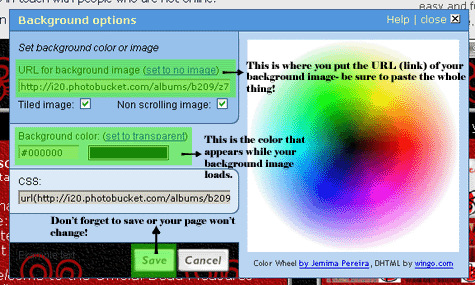
The two easiest colors to use as your background “waiting” colors (the ones that show while you wait for your background image to load) are black for darker images and white for lighter ones. The HTML hexadecimal color code for black is #000000, and for white it’s #FFFFFF. You can use the color wheel on the side of the above menu to pick any color you want, really. Just keep in mind that if your background image doesn’t load, you want your text to still be easily readable, and so you need something either significantly darker or lighter as a waiting color to make it easier for your page guests to view your various ramblings.
Step Two, Part A: Panels, panels, everywhere and I need help to edit them
Never fear, it’s just as easy to tweak the panels on your IMVU HP as it is to fix up the background! It’s a simple matter of doing again what we already did, only smaller. Go to the other photo on your server that you want to use, and copy that link. Then, click on the edit | help section of any one of your panels. Whew! Looks like a bunch of stuff to freak you out, doesn’t it? Well, it really isn’t so bad if you just take it one step at a time. The first thing we’re going to do is edit the panel headers. (We’re going to keep it simple and edit all the panels at once- you can do each separately if you want them to look different from each other by following all the same steps and omitting the bit about applying to all panels.)
Panel headers are those funny title-y thingies with weird names such as “My URL” and “My Visitors”. You can make your own custom headers, but that’s going to be a different tutorial, so as not to confuse the noobies. I hated when people confused me as a noob, particularly because they seemed to enjoy it. Anyway, to edit the headers, there are three different options: Header text color, Header background, and Header defaults (reset), as seen below.

Start off with the Header text color. A menu similar to the one where you edit the page background will appear. It looks like this:
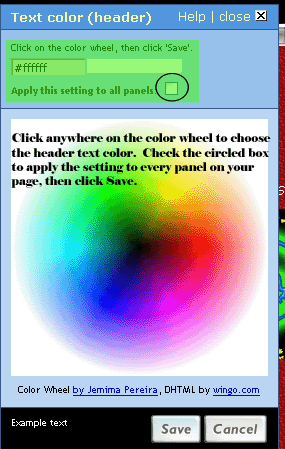
You will get the exact same menu as you did for the page background when you select edit --> Header background. Instead of trying something fancy with an image right now, simply make the color selection you want, check the box to apply it to all panels, and save. Tada- pretty headers! Use the Header defaults (reset) option only if you really screw up and you want to start all over.
Next, it’s time to tackle the main body of your panel. The same three options are available- text color, background, and defaults (reset), like so:
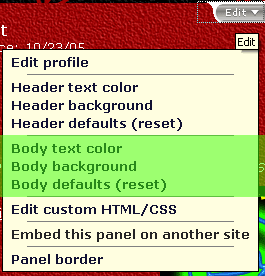
You will get the same menus as you did with the Header options- a simple color wheel for the text, and a menu like you did for the page background when you click Body background. Pick a text color, apply to all, then save. On the background one, do exactly as you did for the page background- paste the panel background image URL in the box, and pick a background (I set mine to transparent- if the panel background image doesn’t load, the visitor will see the page background instead of a colored one), apply to all, then save. See below:
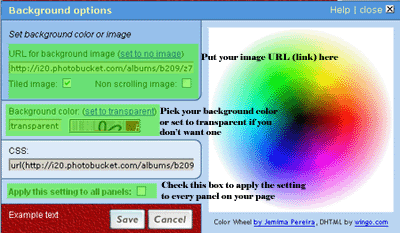
You should have a nicely background-ed set of panels now- things are really shaping up! We’re going to skip a few little bits on the menu now, since this isn’t an advanced tutorial and we’re going to deal with some of it later, and go straight to the Panel border section.
The panel border is that square-ish, boxy thing that is around all your panels. Duh. To edit it, click edit --> Panel border, as shown below.
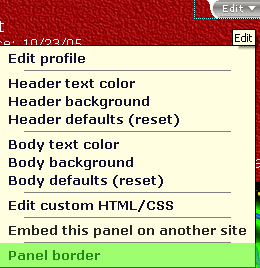
A totally different menu is going to popup, and there’s a lot on it to cover. See below for the menu, and a brief explanation of the sections.

1) Border Style: There are several types of border styles to choose from. The one pictured is “ridge”. Pick your favorite and use that one! You can even select “none” to remove the panel borders completely.
2) Border Color: Duh. Pick a color, any color.
3) Border Width (pixels): This is how thick your border will be. The featured border is at 5 pixels wide, but appears smaller because of image resizing. The higher the number, the thicker the line. I don’t recommend going above 10 pixels wide for a border.
4) Border Padding (pixels): This is how much space is between the border and the actual contents of your panel. The featured padding is set at 0 pixels, so there is no space at all between the panel and the border. I wouldn’t recommend going higher than about 5 pixels on this one, or it starts to take up way too much space on your page. Remember, 5 pixels, multiplied by two sides, is 10 pixels worth of space. When you multiply that by two panels side-by-side, that’s 20 pixels that you no longer have to use (and when you add another however many pixels wide your border is, the lost room adds up fast).
5) Apply to all: Don’t forget to check this box, or you’re going to have to go through the hassle of getting back into the menu, checking it, and applying everything all over again. Blah!
Step Three: The HPs are alive with the sound of music
Now that you have all your panels up and running, we can add music! Open up your ProjectPlaylist account (or whatever you have). The best place for your playlist is in, where else, your “My Music” panel. I mean, it is *your* music, right? Honestly though, you can put the silly thing anywhere you want by following these directions… But for the tutorial’s purposes, let’s assume you’re putting it in the “My Music” panel.

You’re going to copy the code generated for you by your playlist hosting site, or copy the code you’ve written yourself using the Tizag music tutorial listed in the beginning of this tutorial. Then you’re going to go back to your HP, and click the edit | help button on the “My Music” panel. Select “Edit custom HTML/CSS” from the drop down menu- don’t be afraid; it’s not as daunting as you think!
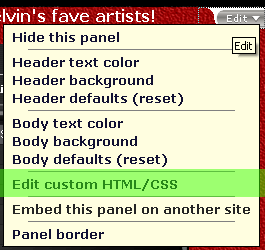
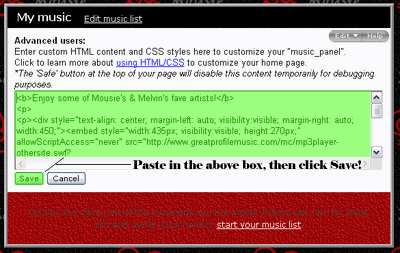
Now that you’ve done that, you should have a blank box. Paste the generated or written code in the box so that it looks like the below picture and click save.
Once you’ve saved, the panel will reload and display your music player. The one I use from ProjectPlaylist looks like this:
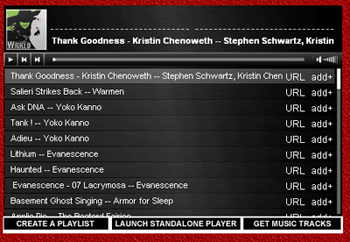
Yours will probably look different, even if you use the black player from ProjectPlaylist; I’m not expecting everyone to like the same music as I do- that’s just silly! Anyway, now that you have your music panel sorted, your page is done! Congratulations on your new baby!