Self-Taught-Typing ManualLearning to type
Keep your eyes on the screen. Do not look at the computer keyboard. If you need to verify the location of a key, look at the hands displayed on your monitor. Do not look at your keyboard.
Say the letter of each key as you type, either out loud or silently.
Repeat each lesson until you feel comfortable with your control of the keys, before moving to the next lesson. Develop your feel for the keys before trying to increase your speed. Typing is a physical skill that requires practice, practice, and more practice. Start with short practice periods , such as 30 minutes a day, working up to longer periods of practice as you develop keyboard skills.
Rest
Relax at the end of each lesson if you need to.Finger positioning
Let your fingertips rest very highly on the center of each resting key, (see below for home keys).Hand positioning
Your hand should be flat, and parallel to the keyboard, without twisting. There should not be any pressure on your wrists or forearms while you type. You should NOT rest your wrists on a wrist rest except while taking a very short break from typing. A wrist rest of the proper height (level with the space bar) can also serve as a reminder to keep your wrists straight. If you feel your wrist touching the rest, you know that your wrists are starting to dip.Use both hands to type multiple combination key strikes. Do not bend your hand in awkward angles to type key combinations.
Depressing a key
After striking a key, quickly retract your finger, turning the finger to rest on its resting position (home) key. Don't rush. Think of the finger and key or keys it control. With practice your fingers respond and type the correct letter in respond to the sight of the letter.
Common Typing Errors
Type of Error Probable Cause Correction Steps Adjacent-key;
long reachFingers out of typing
position;bouncing hands
and armsCheck hand-and-finger
position; type with fin-
ger keystroking action.Uneven
keystrokingFailure to strike each
key with uniform forceConcentrate on uniform
keystroking, especially
with third and fourth
fingers.Spacing Incorrect thumb positon;
failure to strike space
bar with quick, down-and-
in motionKeep right thumb curved
and on or near space bar;
strike and release space
bar quickly.Transposition;
vowel confusionInattention to letter
sequences in copyConcentrate on copy to
be typed.Adding a space
Press the space bar with thumb to add a space between letters and sentences.Capital letters
To capitalize a letter press the letter and at the same time with your other hand press the shift key with your pinky finger. The shift key is to the left of Z for the left hand and to the right of / for the right hand.Start on a new line
To start typing on a new line press the Enter key on your keyboard.Keys with two images
.
To type the lower image of a key ('), just depress the key. To type the upper image of a key ("), press the key and at the same time with your other hand press the shift key with your pinky fingerFinger placement
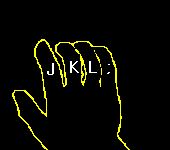
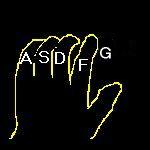
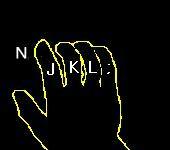
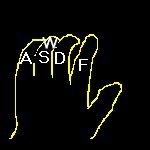
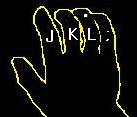
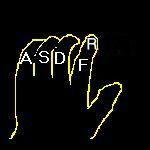
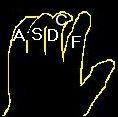
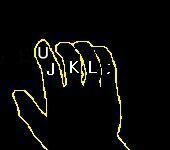
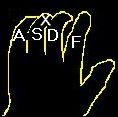
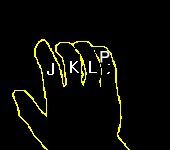
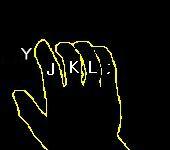
The resting position (home keys) is the position for each finger when not in use. The letter on each finger on images, below is denoted the resting position of each finger.
Left hand resting finger position (above)
Right hand resting finger
position(above)
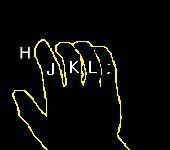
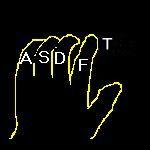
Lesson #1 and #2 will teach finger position for the resting (home) keys. Do not get upset if your make error. You will soon have control over your fingers. Don't stop if you make an error, just keep typing. Stop after a lesson for a moment of relaxation. Start each new lesson slowly gradually increase your speed. If you lose control of your fingers slow down. Never use any other fingers to type these letters. To type the letter H use your index finger (right hand, J finger). To type the G letter use your index finger (left hand, F finger).
Lesson #3
Right hand, use your index finger (J) to reach the letter H. After typing the letter H return finger to resting position.
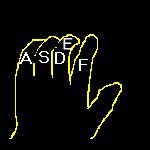
Left hand, use your right middle finger (D) to reach the letter E. After typing the letter E return finger to resting position.
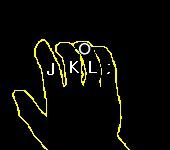
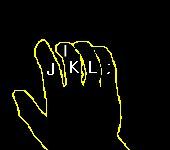
Right hand, use your ring finger (L) to reach the letter O. After typing the letter O return finger to resting position.
Returning to resting (home) keys
You do not need to return to a resting (home) key, if two letters are accessed back to back from the same finger. Example if you need to type HU or YU, it is not necessary to touch J between these letter provided that you are back on the resting (home) keys by the end of the word.Lesson #4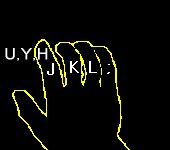
Left hand, use your index finger (F) to reach the letter T. After typing the letter T return finger to resting position.
Right hand, use your middle finger (K) to reach the letter I. After typing the letter I return finger to resting position.
The lesson also includes using the shift key. See "Capital letters" and "Keys with two images" above for an explaination on the shift key.
Lesson #5
Right hand, use your index finger (J) to reach the letter N. After typing the letter N return finger to resting position.
Left hand, use your ring finger (S) to reach the letter W. After typing the letter W return finger to resting position.
Right hand, use your ring finger (L) to reach the . (period). After typing the . (period) return finger to resting position.
Lesson #6
Review past lessonsLesson #7
Left hand, use your index finger (F) to reach the letter R. After typing the letter R return finger to resting position.
Left hand, use your middle finger (D) to reach the letter C. After typing the letter C return finger to resting position.
The lesson also includes using the shift key. See "Capital letters" and "Keys with two images" above for an explaination on the shift key.
Lesson #8
Right hand, use your index finger (J) to reach the letter U. After typing the letter U return finger to resting position.
Left hand, use your ring finger (S) to reach the letter X. After typing the letter X return finger to resting position.
Right hand, use your pinky finger (;) to reach the letter P. After typing the letter P return finger to resting position.
Lesson #9
Right hand, use your index finger (J) to reach the letter Y. After typing the letter Y return finger to resting position.
Left hand, use your index finger (F) to reach the letter G. After typing the letter G return finger to resting position.
Right hand, use your middle finger (K) to reach the , (comma). After typing the , (comma) return finger to resting position.

Lesson #10
Review past lessons
Copyright©2000 Self-Taught-Typing. All Rights Reserved.