|
Under the Hood
Air Filters The air filter and positive crankcase ventilation (PCV) valve are important parts of your vehicle's air intake system. Your air filter removes dirt and provides clean air to your vehicles fuel system. A clogged or dirty, air filter can cause your vehicle to run rough, idle rough and reduce gas mileage.
Even
during low speed operation, the engine pulls in a tremendous volume
of air. This air has a great deal of abrasive particles, which must
be prevented from entering the engine. The air cleaner traps the
abrasive particles before they can enter the engine. In so doing,
however, it clogs itself. The Positive Crankcase Ventilation (PCV) valve prevents the release of gas fumes and blow by vapors from the engines crankcase. If it becomes blocked or clogged, it can cause oil leaks and promote the formation of sludge in the engine. You should change your air filter every 15,000 miles or one year. If you live in an especially dusty or dirty area, you may need to change it more often. To see if your air filter needs to be replaced, shine a flash light from the inside out. If you can't see any light or very little light, it needs to be replaced. Change the breather filter and check the PCV at the same time.
If you have an older car, the air filter is in a big round housing on top of the engine. These are very simple to change. Simply unscrew the wing nut holding the cover down and lift it off. There may be three or four clips holding down the cover as well. Just unsnap the clips as well. All you need do now is remove the old air filter and install the new one. Make sure it is the right air filter for the car. If it is too big, the cover will not go back on and if it is too small, the cover will not seal to the top of the filter. Now, change the breather element. Most breather elements come in a plastic holder with a fitting that goes through the side of the air filter housing. There is a clip around the fitting on the outside. Just pull the clip off, replace the breather filter and pop the clip back on. Replace the air filter cover and tighten it snugly, bit overly tight. In newer cars, the air filters are generally rectangular in shape and involve a little more work to get to. Look for a rectangular shaped housing under the hood. It will usually be located on one of the fender wells or over the radiator area. On most Chrysler 4 cylinder engines, it's located between the engine and the firewall. Cover attachments vary; on some there will be four or six screws around the outside edge. There may be four clips or a combination of both. Use the appropriate tools to open the cover and remove the air filter. Be careful not to let any dirt or debris fall into the bottom of the housing. When you install the new air filter, reattach the air filter housing and be careful not to over tighten the holding screws. Air filters of this type do not have a breather filter since the PCV inlet is below the air filter. You should still check the PCV and be sure it's in good shape. This is one of the easiest things you can do and it will reward you with a smoother running and more fuel-efficient engine.
88888888 *********** 88888888 Cars with fuel injection typically have an air filter element located in an air induction assembly. The filter element is located in a rectangular box called the air cleaner housing. The element may be removed by unlatching a series of clamps or unscrewing a series of screws Cars with carburetors or throttle body fuel injection often have a large round air cleaner assembly mounted on top of the carburetor. The filter is located inside the air cleaner housing. Remove the top of the air cleaner by taking off a single wing nut. 1. First loosen and remove the latches, screws, or wing nut. Remove the cover and then the air filter element. 2. Carefully inspect the air filter element. You will find dirt and oil on one side of the filter element. This material has been trapped by the filter material. Any dirt and oil buildup on the filter means it should be changed. 3. Place the new filter element next to the old one on the work bench. Carefully compare the two filter elements. Both must have the same dimensions. The gaskets on the top and the bottom of the filter elements must be exactly the same. 4. Place the new air filter element in the air filter housing. Make sure the gasket surface is aligned on both the top and bottom. 5. Replace the cover and tighten the latches, screws, or wing nut until snug. The air filter gasket must fit correctly and seal properly. A light coat of grease on the air cleaner gasket of an older car can improve the seal between the air cleaner housing and the air filter element.
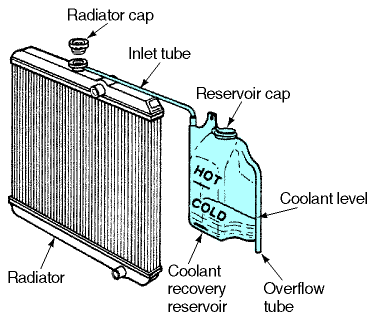
Only Check Coolant After the car has cooled off over night. Engines get hot in all kinds of weather. Engine coolants keep them from overheating. To make sure that doesn't happen, check the coolant level in your radiator every time you check your oil. Like your oil, coolant should at least be checked every 3,000 miles.
1.
Open the hood and find the radiator, which is usually very close to
the front of the car. The radiator coolant reservoir is a plastic
tank near radiator, usually off to one side. 2. Check to see if the coolant level is up to the level indicated on the outside of the reservoir. 3. If the level is low, remove the top of the reservoir and add coolant. A funnel might help you keep from spilling. Make sure you read the instructions on the coolant container. Sometimes you'll need to add water to the coolant before you pour it in.
4.
Very
important: Don't
try to remove the radiator cap when the engine is hot.
Always Inspect with Engine Off
Belts should be checked on a regular basis (about once a month). In general, you should be on the look out for worn, glazed or frayed belts. Many accessories including the alternator, fan and coolant pump are operated by drive belts. If these belts break or slip the components they drive will fail to work. Here's how to inspect and replace a belt: 1. Twist it so you can see the underside of the "V" shape on V-type belts, or the ribs on a serpentine-type belt. The conditions to look for are cracks that indicate the belt is getting ready to fail. Oil-soaked belts can slip and not rotate the component they are driving fast enough. Glazed belts have a shiny appearance; this occurs when a belt is not tight enough and the slipping polishes its surface. Torn or split belts have major damage and must be replaced immediately.
2.
Before adjusting any drive belt, always check the service manual for
specific instructions. Find the longest span in the belt and push on
it. It should move in about half an inch. 3. Most belts are adjusted by loosening the support for the alternator and moving it back and forth to tighten or loosen the belt. Other systems use an idler pulley for the adjustment. 4. First loosen the adjustment fastener on the slotted alternator support. Wedge a pry bar between a strong part of the engine and the alternator. Pull on the pry bar to move the alternator housing in a direction to tighten the belt. Tighten the adjustment fastener. Recheck the adjustment by measuring the belt as explained earlier. 5. When you have determined that a drive belt is defective and needs to be replaced, you should have the replacement belt on hand. Loosen the adjustment fastener on the alternator or idler pulley. 6. Push the alternator or idler pulley inward to loosen the belt. Pull the old drive belt off the pulleys. 7. Place the new and old belt side by side on the work bench to make a comparison. The belt width and length of the new belt must be the same. If you find a difference, check to see that you have not gotten the wrong belt. A belt that is too long to be adjusted properly will slip. A belt that is too short will not fit over the pulleys. A belt with the incorrect width or V shape could be thrown off when the engine is running. 8. Install the correct belt over the pulleys. Adjust the belt to the proper tension as described previously. Start the engine and observe the belt in operation. Stop the engine and recheck the tension.
Things You'll Need:
The manual transmission is lubricated by a lubricant that is splashed throughout the transmission by the moving gears. The lubricant must be at the correct level or the transmission parts could wear out in a very short time. The interval for lubrication level check is specified in the maintenance schedule in your owner's manual.
1.
Some imported cars have a dipstick to check manual transmission
fluid level. 2. Make manual transmission checks with the engine off. Never put your finger into a transmission fill plug hole. If the drive wheels are turned, your finger could be caught in the gearing. 3. For most cars you will need to raise the car up on a jack to check it (you must also be sure the car is level). Locate the transmission fill plug on the side of the transmission. You may have difficulty locating it. If you do, look for an identification diagram. Do not confuse the fill plug with the drain plug, which is located at the bottom of the transmission.
4.
Clean the area around the fill plug to avoid getting dirt into the
transmission. Remove the fill plug with the correct size wrench. If
the transmission is full, you may see lubricant begin to leak out of
the fill plug hole. 5. You will probably find that the lubricant level is below the level of the fill plug hole. Bend a short length of metal wire and insert it into the fill hole. Pull the wire out and note the lubricant on the end of the wire. The lubricant level should be very close to the level of the fill plug. 6. If the lubricant level is satisfactory, replace the fill plug. If fluid must be added, refer to the Repair Guide for more information on changing and adding fluid.
Automatic transmission or automatic transaxle fluid should be checked at regular mileage and time intervals as specified in the owner's manual.
1. Drive the car onto a level surface. Most cars must have the engine running to make a fluid level check.
The
transmission should be thoroughly warmed up to check the fluid. With the engine running at idle, apply the parking brake, put your foot firmly on the brake pedal, and shift the transmission through all ranges marked on the gear selector. Do not accelerate the engine above idle speed. Then return the gear selector to park or neutral, whichever is specified in your owner's manual.
This
procedure gets more specific for different vehicles. Some
transmissions require that you check the fluid with the gear selector
in park, others require neutral. Your owner's manual will tell you which,
All vehicles require that the engine be running for an accurate ATF check, so be sure that the parking brake is applied securely. Some cars must have the transmission in NEUTRAL and others require that it be in PARK for testing. Set the selector in the correct mode. If the transmission is checked in NEUTRAL, block the wheels and set the parking brake. Failure to have the transmission in the correct gear when checking fluid level can cause a large error in the reading. 2. Raise the hood and locate the automatic transmission/transaxle dipstick. Typically you will find the dipstick near the transmission end of the engine at the opposite end of the drive belts.
The dipstick may be labeled TRANS or ATF for automatic transmission fluid and may be colored bright yellow or another color for easy recognition. If both the engine dipstick and the transmission dipstick are unmarked, you can identify them by looking to see where the dipstick tubes go. The engine oil dipstick is usually nearer to the center of the engine compartment, and you can often see the dipstick tube going into the bottom of the engine. The transmission dipstick tube is toward the rear of the engine compartment or off to one side. This dipstick tube goes around or behind the engine. If you are still unsure which dipstick is which, remove them and look at the fluids. Transmission fluid is usually light red or gold, and motor oil is darker amber or brown.
3.
Remove the dipstick and wipe it with a clean, lint-free rag.
ATF is usually more transparent than motor oil, so look closely. If the fluid is dark colored or smells burnt, talk to a service facility about possible transmission flushing and refilling. 4. Insert the dipstick back into its housing and push it down until it seats. Pull it back out and observe the fluid level in relation to the dipstick markings. While you have the fluid on the dipstick you should observe its color and condition. This information can help you decide if the fluid requires changing. Clean, uncontaminated fluid has a pinkish or reddish color. Fluid that has been overheated turns a darkish brown or black. A white milky appearance can mean that the engine coolant is leaking into the transmission.
5.
If fluid must be added or changed, 6. Replace the dipstick and make sure it is seated properly.
Related Items:
Check with Engine Off The secret to keeping your car in good running condition is by making sure your engine is full of clean oil. Don't wait until you see the red oil pressure light on your dashboard. By that time, you may have already done serious and expensive damage to your engine. You can avoid all this by making it a habit to check your oil when you get gas. Also check your oil when you set out on a big trip. By checking the oil frequently, you can get good at estimating how long it takes for your engine to start running low on oil. In general, oil should be changed every 3,000 miles. Older cars tend to burn oil faster than newer cars, and therefore should be checked more rigorously. Keep a record handy of when your oil was last changed. Here's how to check the oil yourself: 1. Park on level ground and shut off the engine. 2. Open the hood, locate the engine, and find the metal loop sticking out of it at the end of a metal stalk. That's the end of your dipstick. If you can't find it, your owner's manual should help. 3. With a rag or thick paper towel in one hand, pull on the metal loop and remove the dipstick with the other. Wipe the straight end of the dipstick, and push it back into the stalk you pulled it out of. 4. Wait a few seconds, and pull out the dipstick again. 5. Look at the end of the dipstick, and notice where the oil ends. There are markings that indicate the parameters of where the oil should reach. If the oil doesn't reach inside the markings, you need to add at least a quart of oil. It's also a good idea to look carefully at the oil on the dipstick. If it is grainy or has little nuggets or dirt in it, it's time for an oil change. The oil should look smooth. 6. To add oil, make sure the engine is off. Find the oil cap on the top of the engine and unscrew it. Pour the oil into the hole. A funnel might help, but don't worry if you spill a bit of it on the engine.
7.
Replace the oil cap and recheck the oil level like you did before.
There are two styles of master cylinder reservoirs. One type has a wire bail holding the reservoir cover in place. These master cylinders are typically made from cast iron and the reservoir and cylinder are made as one piece. Clean the top of the cover and the surrounding area. Unsnap the bail and check the fluid level. You will find a rubber diaphragm attached to the underside of the cover. The diaphragm prevents dirt, water, or other contamination from entering the fluid.
If necessary, add fluid to bring the level to within 1/4 inch (6 mm)
of the top of the reservoir. With disc brakes, the fluid level can be
expected to fall as the brake pads wear. However, low fluid level may
be caused by a leak, and a checkup may be needed. Install the cover
and snap the bail back in place. Many late-model cars have a plastic
reservoir that is mounted on top of the master cylinder. This
reservoir is transparent. It often has a "full" and
"add" line on the side. The fluid level can be observed
through the plastic without taking off the top. Plastic reservoirs
have screw-on caps that may be removed to add fluid. You should add
fluid to bring the level to within 1/4 inch (6 mm) of the top of the reservoir.
The windshield washer system must have enough windshield washer fluid to properly clean the windshield. Anytime you service the windshield wipers or are under the hood, inspect and refill any lost windshield wiper fluid. Windshield washer fluid is available in automotive parts stores. The fluid is often colored blue so that it is easy to see in the washer system reservoir.
1. Open the hood and locate the washer reservoir. Typically, the reservoir is transparent so the fluid can be seen through the reservoir. Inspect the fluid level. Some reservoirs have a "full" line, but most are filled all the way to the top. If the level is low, remove the cap on top. Place a clean funnel in the cap opening and pour in the washer fluid until it reaches the correct level. 2. Most washer fluid containers will indicate a range of temperatures at which it will work best. In cold weather conditions, you will need to have windshield washer fluid that contains antifreeze or you will need to add windshield washer antifreeze to prevent the washer fluid from freezing.
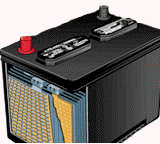
The battery is a common source of breakdown on the road. A battery that fails will prevent the owner from cranking and starting the car. You should perform a visual inspection on the battery anytime you have the hood up.
CAUTION: Always
wear eye protection when working on a battery. Protect yourself from
electrolyte splash, which can injure skin and eyes. The first step in inspecting a battery is to look for obvious damage. You should look for:
Any physical damage to the battery indicates it must be replaced. Broken or damaged cables should also be replaced. Corrosion can be cleaned off the post and terminals, as explained later. Inspect the top of the battery for dirt or electrolyte. Too much electrolyte on the top of the battery may be the result of overfilling. If the top of the battery is not clean, current can flow across the foreign material. This will cause the battery to discharge by itself when the vehicle is idle. Check the battery hold-down to be sure it is tight. A loose hold-down could mean the active material has vibrated off the plates. The electrolyte level should be checked monthly on older style non-maintenance-free batteries. During warm weather driving, these batteries lose water out of the cells. The higher the battery temperature and the higher the charge rate, the more gas that is developed and the faster the water loss. Long trips in hot weather subject the cells to high temperatures and high charging rates. These conditions mean the electrolyte level must be checked often. If the water drops too low, the battery will fail to function. Older style batteries have cell vent caps. Low maintenance batteries have a pry-off cell cover. Remove the cell vent caps or use a screwdriver to pry off the cell cover to inspect the electrolyte level. The electrolyte level should be well above the plates. Most manufacturers have a guide ring built into the top of the case above the cell. The electrolyte level should be filled to the level of the guide ring. If the electrolyte level is low, add water to the cell. Because regular tap water may have a high salt and mineral content, you should use distilled water. The water should be added with a plastic or rubber tool made for battery filling, not a metal funnel. A metal object could cause a short between the plates. Be sure not to overfill the cell. This would dilute the electrolyte strength and cause an acid buildup on the outside of the battery.
Most cars today are equipped with a power steering system. Many power steering systems use hydraulic power. These systems use a power steering pump driven by a belt from the crankshaft. The pump moves fluid under pressure through hoses to the steering gear. The pressure is used in the steering gear to reduce steering effort. A reservoir for fluid is attached to the rear of the pump. Checking the fluid level in this reservoir is a common under hood maintenance job. The fluid in the power steering system provides lubrication as well as the power assist. Low fluid level can cause a lack of power assist, excessive noise, and rapid part wear. The power steering fluid level should be checked at regular intervals.
CAUTION: Check the fluid level with the engine off to prevent possible injury from moving parts. The fluid is checked at the pump reservoir with a dipstick attached to the reservoir cap. Before removing the reservoir cap, wipe the outside of the cap and reservoir to prevent dirt from falling into the reservoir. Pull the dipstick out and note the fluid reading. The fluid should be between the "hot" and "cold" mark on the dipstick. There are hot and cold marks because the fluid expands as it gets hot. If the level is below the "add" mark, you will have to add fluid to bring it up to the correct level. You should use only the type of fluid listed in the owner's or shop service manual. Older cars use automatic transmission fluid. Special power steering fluids are used on late-model cars. Add the correct amount of fluid and replace the dipstick.
The information on this page is designed as a reference material only
DISCLAIMER: PLEASE READ - By printing, downloading, or using you agree to our full terms. Review the full terms by clicking here. Below is a summary of some of the terms. If you do not agree to the full terms, do not use the information. We are only publishers of this material, not authors. Information may have errors or be outdated. Some information is from historical sources or represents opinions of the author. It is for research purposes only. The information is "AS IS", "WITH ALL FAULTS". User assumes all risk of use, damage, or injury. You agree that we have no liability for any damages. We are not liable for any consequential, incidental, indirect, or special damages. You indemnify us for claims caused by you.
I am in no way, shape, or
form telling you to do this yourself. Your results may vary. If
something goes wrong, it is not my fault. |
|||||||||||||||||||||