Felted Oven Mitts:
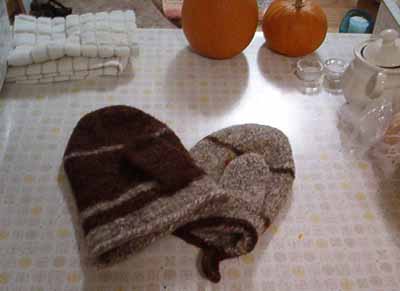
I threw these together with some lovely uber-sheepy yarn I'd been saving for a special occasion. Now I can look at them in my kitchen all the time. They're knit from the fingertips downward.
A quick note on copyright:
As the designer of this pattern, I would love to hear your comments on it. If it inspires you to try your hand at designing, so much the better—I’m an engineer, not an artist, so if I can do it, anyone can.
------------------------
What You'll Need:
-The ability to do, or willingness to learn: working in the round on double-pointed needles, picking up stitches, increases, I-cord, and felting.
-Between 100 and 150 yards of feltable (i.e., nearly 100% non-superwash animal fiber), worsted weight to Aran weight yarn PER OVEN MITT, 200-300 yards all together.
-About 1 foot of smooth contrasting yarn in a comparable weight to temporarily hold stitches (I used cotton).
-Size 10 double pointed needles.
-A yarn needle or crochet hook to weave in ends.
----------------------
Cast On and Setup:
Using two of the double pointed needles and a figure-8 cast on, cast on 20 stitches--in other words, 10 stitches on each needle. (For a discussion of the figure-8 cast on, I recommend the fine
sock patterns on Wiseneedle).
If you have 5 double pointed needles:
Knit one-quarter of the stitches onto each empty double-pointed needle, so that there are 5 stitches on each needle. On one side, the stitches will be twisted. Just fix them as you go. After 1 row of knitting, what you have should look like this:

Except not poorly Photoshopped. Notice that those stitches in the middle are really loose. This gets fixed later.
If you have 4 double pointed needles:
Taking care not to twist the stitches, knit the first 5 stitches onto one empty needle, the next 5 onto a second, and the next 10 onto a third.
After 1 row of knitting, what you have should look like this:

Notice that those stitches in the middle are really loose. This gets fixed later.
If you're using a Magic Loop or 2-circular technique:
You should be able to extrapolate what it should look like--it'll be pretty similar to the second image.
Increasing for the Hand:
There are four increases in every increase row; there are two located at each corner of the work as marked above by a red asterisk.
Increase Row 1: *k1, make 1, k8, make 1, k1* 2 times. There are now 24 stitches.
Inc. Row 2: *k1, make 1, k10, make 1, k1* 2 times. There are now 28 stitches.
Inc. Row 3: *k1, make 1, k12, make 1, k1* 2 times. There are now 32 stitches.
Inc. Row 4 and all subsequent rows: Knit plain.
Inc. Row 5: *k1, make 1, k14, make 1, k1* 2 times. There are now 36 stitches.
Inc. Row 7: *k1, make 1, k16, make 1, k1* 2 times. There are now 40 stitches.
Inc. Row 9: *k1, make 1, k18, make 1, k1* 2 times. There are now 44 stitches.
Inc. Row 11: *k1, make 1, k20, make 1, k1* 2 times. There are now 48 stitches.
Inc. Row 13: Knit plain.
Inc. Row 15: *k1, make 1, k20, make 1, k1* 2 times. There are now 52 stitches.
Once you have 52 stitches on the needle, there's no more increasing.
Knitting the Hand:
I didn't have enough of this yarn to swatch, so I based my measurements on my previous felting experience which says a felted item shrinks to 60-70% the length of the original piece. The oven mitts were therefore knit plain until the total length was 1.5 times the distance from the base of my thumb to the tip of my middle finger (in other words, a smidge below the knuckles to the fingertips). For me, this length is 8 inches, but I have long fingers so your milage may vary.
If you're making these for someone else, knitting plain until the total length is 8 inches is a good place to start.
Making a Thumb Hole:
Once the hand measures about 8 inches long,
decide where you want the thumb to be. If your needles are in the same configuration as above, the thumb will either take up the first or last 7 stitches of the needle, depending on if you're making a right or left handed oven mitt. Mark the first stitch of this spot with a stitch marker.
Cut your yarn just before the stitch marker, leaving a 6-10 inch tail. Without weaving in the ends, knit 7 stitches with a smooth contrasting yarn (cotton works well), then reattach the wool. These contrasting stitches will later be removed and the live stitches picked up to knit the thumb.
Cuff and I-cord bind off:
Knit 5-10 plain rows after the thumb stitches have been marked, working the contrast-color stitches normally. Use a 3-stitch I-cord bind off to finish the bottom, and add a small 2-stitch I-cord loop at the end to hang the oven mitt up, if desired.
I-cord bind off and loop:
1)Knit the first 3 stitches onto an empty needle.
2)Transfer these 3 stitches back to the full needle.
3)Knit 2 stitches, knit 2 together.
4)Repeat 2) and 3) until 3 stitches remain. If you don't want a loop at the end of the mitt, cut the yarn 1 foot from the work, thread the yarn through these last 3 stitches, weave in the ends, and ignore the rest of the instructions.
5)To make a loop, k1, k2tog.
6)Move these stitches to the other side of the double-pointed needle and knit them both normally.
7)Repeat 6) until the I-cord extending from the work is 5 inches long, then cut the yarn 1 foot from the work, thread the yarn through these last 2 stitches, and tack it down to form a loop.
Knitting the thumb:
Remove the contrasting waste yarn and pick up the live stitches, plus one or two on each side as needed to eliminate any holes, for a total of 16 stitches (if you have too many, decrease on the first row as many times as needed). Attach and knit in the round until the thumb is either 1.5 times the length of your thumb, or until it's 3.75 inches long. Knit 2 together across the entire next row, then cut the yarn about a foot away from the knitting, draw the yarn through the last 8 stitches, and weave in the ends.
Finishing:
-Tighten the stitches at the fingertips, starting at the side opposite the yarn end. Just lift each stitch in turn with the tip of your needle and give it a pull until all the stitches are even.
-Weave in any loose yarn ends.
-Run through the washing machine as many times as needed to end up with a very dense fabric. Because of their purpose, make sure you don't see any light through the stitches before you use it or give it away.
-Enjoy!
A quick note on copyright:
As the designer of this pattern, I would love to hear your comments on it. If it inspires you to try your hand at designing, so much the better—I’m an engineer, not an artist, so if I can do it, anyone can.
I would prefer that you contact me and request permission before distributing this pattern to a large group or selling items made from this pattern. Doesn’t mean I’ll say no, but I’d like to keep track of these things.

