
How I Built the Desert Terrain for the Wadi Zoum-Zoum Game 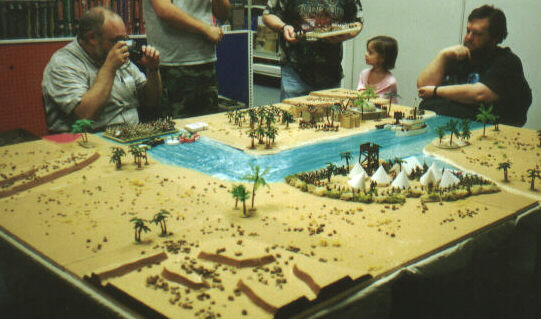
By Jim Pitts
1. Introduction.
Last year when Jay Stribling and I began discussing a fictional Sudan campaign, we also talked a little about terrain, noting the good ideas displayed on such web sites as the Major General’s, Bob Cordery’s, and others. I initially was going to build some two dimensional paper-covered cardboard mountains, even going so far as to collect used brown wrapping paper and corrugated cardboard. Alas, nothing as come from that, yet. There have also been a series of articles in The Courier about building interlocking terrain modules. All these ideas percolated around and resulted in my decision to use ceiling tiles as a base upon which to build terrain modules and the unusual terrain of Wadi Zoum-Zoum almost begged to be made.
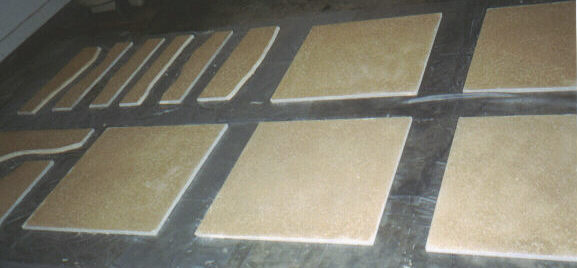
I purchased a container of 15 ceiling tiles from my local Home Depot. These tiles are not quite 2 feet square and about 5/8" thick. Since our gaming table at our local HobbyTown (where we have games on the first and third Saturdays of every month - except December) is 8’ by 6’, I knew I would need 12 squares. After designing the terrain so that the Green Nile would be wide enough to hold several large steamers, the rest of the it just fell into place. I also got a gallon of a desert color of inexpensive latex paint and a big jug of Elmer’s white glue. The sand I used came from a pile in my back yard (after I dried it and sieved it to get all the non-sand matter out).
2. Measuring and Cutting.
I decided that the Green Nile should be about 15" wide. Putting all the squares on my garage floor, I traced out where the river would flow and where the wadi would join it. Using a serrated steak knife that I had previously purchased to cut styrene foam, I cut along the river banks, angling the cut to give some slope to the banks.

The ceiling tiles are made from compressed paper and cut fairly easily, although messily. After all the river section s were cut and cleaned, I went on to the next step - painting.

3. Painting, Sand Application, and Finishing. I realized after I had finished that I should have done the steps in a different order. But I didn’t, so here’s how I proceeded. I painted the upper surface of all the squares and riverbank sections with my desert color. After that had dried, I then painted the undersides with a white PVA dry wall primer/sealer paint.
I then put a second coat of desert paint on the upper surface of each piece and while that was wet, covered each with sand. Once all the sanded pieces were dry and the loose sand shaken off for recycling, I brushed on a wash of Elmer’s glue, water, and brown paint to seal the surface and hold the sand in place.
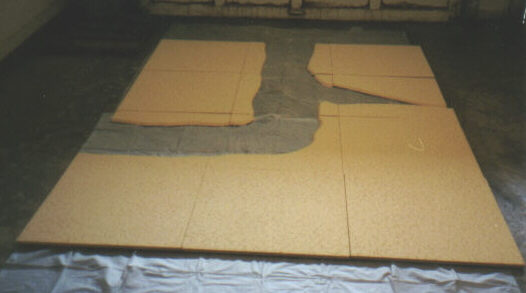
After all this had been done, I then painted the vertical edges with the desert color. This is where I goofed. This step should have come before I applied the second coat of desert color and the sand. Oh well, live and learn. Once all was dry, I laid everything out again on my garage floor to ensure it all still fit together and to number the river bank sections so I could ensure they went into their correct places when we set the table up for the game.
4. Making the Hills.
While the terrain squares and riverbank sections were laid out, I decided where I wanted hills and rough terrain. I did some rough measurements and transferred those dimensions to a large sheet of ľ" styrene foam. Again using my trusty serrated knife, I cut out the hill elevations with sloped sides. Using Elmer’s glue, I joined the various elevations together and put weights on the so they would dry flat. I made three double layer hills and a section of rough terrain that would simulate an area cut with multiple watercourses.
I had initially planned to cover the hills with plaster soaked paper towels so I could add some texture and relief to what otherwise would be fairly flat hills. Since this was my first try with plaster scenery, I wasn’t very successful. The paper towel strips weren’t very cooperative and I ended up just brushing the tinted plaster mix onto the hill and rough terrain sections. After the plaster dried, I then painted the hills and the rough terrain section a medium brown so they would contrast with the level ground.

A second coat of the desert color went on the flat, non-slope areas, followed by sand. I again used my glue/water/brown paint wash to seal the surfaces.

After everything had dried, I laid out the terrain sections again. I also made a "tongue" of sand covered thin cardboard to represent the dry floor of the wadi.

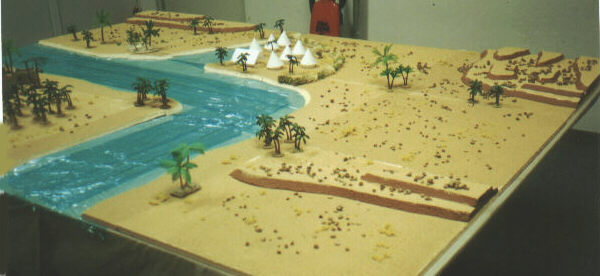
5. The Final Product. Once I had the sections laid out, I decided to see how it would look with the scenery elements (trees, buildings, tents), boats, and troops on the game board. This picture shows the layout on my garage floor. I was surprised that it had turned out so well
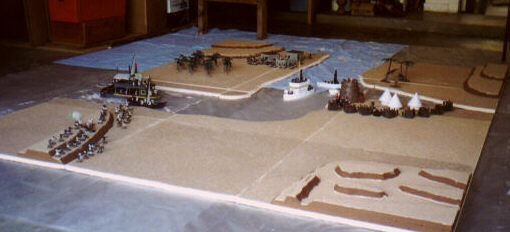 .
.
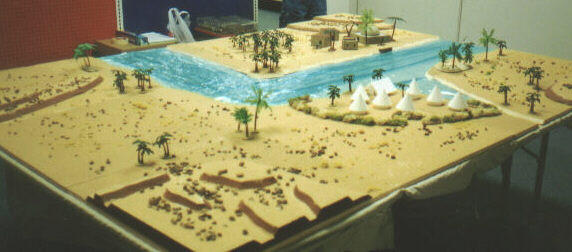
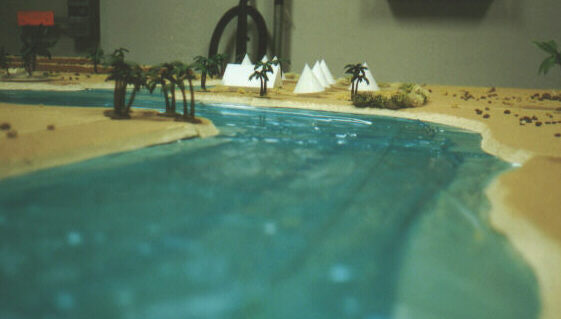
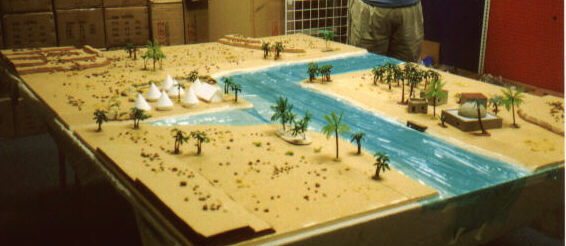
It looked even better when we added the rest of the terrain (more trees and buildings and the zariba around the camp) and the cellophane-wrap water at Hobbytown. These pictures show the set-up from several angles. The blue cellophane-wrap water looked very realistic, especially since we overlapped three layers (two side by side and one "hiding" the seam). This gave the illusion of shallow water next to the banks and deeper water in the middle of the river.
Looking from southwest corner (upriver).

Looking at mosque in village from north (down-river). The mosque was constructed with foam core walls covered with a painted spackle/sand mixture. The dome was a styrene foam hemisphere also covered with a painted spackle/sand mixture.
Looking from southeast corner; the rough terrain area is in foreground.
Looking down-river at British camp. The tents are paper made following David Helber’s instructions (see the Major General's Page) and the zariba is made from a mixture of unbleached and "spring green" lichens glued to balsa wood bases..
Looking from northeast corner.

Looking from northwest corner.
Note that the surface of the tiles has been sprinkled with small stones and bits of coarse light green turf from the Woodland Scenics line.
6. Lessons Learned.
The acoustic ceiling tiles are fragile if lifted or handled roughly. I had one corner break off a large tile and broke the curved river bank section. A possible solution might be to glue the ceiling tiles to thin pieces of Masonite, but if you are going to buy Masonite, then you might as well use that as your base. Of course the thickness of the ceiling tiles gave a good relief to the river and wadi banks.
If Masonite were to be used to underlay the ceiling tiles, then you could paint the river on the Masonite and get a better result than our use of blue cellophane wrap. The Terragenesis web site has a good methodology for making rivers and streams using Masonite as a base.
The hills were made from styrene bead board, not extruded styrene foam, so they created a lot of mess when I cut them out. Once painted and sanded, they were very stable, although extremely light. Again, I should have glued them to thin Masonite bases to add some stability and weight.
All in all, I was pleased with my first effort to create an interlocking terrain system for a particular war game. With some additional modules to take the place of the river, we can use these game boards for other Colonial adventures. I can even paint the bottoms green and use them for other venues that don’t take place in arid terrain - getting double the bang for my bucks.
If you have any questions or comments, you can contact me at: jmcp1650@bellsouth.net
Jim Pitts
Return to The Jackson Gamers Build Things
Go to the "Wadi Zoum-zoum" Battle report.
Go to the Jackson Gamers' homepage
Angelfire - Free Home Pages
Free Web Building Help
Angelfire HTML Library
htmlGEAR - free polls, guestbooks, and more!
Thank you for visiting The Jackson Gamers' pages at Angelfire. Please come back and visit again!
