THE RUSSIAN ATTACK
Game played 4/7/2007

Photo by Jim Pitts
The British redoubt. This was one of the two victory conditions for both army, and the road from this to the Brtish/French rear was the other condition. Both the redoubt and the road were worth 10 points if held at the game's end.
We played this game at HOBBYTOWN for our first game in April 2006. Jay Stribling was the Game-Master. Our table was 5' in depth and 6' from flank to flank. At one point we had a larger table there but a reduction was neccesary to suit the reduced space available to us. Nevertheless, the game seemed to fit well on the table.
The 15mm troops belong mostly to Jay Stribling who has been accumulating them for 25 years! A few of the more nicely painted units were painted by Mark Stevens.
The Russian left flank begins its advance. Ed Sansing's brigade in the foreground and Robert Whitfield's division in the background.
The Russian Players were: Jim Pitts (Russian C-in-C) Travis Melton, John Murdock, Ed Sansing, and Robert Whitfield.
British troops under the command of Sean Pitts defending to the east of the redoubt. This is what the Russian Left flank units would see.
The British troops, again under Sean Pitts defending to the west of the redoubt, the center of the field. This is what the Russian center units would see as they attacked.
The defenders of the Redan itself. The Russian attacks broke upon this work like waves against a rock.
Ed Sansing's Russian brigade approaches the right side of the British redoubt, opposed by one of Sean Pitts' British brigade. Each army was divided into brigades of 2-4 battalions. Each battalion was represented on the field by 4 or 5 stands of four figures each.
Jim Pitts' Russian brigade approaches Phil Young's French command, which was to the left of the redoubt (just out of the picture). The left flank of John Murdaugh's Russian division can be seen just beyond the trees.
The center of Phil Young's French command, an artillery battery flanked by Zouaves and Tirailleurs Algerien and supported by a cavalry brigade. The Tirailleurs would be easily routed by the Russian artillery fire.
The Allied players were: Sean Pitts (British C-in-C and British Infantry) Fred Diamond (British Cavalry) and Phil Young (French forces - both foot and horse.)
What was the Crimean War? THE CRIMEAN WAR was fought in 1854, 1855 and 1856 between Russia and a coalition of allies that included Britain, France, Turkey, and later Sardinia. There were limited naval operations in the Baltic and the Pacific, but most of the war took place on the coasts of the Black Sea. The approach to and siege of the Russian Naval base at Sevastopol located on the Crimean peninsula resulted in the most fighting of the war and gave the conflict the name of "The Crimean War".
French dragoons atatck the far right flank of John Murdaugh's Russian infantry division. Although they did some damage, the French were repulsed by the steadfast Russian infantry.
Two battalions of Jim Pitts' Russian brigade attack the Zouaves, defeating them after a struggle. In the distance are Travis Melton's Cossacks who have ridden around the French left flank.
This movement of the Russian cossacks and regular light cavalry into the French Rear had a decided effect on the game. The threat, which made it neccesary to redeploy the British cavalry, and later some British infantry battalions removed enough force from the front line. This allowed the Russian infantry to pierce and then grind up the allied line.
Robert Whitfield's Russian division slowly approaches the British line. On the hill top in the rear can be seen a British horse battery and some cavalry, commanded by Fred Diamond. Some of Robert's batatlions are in square, anticipating a British cavalry charge that never came because the Allied cavalry was all deployed to counter the massive turning of the left of the allied line.
The British cavalry, seen here riding along behind the redoubt, were hastily summoned to the Allied left flank after the almost complete annihilation of Phil Young's French command.
The British and French cavalry regiments were each composed of six 2-man stands. The British regiments were each composed of four 2-man stands.
After defeating the Zouaves, one of Jim Pitts' battalions attacks and captures part of the French battery on the hill. The rest of the French artillery can be seen fleeing for their lives at the top of the picture. We used a variant for "Chassepot & Needlegun" which is Larry Brom's mid-19th Century rules set for this game. However, we used a new variant firing system, in place of the one in Larry's rules. You can see this new variant "Stormed at by Shot and Shell" .
How many units took part in the game? The Russians had 24 infantry battalions, 6 batteries of artillery, 3 regiments of light cavalry, and 5 regiments of cossack cavalry in their army. The British had 8 infantry battalions, 2 batteries and 4 regiments of cavalry. Their French allies had 5 battalions, 2 batteries and 2 regiments of cavalry.
The allies were outnumbered, but the game-master gave them a very healthy fire superiority, a slight morale edge, and a noticeable command response (will the unit move or remain stationary?) advantage. In the end, through vicious mass attacks and gaining cavalry superiority, the Russians triumphed.
The colored rings shown adorning many of the figures represent the unit's morale state. Gold (yellow) rings show a morale state of 40 - the highest morale. Blue shows 30, Green means 20 and Red indicates 10 - the worst morale! Red rings on officers show the incompetant ones, and gold rings show extraordinary ability. No ring shows just an average man...
Remnants of two of Ed Sansing's battalions attack a British battalion to the right of the redoubt. There were several attacks, ranging up to massive ones with 4 to 5 battalions made against the redoubt. It never fell. The British defenders, aided for a time by the French Grenadiers of the Guard, held it for the entire game.
However, the road to the rear eventually fell to the Russians.
This British battalion was routed earlier in the battle and fled to a patch of woods behind the center of the Allied line. They were forgotten for several turns (being well-hidden no doubt) and were finally rallied late in the game.
This battalion is composed of Peter Laing 15mm figures. Mr. Laing invented the 15mm scale and in the early 1960s was the sole supplier of 15mm figures. These figures are slight of build and have little detail, yet the infantry figures have a certain charm and a few battalions still are in Jay Stribling's armies. The cavalrymen can only be described as "riding huge dogs" and have no charm at all (in Mr. Stribling's opinion.)
What were the Victory Conditions? The Russian mission was to sieze the British redoubt and to fall upon their supply line to the rear. This might result in the withdrawal of the allies to their supply point at Balaclava, and the abandonment of the seige of Sebastopol.
The Russians and British/French Allies would receive 10 points for holding the Redoubt and the Road from the Redoubt to the battle-field's edge. Also, for each enemy infantry battalion or cavalry regiment destroyed or reduced to 50% strength, the Russians would receive 2 points and the allies would receive 1 point.
A panoramic shot of the Russians overrunning the French flank. A small remnant of Britisg light cavalry is in the distance to the left of the woods and beyond them are what's left of a French infantry battalion. Cossacks and Russian regular cavalry are in and around the woods.
The left edge of the redoubt is manned by a British battalion and a French battery, while a British battery that was in the redoubt has moved out to flank the Russians. John Murdaugh's Russian division is regrouping out of the picture to the right.
The first assault on the redoubt by John Murdaugh's Russians. Only one of the three battalions actually closed and it was repulsed. In the background are Travis Melton's regular Russian cavalry attacking the French Guard infantry.
Russian cossacks attack the rear of a squadron of British light cavalry (all that's left of two regiments) while British Rifles man the right portion of the redoubt.
The Cossacks have destroyed the British hussars and prepare to turn on the horse battery, destroying it as well. In the distance is a Cossack regiment occupying the far end of the road, fufilling one of the Russian victory conditions and ending the game (as night fell).
Who won the game? The Russians had more points at the end of the game. Indeed, this game was characterized by both sides wanting "just one more turn." for over an hour as the fate of the "road to the rear" hung in the balance. The Russians finally took the road, receiving 10 victory points, and the allies held the Redoubt, receiving 10 victory points. All of the other points - 26 pts for the Russians and 17 points for the allies, came from destroying enemy units.
The final tally was 36 points for the Russians and 27 for the allies. The French were plagued with several unlooked-for morale failures early in the game. Had these not taken place, the allies would have won the game.
There is a most useful Crimean Wargame mailing list at "Yahoo E-Groups". This is an eclectic mix of gamers, historians, and other good people. Collectively they are a treasure trove of information. To subscribe at no charge and exchange correspondence about the Crimean War, click on the button:
"HALF a league, half a league,
Go to the Special Firing System that we used in this game Go to the Crimean War Period Page. Go to the Master Index of Photos and Games
Return to the Jackson Gamers' Homepage
Angelfire - Free Home Pages Thank you for visiting The Jackson Gamers' pages at Angelfire. Please come back and visit again! 
Photo by Jim Pitts
Photo by Ed Sansing
Photo by Ed Sansing
Photo by Ed Sansing
Photo by Jim Pitts
Photo by Jim Pitts
Photo by Jim Pitts
Photo by Jim Pitts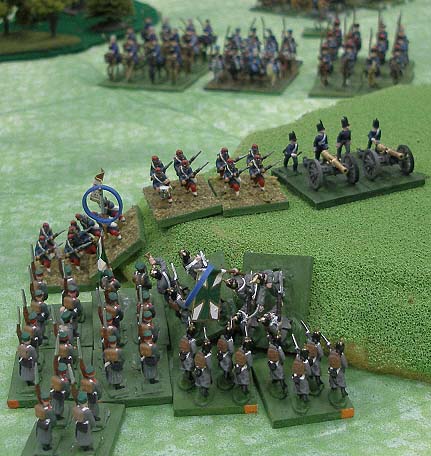
Photo by Jim Pitts
Photo by Jim Pitts
Photo by Jim Pitts
Photo by Jim Pitts
Photo by Jim Pitts
Photo by Jim Pitts
Photo by Jim Pitts
Photo by Jim Pitts
Photo by Jim Pitts
Photo by Jim Pitts
Half a league onward,
All in the valley of Death
Rode the six hundred.
'Forward the Light Brigade!
Charge for the guns!' he said.
Into the valley of Death
Rode the six hundred. -"
Free Web Building Help
Angelfire HTML Library
htmlGEAR - free polls, guestbooks, and more!
