Jackson Gamers' 25mm Medieval Battle
Battle Near Nutley Abbey

Photo by Ed Sansing
A close-up of the troops under the command of Lord Vernon (Jay Stribling).
The High King, John de Bullion, had encouraged his lackey, William Worthington, Duke of Bentwood to poach upon and raid into the kingdom of Circumference. King Oblate of Circumference, who was getting on in years, had been generally unable to stop these incursions by using the border fencibles commanded by his eldest son, prince Rotund.
As his second son, prince Effete, was not cut out for a military life, Oblate took the field himself using his household troops and the select forces of his nearest barons. Acting on the word of paid informants, the King attempted to surprise and capture a raiding force under the command of Bentwood.
Unfortunately King John de Bullion was leading this incursion with greater force than the previous raids had used. When the two sides met, near Nutley Abbey, a battle royal between the forces of knights resulted.
This game was played with parts of the 25mm armies of Jim Pitts, Robert Whitfield and Jay Stribling. We used the "Rules by Ral" to play this game.

Photo by Ed Sansing
A look at the King of Circumference's troops prior to setting up the game. Most of the figures close to the camera are Essex miniatures. Some of the troops further away are Minifigs.

Photo by Jim Pitts
Another shot of the host of Circumference. This is before the army was divided into "Battles" and arrayed for the start of the game.

Photo by Ed sansing
Jay looks quite pleased with his troops, some of the figures having not seen a gaming table for years. All of the forces of each side were mounted, except for one unit of foot to guard the camp & baggage.

Photo by Jim Pitts
The forces of John de Bullion the High King, this photo also is before the game started, with the troops freshly arrived at the field.

Photo by Ed Sansing
The middle of High King, John de Bullion's troops. Ed Sansing writes: "My command (mostly Jim Pitts' troops) fought in the center and protected our camp which is seen in the foreground."

Photo by Ed Sansing
The center of the Circumference line. These are the troops of the Earl of Morton (Phil Young's command).
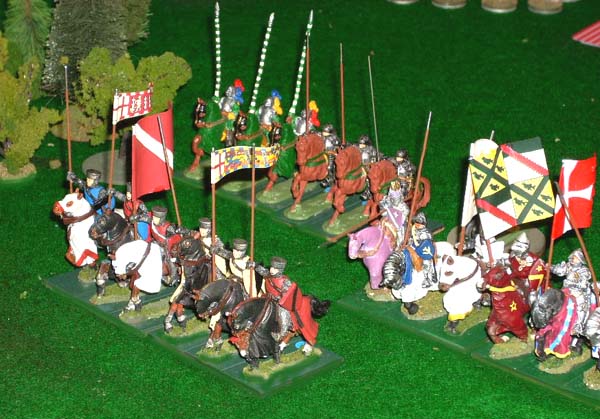
Photo by Ed Sansing
A close-up of some more of John de Bullion's troops. Ed Sansing writes: "The 2 units on the left are part of my command, the unit on the right is part of Bill Hamilton's."

Photo by Ed Sansing
Personal challenges - on or about turn two. Ed Sansing continues: "my leader figure challenged that of Phil Young and killed him (see the dead commander in the orange colors). The overall commanders (Circumference and de Bullion) crossed blades and both survived."

Photo by Ed Sansing
A view from the rear of de Bullion's army. Knights under the command of Bill Hamilton command charged Jay's troops. This is on the extremem left of de Bullion's line.
Who were the players in this affair?
The forces of Circumference were Commanded by Jay Stribling (Lord Vernon) on the right, Phil Young (Baron of Morton) in the center and Sean Pitts (Sir Sean) on the left.
The invading forces of the high king were commanded by Jim Pitts (William Worthington, Duke of Bentwood) on their right, Ed Sansing (The Baron of Lower Jackson) in the center, and Bill Hamilton (Lord Flowood) on their left.

Photo by Ed Sansing
Late in the battle it was a confused series of small fights between units. This rules set does not have a "Major morale" rule nor does it have a mechanism to remove fractional units. So the game goes, on, and on, and on...

Photo by Ed Sansing
Ed Sansing writes: "A 2-figure unit from Phil's force is headed off the board. The red-clad unit of Sean Pitts's tried to attack our camp but did not have the distance to close. It was attacked by a unit of knights under the Duke of Bentwood (Jim Pitts) and wheeled around to face the attack."

Photo by Jim Pitts
Another view of the action above.
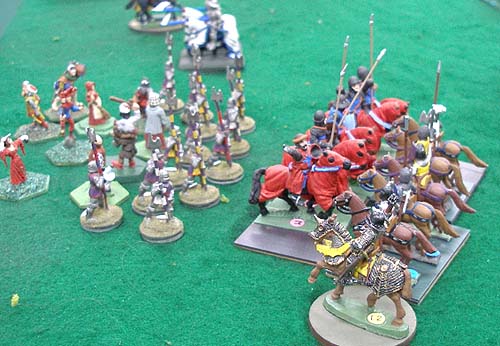
Photo by Jim Pitts
Sean Pitts' knights turn about and fight their pursuers.

Photo by Jim Pitts
For one turn, the Knights of Sir Sean Pitts plunder, drink and generally make themselves at home in the High King's camp. Then they were driven off.

Photo by Jim Pitts
The Left Flank of the army of Circumference, viewed from the High King's right flank.

Photo by Jim Pitts
The right Flank of the army of the High King, viewed from Circumference's High King's left flank. Confused? I know that I am!
What were the victory conditions for this conflict?
We played for victory points. These were earned as follows:

Photo by Jim Pitts
The High King, with his household troops, in the center of the line.

Photo by Jim Pitts
A view of the Center of the line for Circumference. The King of circumference, on the round stand, was killed off early in the game in a personal challenge.

Photo by Jim Pitts
Jay Stribling as the King of Circumference, with his "War Face" on. Phil Young as the Baron of Morton, on the right of the photo, similarly serious.

Photo by Jim Pitts
The forces of the left flank of the High King. All of these figures are individually mounted on metal bases. Then groups of three Knights are placed on magnetic bases. Two of these bases make up 6-man "units."

Photo by Jim Pitts
Another view of the forces in the Center of the High King's line. These knights all belone to Jim Pitts. Basically the game was all of his knights against a similarly sized force of Jay Stribling's knights. We had just finished a series of four Charlemagne dark ages/medieval battles, mainly infantry, spread over 2 months. We were ready to bash some mounted knights for a change!

Photo by Jim Pitts
Near the game's end. A full strength unit and a smaller remnant of the forces of the high king. Note the bodies of brave knights, still lying where they fell.
One of the "Fun" thinks about individually mounted troops is that you can just "knock them over" when they are killed.

Photo by Jim Pitts
A last gasp of life and energy from Circumference as three of their knights charge three of the High King's men who have the advantage of a leader. Note that one of the Circumference knights is Sir Ralston of Purina.
So, who won this battle?
The forces of the High King John de Bullion won. Battles with this rules set RULES BY RAL consist of numbers of small unit-on-unit or unit vs. two units contests. Overall luck should even out. But not in this case. Jay Stribling blames his notoriously poor luck which seemed to spread to the entire army.
We lost personal challenges, and seemingly more and more of the small battles each turn. At the end of the game, the forces of Circumference had 88 victory points. The High King and his lackeys had accumulated 101 points.
Ah well, we will throw the high King back another day!
Return to the Master Index of Photos and Games
Return to the Jackson Gamers' Homepage
Angelfire - Free Home Pages
Free Web Building Help
Angelfire HTML Library
htmlGEAR - free polls, guestbooks, and more!
Thank you for visiting The Jackson Gamers' pages at Angelfire. Please come back and visit again!