His designs use inexpensive materials, and are extremely underpriced, but I
am not complaining. The AF4 plans I bought from him came quickly and seem
very complete. The drawings were large and easy to understand. There
were instructions and specifications, and there were also several pages of
invaluable discussion of materials and choices. I have bothered Jim
several times with questions before I chose his design, and he answered me
patiently and quickly.
My original question to Jim was whether or not the AF4 would handle the
rather rough chop in our coastal sounds. I mentioned to him that I had
many rather wet, miserable, and hair-raising experiences trying to get to the
barrier islands in a 17ft flatbottomed aluminum johnboat. His response was that
the AF4 was perhaps not the design for this purpose. He suggested that I
look at Kilburn Adams's Skiff
America. I took a look, and he was right,
for rough water, the Skiff America was obviously the better design. Plus
the boat was gorgeous. It was also designed to use smaller outboards, and had a
cabin much like the AF4. But the building method was obviously more
involved than the AF4 and then I read this statement, "The completed
boat with all necessary materials: motor, trailer, bimini, steering gear,
paints, epoxies, cushions, marine hardware, EVERYTHING, for the entire package
will cost $8,500 (at the time of building)." I understand that this is not unreasonable,
but it shocked me. I've got a trailer that will fit an 18ft flatbottom.
I've got an outboard barely sufficient to power the AF4, perhaps a little small for
Skiff America (an 8hp Johnson and a 3hp Sears for a kicker). I was thinking
about putting $500-600 into the boat itself, tops. Perhaps I could have
built a bare Skiff America for that, but I began to think not. I also
looked at the GP-16 by Jim Betts. It also would have met many of my
requirements, and been much more roomy for two campers. But again, it had
a very wide beam and would have required getting another trailer and
motor. Even as a relatively inexpensive boat to build, it still could not
compete with the AF4. Remote steering would have been required here, too. I looked
at the Harmonica too, but took Jim's words to heart. This was not the boat
for anything but small placid lakes. It was fodder for many pleasant
daydreams though.
So I chose the AF4. I liked its looks best of all the plans I
considered. I figure I might slowly sneak across the Sapello Sound on a
calm day in the AF4, to get from one river mouth to another, but mostly I will stay out of the wide water and keep to
the inland rivers and creeks. Besides, Jim says he might eventually do a
boat with AF4 capabilities but with a rough water hull. I'll be ready.
I think the AF4, by and large, fits this project very well. So there is
very little I need to do other than build it as designed.
One would think that Southeast Georgia would be
a likely place to find marine plywood, bronze screws & nails, fiberglass,
epoxy resin, etc. But I have not found that to be the case. My
search for plywood locally has led me to this conclusion. People here
don't build boats much, and when they do they slap them together with particle
board, poly-glass, ply sheathing, liquid nails, sheetrock screws, and the
like. They use them for work and scrap them after a season. Each
time I built a boat, I took a stab at finding marine ply. I never found
marine ply at sizes under 3/4". On my first boat I decided to use BC
pine from the lumberyard a mile from my home. It looked good, with few
knots or voids. I used it. I glassed the bottom and sides outside,
and just the bottom inside with a really lightweight cloth 3 oz and epoxy.
A month later the inside sides that I didn't cover with cloth began to check a
lot. The resulting cracks were so thin that it was difficult to get paint
into them. As soon as the paint would dry, the cracks would appear
again. I vowed to use better plywood on my second boat. On my second
boat, I used AC fir exterior. I shopped around to find a lumberyard that
carried it in a nearby town. When I got there I was astounded at the
knotty junk they loaded into my truck. I got it home and looked at it, and
decided that it was still lighter and once I filled the knots, would be better
than BC pine. I basically rebuilt the C face with Elmer's wood
filler. It wasn't until after I had built this boat that I read that the
only wood worse for checking than BC pine was AC fir. I didn't keep either
long enough to see how they held up. I built my third boat, a
Bolger Skimmer, of 1/4" Luaun. I did not glass anything but the
seams, I coated once inside and out with epoxy. I painted with exterior latex
semigloss. It has held up great after 1 1/2 seasons of heavy use, but I
don't like "skimming" at speed on a crunchable piece of luaun.
It makes me feel week in the spine.
So what will I build my AF4 out of. BC pine of course. I will
glass every last smidgin' of it inside and out with light cloth and epoxy to
avoid the checking. I will tape the outside chines, and I will use a
heavier (though not really heavy) 6 oz glass on the bottom. Therefore my
boat will be MUCH heavier and probably cost more than if I could find a more
expensive marine ply that would not check and just painted it. Because I am
basically sealing my boat inside and out with epoxy-glass, I will use epoxy as
glue for the rails, chines, butt blocks. But I will use either weldwood
plastic resin glue or PL Premium on the bulkheads and framing sticks. I
have some of both and intend to experiment a little. I recently read a
statement by Chuck Leinweiber who built the Caprice (another Michalak
boat). He said that epoxy on his boat released its bond when the wood it
was stuck to got wet. He said that apparently this was common knowledge
and was one of the reason's epoxy manufacturers recommended encapsulation.
Until I heard this, I had considered using epoxy for glue and chine taping, but
not encapsulating the wood at all, as this would be significantly cheaper.
But now if I took that route, I don't think I would use epoxy at all. But
I am going the other way. Here's why:
I'll be curious to see how Max's AF4 holds up by comparison. Maybe I'm
just another of those epoxy slatherin' idjuts who have more money than sense
(and I ain't got much money). If mine lasts a decade, I'll have got my
money's worth, even with all that epoxy.
So far I know of two other AF4 builders online, although there have
definitely been many more than that built. They are:
September 1, 2001
Drove all over Savannah, GA looking for boatbuilding plywood. Ended
up with BC pine exterior from Home Depot. It was nice looking wood
though, few to none knotholes on the C side. I waited on the 3/8 inch
sheets though. HD didn't have any but the Lowes next door did. But
as I was loading the 1/4 sheets it started to sprinkle. We've been getting
sudden severe thunderstorms daily, and I decided to hurry home instead.
Right now Brunswick HD has better looking 3/8 anyway. So I hope to pick
up the rest next weekend.
I have decided to stay with 3/8 inch ply, as in the original plans, rather
than switch to 1/2 (as later recommended by Jim), because I am going to glass
the bottom with at least a 6 oz glass.
September 8, 2001
Spent the rainy weekend indoors working on this website, surfing up ideas
for camping foodstuffs, and thinking about other project related
problems. No serious breakthroughs, but a few new dilemmas. For
example, how much fresh water will we need for a two week trip? and will we be
able to carry that much with us? and if not where will we be able to acquire
more en route? This might be easier to answer if I had decided on a
route already. This should be a primary consideration in choosing a
route. We simply must have a few places where we can stop and buy water
and fuel.
September 15, 2001
Purchased the final pieces of BC pine plywood. At the last minute I decided
to buy 1/2 inch. I found myself staring at HD staring at the 3/8 stack
and the 1/2 inch stack side by side. The 3/8 looked a lot better, less
knots, thicker exterior plies etc. The 1/2 inch center plies were
complete junk of course, but the sanded side ply was extremely thin. On
one hand the 3/8 looked better and I knew I would be using a layer of glass
cloth on bottom. On the other hand, Jim Michalak says use 1/2 and that
it should be twice as stiff. I flexed the 3/8 then tried to flex the
1/2. Yep. Bought the 1/2 inch.
My workshop has a dirt floor. I am looking at building 18 inch high
sawhorses, or concrete blocks, or something.
October 8, 2001
Okay, this three day weekend I ran the Altamaha, from Champney River ramp
to the Altamaha Park in Everette City. More about that in the Camping
section. I also cleaned up my shed, added a new section of tin,
increasing the overhang on the "boat assembly area," and set up the
sawhorses and worktables like I wanted them. As usual, each step forward
was had several hitchhiker tasks. For example, adding the tin, required
setting up the ladder, which required clearing inconveniently placed
brush. Then when I got up top to fit and nail the tin, I discovered that
my shed roof was covered with leaves, acorns, and pine needles, so I wound up
carefully sweeping it. And I must say, the incline was plenty steep
enough. One would think the leaves would just slide off. The
lovely one came out to help me move the fiberglass boat, and wound up spending
a few hours raking my dirt floor, picking up scraps, tending the burn pile,
and bringing me cold water and bug spray. She also helped me with the
roof before going in to make a hot pot of chili for supper.
Anyway, late Monday afternoon, I finally began my first actual
cutting/construction task. I built temporary forms #6 and #13.
These are rather simple frames made from 1X4s. But it was good to
begin. Though I felt a pang when I realized that since these pieces will
not ultimately be a part of the finished boat, I haven't really made my first
"cut" yet. I hope to squeeze some time in after I get off
work. There are still some hours of daylight, though the days are
getting shorter.
October 13, 2001
I completed bulkhead 10 and bulkhead 2. I had some trouble with my
Weldwood plastic resin glue. It simply did not turn into glue when I
added water. I followed the instructions, read and reread them.
Mixed several batches. I noticed several things. First 2 parts water to
5 parts powder, did not even thoroughly wet out the glue. Second, adding
more water did little to help. When I finally got a "cream"
like consistency, I applied it to some test pieces. It responded like
wet sand. It looked liquid enough, but as soon as pressure was applied
or as it dried, nothing was left but a damp grainy powder with no adhesive
properties to speak of. Both containers were purchased from a local
hardware store, and they both acted the same way. I suspect they could
have been on the shelf since 1978, perhaps there is a shelf-life for this
product. I must check. I used PL Premium instead. I will use
Epoxy on the butts, the wales, and chines.
As I lay in bed, visions of bulkheads dancing in my head, I suddenly saw a
vision. In my mind I could see the plan drawing of bulkhead 10, its
topsides sloping downward from the center. But wait a minute, the
bulkhead I fashioned seemed to be flat across the top. Could I have made
such an error? I dug the plans out of their manilla envelope, and
looked. Yes there was a 3" rise from the top of the sides to the
top inside of the hatchway. Surely I cut them that way.
October 14, 2001
My first major goof. Somehow I totally goofed up the top of bulkhead
10. After some deliberation, I simply screwed and glued on a wedge
shaped 2X4 faced with 1/2 ply. I countersunk the screws deeply through
the top and used plenty of glue. The result was a rather Frankenstein looking
job. I filled the holes and sanded, I am facing it front and back with
fiberglass cloth, so I think it will be strong enough. It seems pretty
sturdy right now.
October 17, 2001
I just learned that Jim has completed the plans for the AF4 Grande.
It is a scaled up version of the AF4, though still flatbottomed. It is
21 feet long instead of 18, and the cockpit is 7 feet in length instead of
6. Now many times I have looked at the AF4, especially after I completed
my model and tried to lay down the to-scale paperdoll Rav in the cockpit, and
thought wistfully, if only it were just a little bigger. On the other
hand, I still have an 8 HP Johnson, and a trailer just barely (hopefully) big
enough for an 18 footer. And, after the big Rav and DP river trip, I
will most likely be camping solo for one or two nights tops. And even 18
foot of boat is bulky for some of the channels I'll be fishing and navigating.
So right now, I've sent Jim a check for the plans, and reserving ultimate
decision until I see them. I confess that I would like to be the first
to build and document a new Michalak design--even if it is a scale-up.
But it would mean almost a total start over on the plywood, and would set me
back a couple hundred. And I am a cheapskate.
October 19, 2001
I've decided to continue building while I await the AF4 Grande plans.
If I start over, the framing sticks, glue, fasteners, etc. I use this weekend
won't make much difference in cost loss anyway. I completed the transom
today. I added the motor mounting board because it was shown on the
construction drawing. Upon rereading the plans, I see it is one of the
last pieces added. This raises a question that I have never successfully
had answered. Just what is the proper transom depth for my motor. I have
been using it on the 15" transom on my john boat for years, but I am not
sure if the motor is considered long shaft, short shaft, standard or
what. The question is further complicated because this motor has two
cavitation type plates. I'll ask Max about it, as he has obviously seen
a few outboard motors.
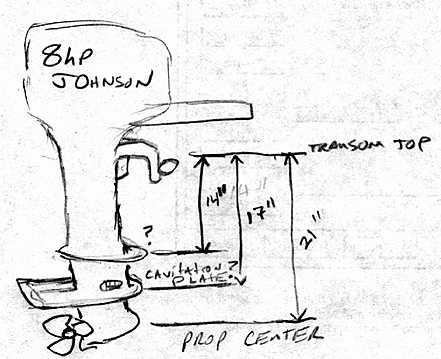
October 20, 2001
Max says my motor is a short shaft model. This is a relief. I
plan to leave the transom as spec'd. I may monkey around with it after
the boat is tested. He also explained what the inlet at the top of the
cavitation plate is for, and gave me some good estimates of what I can expect
with an 8 hp motor, Rav & DP and gear. Thanks Max!
October 21, 2001
Today I did cleanup on the bulkheads. I filled holes, replaced
sheetrock screws with galvanized deck screws, bronze nails, etc. I cut
bulkhead 16. For some reason I kept screwing up the bevels and length of
the framing sticks. I wasted an entire 6ft 1X4. I cut the stem
from a pressure treated 2X4. Although I plan on sealing the frames with
epoxy and light cloth before assembly (just so much easier horizontal) and
possibly cutting my vent, I am technically done with the construction of all
frames, stem to transom. I must order epoxy and glass from Raka
soon. The quart or so I have left will not go far. The next big
move will be joining the 2 1/2 sheets of ply together and marking and cutting
the sides.
October 23, 2001
Today I bought Fiberglass and Epoxy from Raka
Marine. I bought:
- 6 yds of 6oz (T) 50" cloth @ $5/yd =$30.00
- 21yds of 1.5oz 40" cloth @ $2.75/yd = $57.75
- 1 roll of 6oz 3" fiberglass tape = $24.75
- 3 gals epoxy (2gals resin + 1gal slow hard) = $118.00
- 4 mixing pots 16oz = $2.00
- 5lbs pine wood flour = $10.00
Total = $254.91
I can't help it. It doesn't matter that I am building a boat, that
Raka epoxy is cheap, that I am getting my money's worth. When that kind
of money leaves my wallet I gotta cry a little. Whaaaaaaaaaa . . aaahhh.
I'll be okay again by the time the order arrives. I think.
October 26, 2001
The Raka order is here! After a seeming hour of distracting errands,
I get out to the boatshed with my new supplies. Maybe I'll coat a few
frames, cloth bulkhead 2, or the transom, while I still have them
horizontal. But I have forgotten something essential. Cheapo
paintbrushes. Bah, It will have to wait until morning. Plus, dp
calls on Friday nights. Ah, It's time right now. gotta go.
October 28, 2001
I have decided to continue to build the AF4 and save the AF4 Grande for
next time. One day I will buy a 15hp Honda 4 stroke and a new galvanized
trailer, but not this year. And what better practice for building an AF4
Grande than building the AF4! I can make all my mistakes, work out all
my modifications and customizations on this boat, and then implement them on
the next one. Plus I am such a slow builder, I'd be kidding myself to
think I would be first to complete the AF4 Grande. A side note though, I
was just reading a book called Tidecraft by Rusty Fleetwood. In it are a
lot of photos and sketches of boats used in the Carolinas and Georgia coastal
waters. There were two boats used in Fernandina, FL as shrimping
trawlers, the Rene Goddard and the Sebastiana G, which had raised decks and
lines amazingly similar to the AF4. Their LOA was not given but the Rene
Goddard looks to be easily twice the length of the AF4. It was designed and
built in St Marys, GA by Alex Mcdonnell, circa 1915.
October 29, 30, 31, 2001
Ah the fall is here, and the harvest has begun. But now I have once
again snagged myself. I have ordered Raka epoxy and Very Slow Hardener
as I always do, and up until now it has been a good idea. I work in
small increments, and I have been perfectly willing to suffer longer curing
times in order to have a mix with a longer pot life. I work slowly and
carefully, and it is such a feeling of waste when the epoxy kicks off in the
pan before you can get it applied. And up until this project, I have
always been working in temperatures ranging from 80 to 90 degrees
Fahrenheit. But this project is different. I am going to use Epoxy
as glue for my butts, scarfs, and chines. I am also planning to
epoxy/glass all surfaces inside and out. But early in the week, we got a
cold blast and the nighttime temperature dropped down to the mid 30s.
Now the "user manual" that Larry sends out says I should maintain
temperatures above 70 F for a strong cure. On the other hand, the System
3 guy and others say that low temperature may slow down a cure, but that the
cure will merely resume as soon as the temperature rises. So this week
started out as an experiment and has been going well. Monday the
temperature was at it's lowest point, and has been rising slowly each
day. I have been applying epoxy and glass to the frames in the evening
by flourescent light. By morning, the epoxy is still tacky, but no
longer wet. I then move the frames out to a spot that will be sunny most
of the day, and by the time I get home from work the cure is hard enough to
handle and even lightly sand off the bugletts. I have had some trouble with
air bubbles, but nothing major. I am using the wet on wet method for the
first time on these frames. I find I actually use less epoxy this
way. The last time I tried this method, I waited too long, the epoxy was
too sticky and the cloth too light. Also rolling the cloth out
myself. I wound up with a bunch of ruined cloth firmly stuck here and
there with lots of wrinkles and ripples which could not be smoothed out.
I had to struggle to peel it back off, let the first layer cure to hardness,
and then lay new cloth over it. But with the smaller pieces of glass I
am using for the frames, and with the cooler night air, I have plenty of time
to place the cloth and smooth it before the first coat becomes sticky and
unmanageable. I sliced through my gloves into my fingers tonight on a
bit of hardened glass that I didn't trim flush with the edge of the
frame. Gotta watch that stuff--it's like a getting a papercut only the
edge slices much deeper much more quickly. I have coated every surface
of every frame with epoxy. I have glassed every plywood face of every
frame inside and out, exept the outside of the transom. I am going to
use the overlap from the heavier 6oz glass for the bottom to cover the transom
exterior. I felt a little blush on the surface today, and I think this
has something to do with the inordinate amount of fog/dew present during the
night/morning. Whereas I didn't get any earlier in the week when it was
colder. This seems to be a pattern with Raka epoxy. It blushes more from
humidity than from low temperature.
click
above to see Bill Sandifer's Crawdad at his minimalist boater website. This is
like a tadpole AF4!
November 4, 2001
The sides are cut and butt blocked. There was quite a bit of work in
marking and measuring, and it all occurred at ground level. So my knees
took a lot of abuse, my back hurts, and I have a massive headache. Still
it is wonderful to have those two sides laying flat in the "assembly
area" of the shed. I have been fortunate to be enjoying days in the
70s and no rain. I need about 5 more days of this to finish my epoxy
work--full days--not necessarily consecutive days. Hell, I wish it was
March already.
November 18, 2001
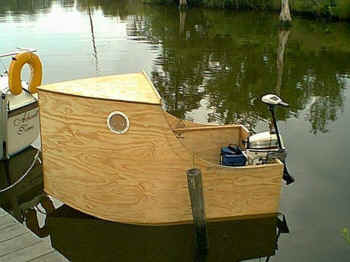
This weekend I finally went 3-D. I attached all the preglassed, epoxy
coated sides and frames. And Voila, she looks like a boat. It is
funny how no picture, no model, no shape drawn out on the dirt with a stick,
can entirely communicate the the reality of the boat shape. Or perhaps
that is a personal limitation of my visualization abilities. But in any
case, the boat appears "fatter" and less sleek than I
imagined. From what I can see now that it will be perfect for solo
onboard camping, and a very realistic hull for hauling camping gear and two
large adults. I am glad now that I did not build the AF4 Grande.
This will be plenty boat for my purposes. It is still small enough so
that I wouldn't hesitate to take it on a solo fishing trip, but with as much
room for gear and crew as I will ever need. If the lovely one develops a
new interest in onboard camping, and I get financially able to buy a larger
motor and trailer, I'll take another look at the AF4 Grande. I hope
someone else does before then, and takes some pictures with people in it for
scale.
I got the first lamination of the sheer wales on, and scarfed the pieces
for the deck clamps. But sadly I ran out of pine 1X4s before I ran out
of sunlight and good weather. I must acquire more tomorrow after
work. The 70° days and 50° nights are supposed to drop to 60 and 30 by
Wednesday. Drat it. I also need to get one of those round plastic
access ports for my vent in bulkhead 2. I've decided that that will work
well enough. I am still puzzling over how I can have windows that
OPEN. I really want this feature. On the other hand I am not
paying $100 each at a marine supplier for them.
So I am epoxying while I can. Next the deck clamps, cockpit coaming,
and final sheer wale lamination. Then the hinged door for the
compartment under the motor well. Then the deck beam. There was a snafu with
the pictures. The lab lost some of my negatives and didn't include
prints of others. And then the ones I do have are darker than I
wanted. I'll get a pix page up once it gets too cold to
glue.
November 22-25, 2001
Completed cockpit coamings, deck clamps, sheer wale, and added deck beam
and bow deck. I also flipped the boat by myself (a hairy moment that
was), and attached the chine logs with epoxy and screws.
November 29, 2001
Attached bottom with butt blocks with epoxy and screws. Yes!
Saturday, I will bevel the chines and glass the bottom.
November 30, 2001
Glassed bottom this evening, will second coat Saturday a.m.
December 1&2, 2001
Taped seams, second coat to fill weave of glass cloth. Sanded tape
edges. Bottom now ready for skids. Once again I am out of
lumber. Plus the holidays (and the lovely one) demand I snap out of my
obsession for a week or so.
December 9, 2001
My buddy, dp, suffered a setback, and his participation in our adventure is
now less certain. I hope he can overcome his pitfall, seize his
opportunity, and still make it to Georgia by next Fall.
December 26, 2001
The weather has finally turned. Tonight it is supposed to be in the
lower to mid 20's here. Today the high was 57°. I spent a little
time cutting out air bubbles, sanding, etc. The skids are epoxied on and
have been coated once (which was absorbed by the wood). Will have to
wait a while for warmer weather. I may spend a little time getting the
trailer in shape.
March 16, 2002
Somewhere in January I painted the bottom of the boat. I bought Behr
acrylic latex primer and paint. And applied it with roller. Now I bought
a 3 inch roller handle, but I had some longer rollers in the shed. So I
cut one down to fit, thinking to save a few bucks. Bad Idea. It
turns out that the fuzzies on the cut edge of the roller, came loose and
imbedded in the paint as I applied it. Not noticeable at first, but when
checking the dried paint I realized I had bumps and squigglies all over the
surface of my finish. First I picked at them, leaving exposed pocks in
the paint, revealing the primer underneath. Then I tried sanding them,
but in some cases, the fuzzies remained even after the surrounding protruding
paint was sanded away. What a mess. Ultimately I sanded the finish
nearly off and started over using the brush. Now it looks fine, but the
finish is not very hard yet. I am hoping that a few weeks of sunny days
in the 80's will take care of that. In the meantime, I have developed a
plan for revamping my trailer. I definitely want a board down the
center for walking on. I also have to add bunks and chisel off the
rusted split rollers that are on the trailer now. I have a lumber list
for the supplies. I am slightly worried because the wheels are 15 inch
truck tires, and the bunks will have to be higher than usual because the AF4
has such a wide flat bottom. The john boat fit between the tires, and
the v-bottom that came with it had enough deadrise to ride well over the
tires.
Also, I purchased a marine toilet. I bought a Thetford, bottom of the
line. It looks good. I haven't tried it out yet, though I did sit
on it in the store. The friend who was with me suddenly forgot she knew
me and vanished down another aisle. I get it home and I am showing the
lovely one. I demonstrate it's flushing, with some water and toilet
paper. It is all I can do not to take it for a real spin. I'm just not
used to spending so much for a toy I can't play with when I get it home.
The lovely one and I decided that for the boat, the 15ft cabin tent we have
is much too large and heavy. So we bought a 4 person (which is really
only a 2 person) dome tent. It is extremely light but is still large
enough for two air mattresses and gear. And it only cost $30 at WalMart.
I am very happy with this buy.
I have also purchased the plans for Michalak's Piragua 18. I think I
can cartop it for when the lovely one and I camp at state parks. I like
Jim's electric motor idea, but will get to that later. Just need
something light, easy to paddle, and big enough for two. I recently saw
an undecked Larsboat pictured on Jim's site, and it made me think some more.
But in the end, I still think the Piragua 18 will suit my needs
perfectly. It's not that I couldn't build a multi-chine hull if I wanted
to. I just haven't found the right one. I am hoping one day to
find a design nearly as simple as the AF4, but about 20' with some vee in the
hull. If not, I may actually take a stab at modifying the AF4 Grande
hull myself. But that is far in the future when I can afford a 25hp 4
stroke. Or who knows, the AF4 may handle the chop in the sound better
than I think. I do plan to try Max's idea about filling the anchor well
with water. With enough weight in the boat, I might just plow through a
rough chop at low speed. Probably not, but I'm gonna try it.
March 17, 2002
Okay, one more thing is bothering me. I painted only the very bottom
and chine logs, not the sides of the boat, because the sides still have screws
in them holding in the temporary frames. I want to leave the temporary
frames fixed in place until after I flip the boat and put on the decks.
But this will slow down my finishing, because I will have to fill the screw
holes with epoxy, then prime and paint the sides later. I guess this
doesn't matter that much. But there seems like there might be a shortcut
here, if I were smart enough to figure it out. Several great boating
weekends have already passed me by and I have still not flipped the boat
over. I must get my butt in gear. The gnats are gnawing, and the
yellow powdery tree pollen is dusting everthing, including my freshly painted
boat bottom.
March 22, 2002
Well, Me, Lovely, and a friend of ours (a young lady) from up the road
flipped the boat. We didn't have enough muscle between us, so we wound up
grinding one chine against the floor as we simultaneously turned the boat one
direction and slid it back the other way. It scraped through the paint
and the primer and slightly into the epoxy, but the fiberglass tape held up.
The boat cushion I put under the edge to protect it slipped out past our point
of no return. So I just listened to it grate and kept encouraging the
girls. Not a big deal, I'll touch that right up, etc. They WERE a great
help.
Next weekend I am going to see dp at his home in Tennessee. He is
converting to Catholicism and joining the Church. I'll drive up Friday,
stay the weekend, and drive back on Monday. It's an important
moment in his life (understandably) and he asked me to come, so. It'll
be good to visit him, even for two days. So this weekend is BOAT BUILDING
MANIA MADNESS. I'm puttin on my fiberglass proof mask and leotards and
kickin some serious boatbuildin butt. Come see what the Rav is cookin!!
(deteriorates into bad pro wrestling rap)
March 23, 2002
I got up around 9 am and made coffee and breakfast while Lovely slept
in. Then mosied out to the boat to survey the situation. First I
removed all the bracing sticks I temporarily screwed on before flipping the
bottomless hull upside down. Then there was some cleaning up to
do--there were COBWEBS I am ashamed to say. I spent a lot of time just going
over the corners and assessing the glue drips, etc. Then I removed the
drywall screws which were holding the skids on until the epoxy set, and I
replaced them with bronze ring nails. The instructions said that my next
move was to make glue putty fillets all around the inside where the sides and
bulkheads meet the bottom. I wanted to use fiberglass tape on the seams,
because it makes it easier to have a smooth fillet, but I had a problem.
The temporary forms were in the way. The instructions mentioned removing
the forms after the decks were temporarily in place. But could I get
away with removing them now? I decided that I would try to screw the top
board of the forward form to the plywood sides and then remove the bottom and
sides of the form, leaving the top crossmember in place. I began removing the
screws from one side of the form, thinking that the inward compression of the
gunwales would hold the form in place. But I was wrong, the form was not
in compression, after all, but in tension. When I removed the last screw
on the starboard side, the side popped away from the form about 1/2
inch. I was surprised, but I looked the shape over, and it seemed to
still have a nice smooth curve. So I removed the form entirely. It
looked good. So I sanded all the bumps and drips, vacuumed, mixed up a
batch of epoxy, and filleted the cabin all around. The taped seams
looked really good, and I decided that my skills had really sharpened since I
built the pirogue in 1998. Then the Lovely One came out to see what I
was doing, and to remind me that I was taking her to the grocery store.
So I cleaned up and went in. Going to the store, returning, cooking
supper, etc. used up the rest of the daylight. Somewhere around 8pm I
decided that I would go out and gaze at my beautiful boat again. I
reached up to throw the switch on the overhead shop light when the flourescent
tube suddenly fell out onto the cabin floor. I switched on the drop
light and looked. There in the sticky, yet-uncured epoxy fillets were a
million tiny fragments of broken glass. I mean millions and I mean tiny.
Each piece being between 1/8 and 1/4 inch square (well not really square, but
it gives you an idea of size). To pick them out of the goo would take
hours and tweezers. I spent about an hour doing just that. I had
some success scraping with pieces of cardboard and tongue depressors, but it
was a major bite. I finally gave up and went inside, thinking I would
figure out a way to deal with the remaining imbedded fragments after the
cure. I decided I could maybe pulverize them with a round stone, or use
grinder on the dremel tool or something. Anyway I was a little
discouraged and done for the day.
March 24, 2002
This morning I started at about 9am and began by making a list of things I
would do, in chronological order. Then I did them all 1. I vacuumed out the
cabin, and picked out most of the remaining glass fragments (the cure being
more advanced actually made it easier to pick out the pieces without taking up
a lot of gooey glue with them. 2. I sanded the bumps and drips off of
the cockpit sides and floor, and removed the temporary form in the cockpit. 3.
I filleted and taped the seams in the cockpit and ran a finger fillet all
around the butt blocks. 4. I mounted, marked, and cut the decks.
Then temporarily screwed them in place. 5. I removed the cross brace on the
deck . . er, coaming? and cut the extensions off flush. 6. I marked and
cut the circular hole for the vent in bulkhead 2 (I am using a plastic access
port for this). 6. I rounded the gunwales at the bow with the belt
sander. 7. I sanded the top of the sheer wales, to remove drips and
smooth any differences the between the two 3/4 inch laminations. 8. Then I
vacuumed out the anchor well and vacuumed the sheer wales and the top of the
chine logs. 9. Then I filleted and taped around the bottom of the anchor well;
this was a bit difficult to reach down in the tall narrow space, but I managed
by hanging over the side being careful not to get stuck. 10. I used the
remaining epoxy to seal a few remaining cracks between the chine log and the
sides, running a finger fillet down the hole length.
Everything looks great. Still left to do: Seal floors, glass decks,
paint exterior sides, paint interior, make and attach deck clamps, install
motor well deck, cut and install windows, add bow and transom U-bolts, Kleats,
plugs. Is that all? I am getting close to
finishing!!
March 25, 2002
Today I did get a half hour to look the boat over and check the status of
the epoxy cure from yesterday. I looked at the deck tops again, and I
just can't help myself. I know they are going to check, and I can't live
with it. I'm ordering 6 more yards of cloth from Raka to glass the
cockpit floor and the decks. These are areas which will take the most
abuse from the sun. Plus the glass weave on the cockpit floor, without
fairing will provide a strong nonskid surface (maybe). Especially as I may
wind up storing this boat outside. This will add a couple of weeks to my
building schedule, but will be worth it in the long run. I just reread
my skimmer page, and I am reminded that I need to take a Saturday to go
fishing sometime soon.
March 27, 2002
This afternoon, I had little daylight time to accomplish anything (the
breaking of the fluorescent bulb having crippled my previously inadequate
lighting), so I just wound up hanging out with the boat and thinking ahead. I
put a few milk crates in the cabin to approximate the battery, supplies, and
toilet, and then lay down. First thing I notice is that there is JUST
enough space for me to stretch out comfortably, another person sleeping in the
cabin would not practical. It could be done, but all the gear would need
to be moved into the cockpit, and it would still be "cozy" to say
the least. And as Lovely will testify (and as evidenced by her
collection of earplugs) I snore horribly. Good news is that the much
discussed "sharpie slap" should be a distant drowned-out second in
nighttime distractions aboard my boat. So I think IF Lovely comes with
me, and IF we wind up sleeping aboard instead of tenting ashore, THEN I might
sleep in the cockpit. Now I am a few inches longer than the cockpit, but
it is plenty spacious and I can do a slight fetal curl and sleep in reasonable
comfort--I think. Second thing I noticed was the butt block in the cabin
seemed to get larger and sharper the longer I lay there. I flashed on my
"princess and the pea" camping experiences, where I wake up bruised
and battered, break down camp and tent looking for that monstrous, spiky
meteoroid I slept on--only to find an acorn. And my experience has been
that no reasonable amount of foam (of thickness one might haul a-camping
anyway) will not significantly deaden the feel of a root or other irregularity
under your sleeping bag. In fact, until recently when Lovely and I camp
tested our first set of air mattresses, we didn't know what we were
missing. Lovely slept great which is unusual for her. I always
sleep like a log, but this time I woke up feeling refreshed and rested instead
of abused, in fact I actually went back to sleep for another hour. So
some type of air mattress will be a MUST for sleeping across those butt
blocks. The ones we have are "twin," but they are still way
too large for sleeping aboard. We'll have to seek out an inflatable
float of the right proportions.
I also got to thinking about the lighting, battery power, etc. I am
sorely tempted to just skip the whole electric thing and use two lanterns for
cabin and anchor lighting. Pro's were: Via cigarette lighter socket a
Recharging source for mobile phone; Electric cabin lights; Electric
anchor light; Power for small fan (it gets hot in South GA) and other small
appliances; Battery weight forward for better trim. Cons: Battery weight
increases overall weight, Battery takes up space in cabin, any wiring
performed by me will look less than aesthetic. I don't know what the
downside of propane or liquid fuel lanterns might have as cabin or anchor
lights, but I think I will try them first before messing around with
batteries. My phone holds a charge for at least a week as I only turn it
on to make short calls and immediately turn it off again, and I can recharge
it anywhere with shore power or a 12v battery. Weather radio, cassette
player, and small reading light, can be powered using conventional
batteries. The fan may not be a necessity if I have good ventilation, or
it might not make a difference on a hot night anyway--yet to be
determined. I think I'll have to give it a go without electric for a
while and see what I think.
I checked the store for the AF4 building photos today, the day they told me
they would be ready. They didn't have them back yet, got defensive, and
insisted that I was there a "day early". I was nice and didn't
argue, but I'm nervous since they lost my negatives last time. I gotta
go digital or find a better photo lab.
Leave for dp's the day after tomorrow.
April 2, 2002
Back from dp's. No time for the boat until this weekend. But
daylight savings should make more weekday work possible starting next week.
April 6, 2002
Today I accomplished quite a bit. The sloping top of bulkhead 10
meets the sides about 1/4 inch high, so I ground the corners down with the
belt sander. I also used the jigsaw and the belt sander to trim the
slightly oversized deck panels to fit. I measured and cut the window
openings, marking them first on the outside, then, using a small bit, drilled
holes at the critical points. Then I went inside with a pencil and
straight edge and connected the dots. I like the looks of the square
windows per Jim's plans, rather than round or oval ports. But I did
round the corners well to help prevent water collection. Then I sanded the
openings, a few epoxy burrs I missed here and there, and the epoxy filler I
put over the nail heads in the floor. As I had removed drywall screws and
replaced with nails, most of the heads were set below the surface and needed
filling over. I measured and cut the deck beams. I took a 1X4 the
same width as the 2X4 and screwed it flat to the back end of the deck
beam. Then I went to the front end of the deck beam and raised the
unscrewed end of the 1X4 an inch and screwing it in place. Then I just
set my table saw fence at 3 1/4" and tilted the blade 6 degrees (for the
bevel) and ripped it through. Remove the screws and the 1X4 and
Viola. The deck beam 2 1/4" in front and 3 1/4" in back with a
6 degree bevel. It was easier than I thought. I dry fitted the
deck beams and decks, then removed them and glued the beams to the decks with
PL premium and drywall screws. I used a tube I had still in the gun
since November--it was still good much to my surprise. I had simply
wrapped a little piece of duct tape over the tip. I had to push a little
hard piece in the tip back into the tube with a bamboo skewer.
Afterwards I epoxied 6 oz. cloth onto the deck tops. I vacuumed the tracked in
sawdust and dirt from the floor of the cabin cockpit and motor well. I
rolled out and cut cloth for the cockpit floor. Then I painted a coat of
epoxy only on the cabin floor and motor well, epoxy and glass in the
cockpit. I had wanted to glue the kleats that support the motor well
deck, and cut the deck pieces, but I had to drive the lovely one to the
grocery and eat a barbeque sandwich with slaw. Plus my knees and back
were killing me. I slipped on rain slicked concrete and fell on my hands
and knees at dp's, and I'm still not quite right. I've been a flatlander
for so long now, I forget the importance of a good shoe tread.
I am so close to finishing now, I am beginning to think in terms of
"what is left to do" rather than "what is next." Tomorrow
will be largely interrupted by a trip to Wal-Mart, Home Depot, and buying my
father's Oldsmobile. But I should be able to get a few hours in before
and after.
April 7, 2002
Got less done today than planned. I installed the sticks (or
"flanges" on which the motor well deck will rest. I got a
little confused about the measuring of the motor well deck. The plans
show this part (put together from two) in the nesting drawing cut from the end
of piece of 1/2" ply, but no dimensions. The piece is cut into
using a diagonal across the center of unknown angle. I guess Jim figured
this was too elementary to detail, and likely to be a cut-to-fit operation
anyway. But it sort of threw me. Sometimes my brain trips over
even the simplest steps (like whether or not setting your clock back takes
away or adds time to the day). When this happens the more I think, the
more tangled and obsessed I get. This is what happened with the motor
well deck. I understood that the diagonal cut was a way of having a the
deck wider than the 48" sheet forward and less aft. My brain choked more
on the angle of the cut. I went inside did something else, then sat down
with a pad and ruler to approach the problem earnestly. First the width
at front was 49 1/4" and the width at the transom (without the corners
chopped out) would be about 46". So erring on the side of
caution--I can always trim down-- I decided that I needed to slope my cut to
decrease 1 1/2" over the 20". So I settled on 24 3/4" and 23
1/4" from both ends. These will be much easier to fit and trim BEFORE
joining the two halves.

I rolled another coat of epoxy on the cabin, cockpit, and motorwell floors,
more on the topside of the decks as well to fill the weave. Mixed a
little leftover epoxy with wood flour and filled any cracks where the flanges
joined the motor well. The Lovely One promises to put the decks in the
sun tomorrow midday. I wish I could roll the whole boat out, as the
epoxy cures so much quicker in the sun. But I can't yet. Max suggested
how to get the boat on the trailer (once I get the trailer ready) and it seems
so simple now.
The trailer's previous owner installed auto tires and wheels, on the hubs,
which is why I am having to build the bunks up so much, but I am thinking I
might save some trouble if I can just switch back to smaller wheels.
We'll see if the lugs are too rusted, etc. and compare the cost. My list of
Things Yet Undone shortens. My father suggested a boat name today which
is the best one yet, but still . . . I continue to search for the perfect
swamp-boy-river-boat name.
April 8, 2002
Daylight SAVINGS!! I LOVE IT!!! It seems like I had 3 extra
hours to work this afternoon. I cut the motor well deck according to my
measurements and it fit more or less. I only had to cut out the corners
and shave 1/2" out of the middle. I connected the two halves with a
1X4 and PL Premium, and epoxied the underside (tomorrow I'll flip and do the
topside). I also epoxied the underside of the cabin decks. When I glue
the decks in place, there will be a little sanding of edges and some sunken
screw or nail heads. This will require a little epoxy touch up.
But other than that I will be through with the epoxy on this boat. When
I'm finished I will have used four gallons total (yerk!). I think
building in cooler weather was partially to blame; I notice getting a lot more
mileage out of a pint of epoxy not that the weather is warm. On the
other hand, the wood seems to soak up more now too. I don't know. I've
never used more than 6 quarts on a boat before, but this is a bigger boat by
far than any I've built, with a lot more surface area.
Still no name...
April 14, 2002
Epoxying is officially finished (well except for swabbing the Motorwell
drain holes and maybe some fairing where the angled 1/4" side decks meet
the flat 1/2" front deck). The recent epoxy application has been on
decks, so I commenced to prime the inside and outside of the boat. I
painted the sides up to the sheer wales. But I was out of paint.
Now why didn't I buy the light color for the inside when I bought the hunter
green? I'll get it tomorrow. Still no name...
April 15, 2002
Bought paint today. $23 a gallon. Now I remember why I didn't
buy both gallons at once. I bought some stainless u-bolt bow eye thingys
for the bow and transom eyes (I'm hoping they are substantial enough for the
lift at the marina). I bought some cheapo bow chocks, too. I discovered
a "boaters world" near home depot. I was both entranced by the
stuff and repelled by the prices. The guy in front of me in line was
special ordering some fishhooks out of the catalogue. While the inept
clerk went for help, the guy calls a buddy on a cell phone to tell him this
kind of hook can be had. Then they finally get back and ring him
up. "That'll be $86.95, sir." "Will they mail them
to my home or will I have to come back here to pick them up?"
"They'll be mailed here, sir," taking the signed slip and giving him
the receipt. "Just bring this with you when you come to pick them
up. It'll be about two weeks." Suddenly the clerk's attention
turns to me and my plastic chocks and u-bolts. I realize my mouth is
hanging open. I hear you can take a safety pin and bend it to make a
nice fishhook in a pinch. I've seen barbed twigs and bones in Native
American museum displays.
Still no name . . .
April 26, 2002
I absolutely hate painting. I generally suck at it too. You
could hand a typical 10 year old a paintbrush and let them have at it and the
results would be superior to my best efforts. If I use a brush, it takes
me 4 or 5 coats to get a good coverage. I don't even want to talk about
what happens when I use rollers, foam, etc.. Until I began building
boats, I had managed to avoid painting anything for a decade or so other than
spray painting some patio furniture.
This boat has really soaked up some paint. I have now applied 1 1/2
gals of primer and 2 gals of paint and I'm still not done.
I have started on the trailer, and have spent nearly half the cost of a new
trailer already. Lumber, rollers, galvanized hardware, wire, carpet,
glue, etc.. I finally have the kinks out of my plan, and am short only a
few bolts of having all the materials I need for realizing it. I should
complete it this weekend.
I have a few other things to do on the boat. I still don't have the
motor well deck screwed and caulked in. I don't have the window glass
cut or installed. I don't have the round access port that I am using for
a vent installed, nor have I installed the handle and chain on the
inside. I haven't finished painting the decks, one more coat there, in
the cockpit and the anchor well. I haven't drilled and installed the bow
eyes and transom eyes, cleats, and other hardware. I haven't installed
the door over to the storage area under the motorwell. I haven't built a
tiller extension, and I am back to square one on the bimini top--the freebie
from my friend didn't materialize.
May 3, 2002
Okay, so the trailer is being a real pain in the butt, but it is more or
less complete short of tacking on the carpeting. I finally got the bunks
mounted, thanks to some advice and photos from Max and others at the Michalak
e-group. Also, some valuable information was acquired by pulling over to
look at boat trailers parked in yards, the ones at the local marina were less
instructive, because they were all nearly new and built for the vee
hulls sitting on them. Next time I will consider a new trailer part of
the required expense for building a boat.
Today I saw a 1992 15 hp Yamaha in "excellent condition" for sale
in the paper for $650. I called the guy from my job and made
arrangements to see it after 5 pm, but I was pretty much decided on buying
it--I even called the Lovely One to warn her that her boat crazy husband would
be coming home poorer and happier. When I called him at a quarter 'til for
directions, he told me he had sold it already. I was soooo
disappointed. I could kick myself for not cutting work and running right
over there, but I had fairly critical things going on at work today.
Damn, I'm still having a hard time letting go. I have been checking the
classifieds without fail for over a year now for just such a deal. When
I saw it, I thought "that's my motor, just in time!" But it
turns out that it was someone else's. Oh well.
I received the $11.14 u-bolts from McMaster-Carr today (total $27.85 with
shipping), and drilled the holes through the motor mount board and the 2X4
transom framing. Way too expensive, but now I don't have to flash on
Max's splitting 2X4 nightmare scenario every time I launch. Sometimes I have a
real internal struggle between being smart and being cheap. I like it
best when I can do both at once.
I have screwed and caulked the motor well, and painted the perimeter.
I have cut and installed the window plastic. I cracked it so many times
I began to fear getting two window sized pieces out of the 36 X 48 sheet I
bought. The drill cracked it, the sabersaw cracked it, the grip clamp
cracked it. Argh! The window framing on the inside was also a
disaster, and I missed the shear wale and drove a screw right out through the
outside of the hull. But with filler and glue, I have managed to hide
most of my errors. I suspect the cause for my difficulty was the
thickness of the plexiglass (Home Depot did not have the specified thickness
except in large untinted sheets priced at over $60). I installed the
access port in the ventilation hole. I still haven't found a small
galvanized handle for opening from the inside and attaching a small chain.
Decks have been painted. I may give the cockpit one more coat, now that
I have little further reason for climbing in and out of it. Have yet to
install the bow eye (am thinking of waiting until I get it on the trailer) the
stern storage area door, and cleats.
Still no name.
May 7, 2002
A few days ago, I attempted to get the boat trailered using Max's method of
raising up the front end, blocking it back at the midpoint, and winching the
trailer under the boat. Right away, I had a problem. The skids I
had measured at the transom as being 31 inches wide from outside to outside
were 31 3/4 inches wide at the bow. Some measuring of the bunks revealed
that somehow in my tightening and adjusting I had managed to decrease the
width between the bunks to be something just a hair under 31 inches. The
story gets stupid where I didn't really believe my own eyes, because I had
measured so many times and just knew it would fit. So I continued with
the lunacy of trying to load the boat long enough to scrape paint of the skids
and imbed carpet fibers into the paint. I am concerned about losing the
paint. True I put it under extreme duress, but I suspect some might have
rubbed off anyway, and the way the fibers from the carpet stick into the
surface leaves a fuzzy nasty surface to paint over. And this particular
paint is now over four months old! Next time I do this I will paint the
boat using thin multiple coats, with a roller, not a brush. I will paint
it in the 90 degree sunshine and let it bake on.
Anyway I had to take the boat back off the trailer ( a whole 'nother
crisis), take the trailer back apart, drill new holes in the galvanized frame,
and reconstruct the bunks and the separating frames. I busted more
knuckles, etc. This weekend I should have time to retrailer the
boat and get it out in the light to take some decent pictures.
May 12, 2002
Yesterday I retrailered the boat and got it out into the sun. I shot
a roll of film on it from every conceivable angle (trying not to get too much
redneck yard junk in the background). But I still have a problem with
the way the boat sits on the trailer. Because it rides so high, to clear
the auto sized tires, the bow is nearly 17 inches above the trailer
frame. Plus it lacks support up front, so it rocks forward raising the
transom off the bunks nearly 5 inches. The rollers forward I raised as
high as they will go, barely make contact now, when raising the bow up so the
transom is flat on the bunks, the rollers are nearly 4 inches below the bottom
of the boat. I stuck a little stool (actually it is one of those
carpeted cardboard cylinders sold as Kitty Condos which I have been using as a
stool) under there, just to get a look at where I need to be. I finally
decided to do something simple and build up a solid chunk of wood from 2 X 8
scrap ends, then affix angled bunks on each side, and just wedge the sucker in
there This also allows me a little adjustment should I choose to adjust the
bunks a little lower later on. I got the chunk with bunks built, but I
need to round the forward ends, tack on the carpet, and build a small platform
across the front of the trailer frame to set it on. I think I will tack
some 1X2 around chunk, so I can lift it out, but once in place it will not
slide around.
Other things I've done but failed to mention. Bow eye, mailed off
boat registration (could have done that months ago), patched a place on one of
the skids where a nail punched out a chunk of wood after I flipped the boat
over and was nailing from the inside. I didn't see it until I was trying
to get the bow up high enough to get the trailer started under it. Installed
the cover over the rear compartment. Yeah, that's about it.
Still no name.
May 14, 2002
Okay, the trailer is done. I still don't have the kleats, slot top,
and tiller extension done. So the boat is pretty bare looking, but I
will launch regardless this Saturday. In the light of day, one can see
my lack of spit and polish finishing, but I just squint and step back a few
paces, and she's a beauty. My new PC doesn't work with my old flatbed
scanner, so I won't be able to post pix until after the launch. I'm
giving up on the name until one suggests itself strongly, perhaps during an
excursion. I must acquire tie downs, etc. There is a certain
untouched beauty to it now, without gear and the necessary screw eyes, hooks,
and bungies. But already I have tracked up the floor with footprints,
etc. My primary concern regarding the launch is the drain holes and
plugs. They are the obvious place for leakage if there is to be
any. Also I worry about loading and unloading. But I have picked a
freshwater location for the splashdown, and have decided that I will submerge
the axle if necessary to get the boat off and on without scraping or
damage. Gotta get the motor ready. Nothing much else to report
until after the big event. Wish dp were here to see it.
May 15, 2002
This afternoon purchased tie-downs, etc. for the transom, bow and a strap
across the middle. Looks extremely secure to me. I forgot to buy
PVC, DOUGH! I need larger than the 1 1/4 inch PVC I have now.
Saturday looms closer.
May 18th, 2002
Thunder and lightning from noon on. If I believe the weather forcast,
I will not launch at all this weekend.
May 26th, 2002
IT FLOATS! She is an incredible craft! Being somewhat socially
awkward I found myself a little overwhelmed answering questions
about the boat at the overcrowded ramp and park. People on the water
even shouted questions and compliments at me as I chugged past. The 8HP
is plenty of power for my intended use, but I could not get her to plane.
Except for a 15lb river anchor forward, the hull was more or less bare, but I
had some friends and family show up and I never had less than three people on
board. I had rigged a tiller extension, but I didn't need it with all
the passengers wanting to ride standing in the slot. I wanted to try her solo,
but I ran out of time. Plus the water was insanely crowded with holiday
boaters.
But later that evening, in the solitude of my back yard, I loaded my tent,
porta-potty, lanterns, camp-stove, air mattress ($1 kid float from Dollar
General), sleeping bag, jug of water, cooler, etc. on board. I tied a tarp
over the slot. Then I snagged my copy of "The Esoteric World of Madame
Blavatsky" and crawled in for the night. The cabin would not sleep two of
my size in any but the most desperate (or perhaps intimate) conditions--and
only if all the gear were set outside in the cockpit, even then. But two
people could easily sit comfortably inside for an hour or two waiting for some
bad weather to pass. One of the miniature kerosene lanterns (burning lamp oil)
I bought at Fred's was plenty light to read by. I slept comfortably, but awoke
feeling a little rough about 7am. The boat was tilted up much higher in the
bow than would be normal on water, and there was no gentle rocking, soft
slapping of water on the bottom, or crisp sea breeze. So I had to use my
imagination.
Anyway, I plan to experience the real thing soon, perhaps this weekend. I
finished a proper cover for the slot top (which required sewing, cutting PVC,
and application of velcro. I still need to find 1/4" bolts long enough
for the stern kleats. I installed the USCG required fire extinguisher and air
horn. I wait for my registration numbers to come in the mail any day.
June 3, 2002
I forgot to mention, the boat has a name. It will be called the Jubal
Edisto. It's an inside story, but I think it suits just fine. I am dying
to go overnighting, but I have major household construction in my immediate
future, and doubt to have more than a day trip in the next 4
weeks.
Launch Pix still in development.
Back to Top
Because I am a big guy who snores, because my buddy is also, uh, big for his
height, and because the AF4 cabin is, in Jim's words, "Cozy," we will
not want to share the cabin space for sleeping if we can avoid it. We will still
want to respect each other in the morning. The alternatives are to tent camp
ashore whenever possible, and to develop a tent or cover for the cockpit.
Now in these parts we are plagued by a variety of gnat which gnaw you to death
in short order, and also, like much of the South, are subject to large mosquito
populations. Plus, it gets downright muggy at night. So i am looking
into several possibilites.
One is to buy a bimini top and drape with mosquito netting and/or polytarp at
night.
Two is to design some type of quickly erected structure with a polytarp,
cover which can be disassembled and stowed when not in use. I have toyed
with several of these. Select below to see rough sketches
Again I have taken Jim's advice seriously, and will develop a polytarp cover
for the cabin slot using the PVC bows he describes in his essay
on hatches and vents.
My friend with the Whaler got a different boat. She's giving me the
bimini from her Whaler. It may well be too wide, 59 inches, but hopefully
I will be able to do something with it. I found exactly what I need, were I to
buy new for $119 mail order--basically a two frame budget bimini made for your
typical aluminum john boat. Either way, acquiring a commercial top should
be within my grasp. Then I can see what I can do with some tarp and some
mosquito netting for closing the cockpit in entirely.


 Searching for Plywood.
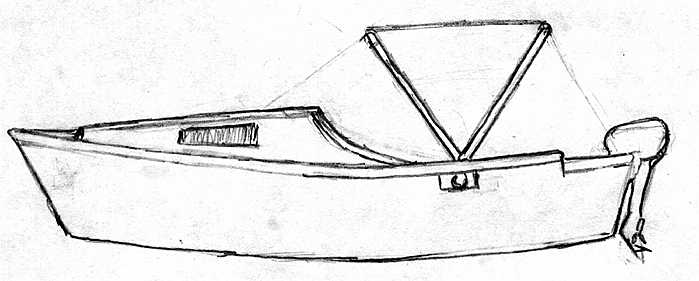