
| BODY MODS |
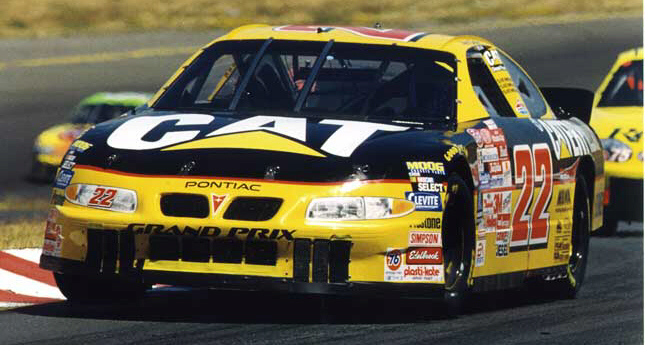
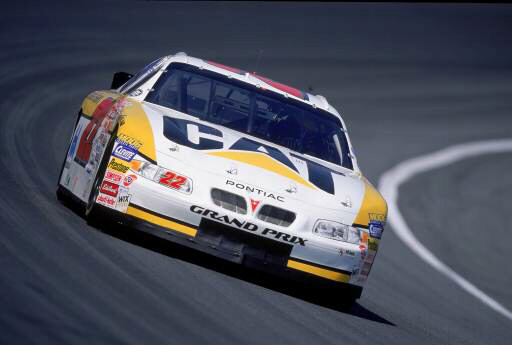
The noses of the two Ward Burton Pontiacs we will trying to model are slightly different from the noses in the kits. These towo photos show the two cars we are trying to replicate. You will note that the grill and duct openings are different on both cars and are not the came trapezoidal shape as the kit.
We will be simulating those ducts with decals, but there is also a raised lip under the ducts on both cars that needs to bbe added. Mind you this is really nick picky, and if it is beyond your capabilities they can be ignored. But if you up for it then here is what I did.
 |
| The first thing I did was fill in the little trapezoidal ducts with sheet styrene. The depth of the ducts was about .020". Using the same thickness styrene, I cut a strip a little less than 1/8" in width (the height of the ducts). Each duct is 5/8" at the bottom and 3/8" on top. If you did this correctly, the little bits of plastic will fit in the ducts perfectly. You may have to bend them a bit to allow them to fit the curvature of the front valance. I glued them in place with CA glue hit with a little accelerator. I then wetsanded them flush with the surface with 240 grit paper. When they are close, lay down a thin layer of Squadron White putty over the entire duct area to fill any any little gaps. When the putty is dry (about 2 hours) wetsand with 240 and 320 grit paper until nice and smooth. Touch up as necessary. Now we need to simulate the raised area at the bottom of the valance. I first scribe a line 3/16" from the bottom of the valance with a compass. This will be used as a guide for gluing the plastic strip onto the body. 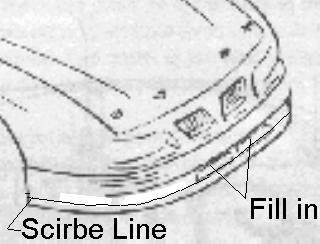 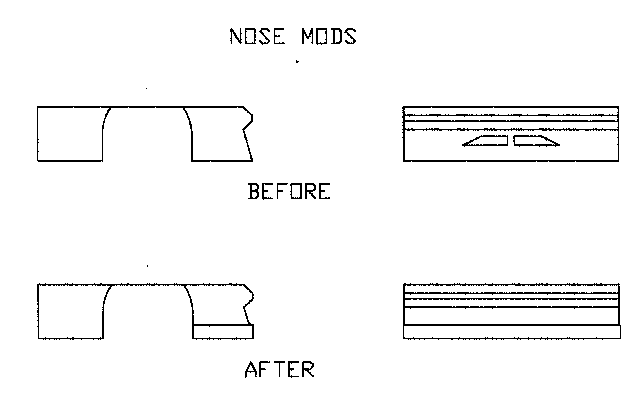 Next I cut a strip of .010" sheet styrene 1/4" wide. I start gluing this strip even with the scribed line starting at one end by applying medium zap in the area to be covered at one fender side and hitting it with accelerator and then wrapping and gluing the strip around the valance until it goes completely around the bottom edge of the valance. Be sure to lay it on the line and keep it tight against the body. I reinforce the joint by laying a bead of CA along the upper joint where the stirp meets the body at the place of the scribed line and also at the bottom inside where the strip meets the bottom of the valance. After it is dry, I trim the excess at the wheel wells and at the bottom. I sand the bottom of the new valance/spoiler even first with rough sandpaper, followed by wetsanding with 240 and 320 grit paper. I then use White Squadron putty to blend in the top edge of the plastic strip with the body. I let this dry overnight and then wetsand the area smooth with 240 and 320 grit papers. Here is a little trick I use to check the joints. I use Tamiya flat white paint brush painted on to the joints to check and it works like a filler also. I normally let this dry overnight and sand it smooth. 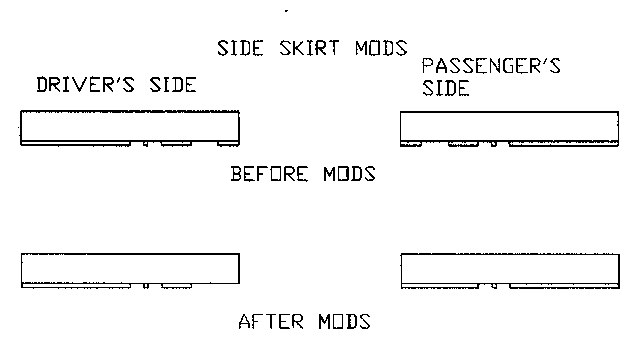 The final body modifications I made to these Pontiacs was to modify the side skirts to reflect driver side only exhausts. We will scratchbuild the exhaust later. My pics show that on both CAT cars the exhausts were on the driver's side only rather than dual side. To do this I remove the rear most side skirt on the driver side leaving the short one behind the jack post. This will leave enough room before the rear wheel opening to fit the new exhaust. I next remove both short side skirts from the passenger side as it is easier to replace them with a single replacement piece made from sheet styrene than try to fill in the gap for the passenger side exhaust. I acknowledge that the kit side skirts are way too thick, and it would be more scale to remove all the skirts and replace them with scratchbuilt ones made from thinner stock. I have done this on past models, but I will not on these. Therefore I replace the driver's side rear skirt with one made from .080" thick sheet styrene about 1/16" high and cut to length. I glue this piece to the location so the space between the jack post and this piece is the same as the space from the jack post to the front skirt. I make it a little longer than necessary and then trim it on the car even with the front of the rear wheel opening. I am careful to position it so that it matches the slight overlap with respect to the body sides of the front skirt as close as possible. If done correctly, no filling will be necessary, only sanding and thinning from the inside to match the original skirts thickneses. |
