|
Rotation Straight Pool strategy guide If some of these shots are too difficult for you, you can buy instructional videos or take some lessons from Patrick. This strategy guide is made mainly for pro players or good amateurs, but all players can also benefit from this guide.
The opening break In the beginning, the 1 ball is racked in either corner, the 3 highest balls in the middle, and the rest are random. The first thing you need to look at is where the 2 ball is located, because you make the 1 ball one rail in the corner, this is a shot you should have mastered already, if you haven't mastered it then you can make the normal safe break. It all depends on where the 2 ball is, you need to place the cueball differenty and use different speed and spin to get position on the 2 ball. 1. If the 2 ball is somewhere in the lower row, then you need to use more draw than sidespin and make the cueball go to the side rail and towards the rack. 2. If the 2 ball is in the same side row as the 1 ball, then you shoot the 1 ball soft and hit the bottom rail first, then the side rail, that is the normal easiest break shot. 3. If the 2 ball is on the other side of the rack, you either go to the bottom rail first with two or three rails to come up to the centre of the table. Or then you use draw and side spin and control the cueball below the rack to the other side. It all depends in what position the 2 ball is in, you will learn this by trial and error. All you need to do is to get a clear shot on the 2 ball, then you can either make a safety or a trick shot, a carom shot is a high percentage shot, you should learn this. If you are good at controlling the rack, then you can play position for the 2 ball so that you can make it easy in a pocket.
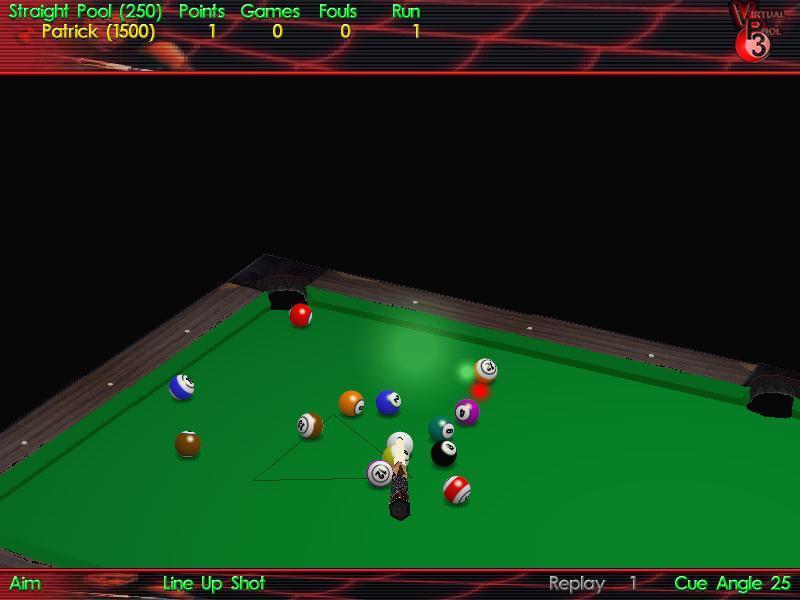
Here is a picture to show the break. Here the 2 ball is in the middle of the rack, this is not properly racked balls, the highest balls should be in the middle. But it is still possible to break out the 2 ball in the middle by using a lot of side spin and make the cueball go two rails and back into the rack, so you break up the rack two times! But for this you will need luck, it is hard to predict when going twice into the rack and hitting loose balls, this is why I made the rule that the highest balls are racked in the middle.
With a little luck I managed to get position on the 2 ball and an easy combo too! To see the continuation of this match, click here for a video! Continuing breaks When you have a few balls left on the table, you should plan ahead where the best place for the cueball is to break up the rack. Of course you should always look where the last ball is early in the rack to see if it is in a good position, if it is inside the triangle, then you should try to construct it into a better place. The last ball should be in a place where you have the most options possible, a good break is to cut the last ball so it is possible to get as much speed in the rack as possible. You can play good position for the 1 ball this way. Cutting with a rail is the best break shot, you have more options this way, you can change the angle the cueball travels in, if you don't have a rail, the cueball will travel at a 90 degree angle and the only way to change it is to use follow or draw, which will not work if you shoot hard. 1. If the last ball is close to the side rail near the rack, you will have many possibilities. If the 1 ball is on the same side as the last ball, then you can just break soft and you will have a shot on the 1 ball, if you are good enough, you can break harder if you are sure you get an easier shot on the 1 ball. If you are not good enough, it is better to be safe than sorry! If the 1 ball is on the other side on the rack, then you need to hit the balls at an angle so the cueball comes to the centre of the table, and you will often have a clear shot on the 1 ball to make it in the corner or combo another ball in. If the one ball is at the lower side of the rack, then you need to use top spin on the break and shoot hard, because when the cueball hits the rack hard with top spin, it will go forwards towards the bottom rail. 2. If the last ball is above the rack, you need to hit one of the top balls thin, if you hit the side balls, there is a possibility to scratch, but this is possible to avoid if you are good enough. Position for the side rows is easy and you often get a shot where you can make an easy carom shot for the side. 3. If the last ball is below the rack, then position for the lower row balls are the easiest of course, if the 1 ball is at the sides, you need to use spin on the break shot to make the angle change on the side rail. You should always try to cut the cueball into the rack! If you use the normal break shot in straight pool, then what will you do to get position on the other side of the rack, you can't force the cueball through the rack because it is such a thick contact on the last ball. If the 1 ball is in the corners, then you can use a controlled soft break which is easy to do. If the 1 ball is the ball closest to the corner ball, you can still get it loose with a soft break. But if the 1 ball is in the middle of the row, that is the hardest break shot there is and it would be better to play harder or play for position for a carom shot! How to win a safety battle Just getting the cueball behind another ball is not enough in this game, you need to plan ahead, you need to know what your opponent can do after your safety. You also need to know what you can do if he succeeds with his safety. This is like chess. Here is an example of an obvious easy safety, but this really is a very difficult one.
You need to place the cueball in a place where the opponent can't make a safety back at you! You have many options for safeties here: 1. If you place the cueball behind the 9, then your opponent can make a two rail kick and if he hits the 3, the cueball will get safe behind the cluster. 2. A smart player would try to avoid it and place the cueball anywhere frozen to the side rail, but the opponent will get a one rail kick by using right side spin to avoid the 6, this safety would work if the 6 was more in the way. 3. Anywhere on the other side of the table is bad, because you can make a two rail kick from either side with a re-safety from the 3. You can also make a one rail kick from the right side of the cluster. 4. Sure, you can try get the cueball frozen to the 11, but even if you succeed, the opponent will have an easier shot than you had, many multiple rail kicks are possible. 5. So, now you don't have any good options, so you can accept that the opponent will get an easy kick shot and try to find the toughest one; where he can't make a good re-safety.
Of course, use a lot of left spin on this one, it will be needed to gain speed when you hit the 10 and 15. There is a small chance to get the cueball snookered behind the 8, try and go for it, but don't go too far so the opponent gets an easy two rail kick. Make his only option a one rail kick from the side rail, when he hits the 3, he has a possibility to scratch in the corner. To make a re-safety here is very difficult. Some of you may think that he can hit the 3 and get behind the cluster using two rails, but look where the 9 is, there is a big possibility to carom into it after the cueball has hit the two rails.
So the opponent's only option is to leave you an easy open shot, the best way to do that is by leaving the cueball frozen to the rail to at least remove your possibility of draw shots.
The best safety there is is to place the cueball between two balls so the opponent can only get out in one direction (An even better safety is when three balls or more are surrounding the cueball so there is no way to get out, but an opportunity to that safety is very very rare). Now try to get the 3 ball as far away as possible from the other balls; so the opponent can't make a re-safety.
Congratulations! You have done it, you have won the safety battle! You have limited his choices to try to play only offense. Here you see, the opponent will need to bank the 3 ball to get a chance of a safety, or hit the 3 ball thin, and in both cases the balls will need to travel very far which makes accuracy lower. His chances are far bigger to try to make the ball instead, and this is only about 20%. If he makes it, there is a possibility to scratch in the corner, so he will try to shoot the shot harder and will lose position on the 4 if he makes it. Shooting harder on the 3 also helps to get the 3 ball far away from the cueball in case he misses it. Chances of him making a lucky safety is about 4%, and even then you probably can make re-safeties by kicking. So planning ahead is very important and will make you win matches. Don't just leave the opponent a safe that you planned, try to make that shot even harder. Try little nudges on balls and try to make the cueball travel few cm or mm differently, even if you are not as good and the shot is a 1% possibility to succeed. In the long run this will be an advantage. Always try for perfect position. As in the example in the last safety, try to get the 3 ball in a place where if the opponent makes it, he will scratch. Webmaster: pmsi@chello.se ICQ number: 111112016 Site design by
|