
Skis part 2: Cycling the
skis
Page 1 2
3 4
PAGE THREE - Rotating the skis - Animating CUBE
So now we will rotate the skis. At this stage you might be confused by the terminology, since I will use the bones names. Do not hesitate to refer to the schematic view. On a brighter note, in this part we will only keyframe the ski bones.
Go to frame 2 and select ski_R_bone1. Save a keyframe by doing Motion > SaveKey > Object > Rotation > Z.

Click with RMB on the timeslider, and move it to frame 20. Save a keyframe.
Go to frame 0, and this time rotate the bone. Save a keyframe.
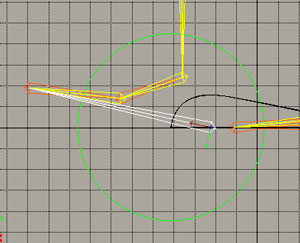
Do Motion > FcrvSelect > Object > Rotation > Z. You should have something like this:

Select the function curve, and do Motion > FcrvEdit > Extrap Mode > Cyle. This will create a cycle with function curve. Edit the curve to make the plateau at flat as possible:

Now let's do the other foot. Select ski_L_bone1.
Save a Z rotation keyframe
at frame 22. Copy this keyframe to frame 0.
Go on frame 20, and rotate the bone. Save a keyframe.
Load the rotation function curve, and make it a cycle. You will not need to
flatten the plateau.

Now we will animate the third ski bone. Select ski_R_bone3.
Go to frame 0, and save
a Z rotation keyframe. Click with RMB on the timeslider, move it to frame 39,
and save a keyframe.
Go to frame 20. Rotate the bone and save a keyframe.

Do this with the other foot.
Select ski_L_bone3.
Go to frame 20, save a Z rotation keyframe.
Go to frame 0, rotate the bone, save a keyframe. Copy this keyframe to frame
39.

Now we will animate the second ski bone. Select ski_R_bone2.
Go to frame 2, save a Z
rotation keyframe. Copy this keyframe to frame 20.
Go to frame 0, and rotate the bone in Z axis. Save a keyframe.

Do Motion > FcrvSelect
> Object > Rotation > Z.
Select the function curve and do Motion > FcrvEdit > Extrap Mode >
Cycle.
Adjust the plateau part to make it flat.
Select ski_L_bone2.
Go to frame 22. Save a Z rotation keyframe. Copy this keyframe to frame 0.
Go to frame 20. Rotate the bone, save a keyframe.
So now we animated all the rotations!
The next thing to animate is CUBE. We will start with the rotations, because if the tranlations are made first there will have to redo part of the translations after the rotations. Start by branch-select CUBE.
6.1- Rotations
a) Y rotations:
The rule is simple. The hips should be rotated on Y axis in the same direction
as the feet. For example, if the right foot is in front, then the right hip
should be in front.

So rotate CUBE
and do Motion > SaveKey > Objects > Rotate > Y. Copy this keyframe
to frame 39.
Now go to frame 20. Rotate CUBE to conform to the
rule: the hips point in the same direction as their respective foot. Save a
keyframe.

b) Z rotations:
The rule here is very similar to the Y rotations. The lowest hip is the one
wich the respective foot is in front.
Go to frame 0. Rotate CUBE in Z, to reflect this rule, and do Motion > SaveKey
> Objects > Rotate > Z.

Copy this keyframe to frame
39.
Go to frame 20, and rotate CUBE in the opposite
direction. Save a keyframe.

c) X rotations:
Finally, we will animate the X rotations differently. Now, each time a foot
touches the ground, CUBE is leaning forward. Between
each time a foot touches the ground, CUBE is leaning
backward.
Go to frame 0. Rotate CUBE to make it learn forward,
and do Motion > SaveKey > Objects > Rotation > X.

Copy this keyframe to frames
20 and 39.
Go to frame 10. Rotate CUBE to make lean backward,
and save a keyframe.

Copy this keyframe to frame
30.
You can playback the animation, since we are finished with the rotations.
6.2- Translations
a) Y translations:
Translations are keyframed in a very similar way to the X rotations. Each time
a foot touches the ground, the hips are at their lowest position. And between
each step, the hips are at their highest position.
Go to frame 0, and place translate CUBE at the
eight you want (remember, do not make the legs fully extended). Save a keyframe
by doing Motion > SaveKey > Objects > Explicit Translation > Y.
![]()
Copy this keyframe to frames
20 and 39.
Go to frame 10. Translate CUBE on Y axis to move
it up. Again, take care to not make the legs fully extended.
![]()
Save a keyframe and copy this keyframe to frame 30.
b) X translations:
Rule: The hip whose foot is in front has dominance. In other words, when the
right foot is in front, CUBE moves in X negative,
and when the left foot is in front, CUBE moves
in X positive. You should be aware that this movement is very subtle. The keyframe
values should range (in the provided scene) between -0.075 and 0.075.
Go to frame 0. Place CUBE in X negative.
![]()
Save a keyframe by doing
Motion > SaveKey > Objects > Explicit Translation > X. Copy this
keyframe to frame 39.
Go to frame20. This time, tranlsate CUBE in X positive,
and save keyframe.
![]()
c) Z translations:
Rule: When a foot touches the ground, the hips move forward. Between the steps
the hips move backward.
Go to frame 0. Move CUBE in Z positive (forward).
![]()
Save a keyframe by doing
Motion > SaveKey > Objects > Explicit Translation > Z. Copy this
keyframe to frame 20 and 39.
Go to frame 10. Move CUBE backward, on Z negative.
![]()
Copy this keyframe to frame 30.
Finally, we will make some finetuning to CUBE's animation.
With CUBE still branch-selected,
do Motion > FcrvSelect > Object > Rotation > All.
Multi-select each function curves, and do Motion > FcrvEdit > Extrap Mode
> Cycle. This will loop the function curves.
Tag every keyframes that are on frames 0, 20 and 39.
In TAG mode, translate in X the keyframes, to move them 2 frames forward. Be
as precise as possible.

We move these keyframes to match the moment where the feet become flat on the ground. If you remeber, the feet touche the ground on frames 0 and 30, but become flat at frames 2 and 32.
We will do the same for
translations.
Do Motion > FcrvSelect > Clear. This will empty the Fcurve window.
Do Motion > FcrvSelect > Object > Explicit Translation > All. This
will bring the (explicit) translation function curves for CUBE. Multi-select
all the function curves, and click with MMB on FcrvEdit to make looping curves.
Tag all keyframes that are on frames 0, 20 and 39, and translate them 2 frames
forward.
So we are finished with CUBE!
Previous:
Moving the heels
Next: Moving the wrists - Personal touches
