Site hosted by Angelfire.com: Build your free website today!
COIL SPRUNG---Solid Axle Swap Information Page

If your on this page, then you've got the bug too or heard what a crazy SOB I was for hacking up a brand new truck. Well let's try to explain my insanity! I decided to go Solid when I couldn't get any articulation out of my 11+ inches of Independant Front Suspension or (IFS). I was running the Trailmaster 6" kit, Performance Accessories 3" Body Lift, Fabtech's 3.5 inch Coilover, and Alcan 7.5" Leaf Springs. When you run these kits in combination, you end up pushing the front suspension to the limit, and then you start breaking things, usually front cartridge struts. So After replacing my Trailmaster struts 5 times, I decided to be rid of my IFS once and for all. I spent about 5 months researching the Solid Axle Tacomas. I had the choice of building a leaf sprung taco or going crazy with a coil sprung truck. I had been talking and researching with a knowledgable friend who works for a very reputable 4x4 shop here in Anchorage (http://www.northern4x4.com) and with his help we decided to go for it. Knowing the work we would have ahead of us and the time I'd be without a vehicle, I bought a commuter car and finally decided to go for it. I then decided to find an axle that was equal to my Toyota's rear axle which is 61" wide. There are many different Dana44's out there. Many vehicles came with Dana44's stock. I chose to use a Dana44 out of a 1978 F150. It measures 66 inches from WMS to WMS so my front will be wide as hell, but who cares, I'll be rocking and rolling down the trails. I'll add 1" rear wheel spacers later to even the rear out a bit. Below is a Picture of the axle straight from Mike @ www.completeoffroad.com. Once she's put together the front will be 1.5 inches wider on each side then the back.(WMS stands for Wheel Mounting Surface).


Ford F150 1/2 Ton Dana44 Front axle


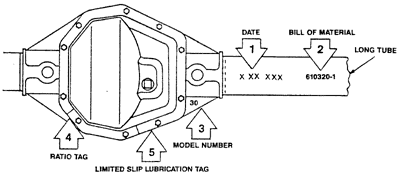
I have found that when you first look for your Dana44, if never dealing with axles before, it's hard to identify it just by looking through the junkyards. So I searched the net up and down to find an ID chart to help us out and finally found one. Here is a chart to help Identify your axle, keep in mind though this may not be 100% accurate.


Differential Identification Charts

Chart Provided by Nationwide Parts (www.Nationwideparts.com)

Dana 25, 27, 30 Dana 28 Dana 35
Dana 44 Dana 60, 70, 80


Dana/Spicer Axle Markings:


Before and after my swap, I tried to gather every piece of information that I thought could be helpful for anyone contemplating doing a Solid Axle Swap. In my search I've talked with many folks and found many useful charts. I'm including this Axle Chart that shows which axles came on which vehicles over the years. I found this to be very useful if your getting a bunch of different answers from friends. It's better to know before you head out to the JunkYards. With the two charts I've provided you should be able to spot your axle and have it off and loaded onto the truck within an hour.

Chart Provided by IWE Rear Ends Only Ltd. (www.iwerearendsonly.com)

Axle Reference Chart

Model: Years: Front Axle: Crown Size: (Inches) Crown Bolts: Cover Bolts: Rear Axle: Crown Size: (Inches) Crown Bolts: Cover Bolts:
DODGE:
1/2 T 4WD 72-93 Dana 44* 8.5 10 10 Chry 8 1/4* 8.25 10 10 CC
1/2 T 4WD 94-96 Dana 44* 8.5 12 10 Chry 9 1/4 9.75 12 12 CC
3/4 T 4WD 94-96 Dana 60* 9.75 12 10 Dana 70* 10.5 12 10 FF
1 T 4WD 94-96 Dana 60* 9.75 12 10 Dana 80* 11.1 12 10 FF

* - Check carrier crown surface height
F - Floating axle
FF - Fully floating axle
CC - "C" clip axle

Model: Years: Front Axle: Crown Size: (Inches) Crown Bolts: Cover Bolts: Rear Axle: Crown Size: (Inches) Crown Bolts: Cover Bolts:
FORD:
1/2 T 2WD 67-83 N/A N/A N/A N/A 9 drop-in 9 10 drop-in
1/2 T 2WD 83-96 N/A N/A N/A N/A 8.8 8.8 10 10 CC
1/2 T 4WD 67-78 Dana 44* 8.5 10 10 9 drop-in 9 10 drop-in
1/2 T 4WD 77-83 Dana 44 rev* 8.5 10 10 9 drop-in 9 10 drop-in
1/2 T 4WD 83-96 Dana 44 rev* 8.5 10 10 Dana 60* 9.75 12 10 FF
3/4 T 4WD 77-82 Dana 44 rev* 8.5 10 10 Dana 60/61* 9.75 12 10 FF
3/4 T 4WD 83-96 Dana 44 rev* 8.5 10 10 10.25 10.25 12 12 SF
1 T 4WD 83-96 Dana 50 rev 9 10 10 10.25 10.25 12 12 FF
Ranger 2WD 83-96 N/A N/A N/A N/A 7.5 7.8 10 10 CC
Ranger 2WD 4.0 90-96 N/A N/A N/A N/A 8.8 8.8 10 10 CC
Ranger 4WD 83-96 Dana 28* 6.575 10 8 7.5 7.8 10 10 CC
Ranger 4WD 4.0 90-96 Dana 35 rev* 7.75 8 10 8.8 8.8 10 10 CC

* - Check carrier crown surface height
F - Floating axle
FF - Fully floating axle
CC - "C" clip axle

Model: Years: Front Axle: Crown Size: (Inches) Crown Bolts: Cover Bolts: Rear Axle: Crown Size: (Inches) Crown Bolts: Cover Bolts:
JEEP:
CJ 5 73-75 Dana 30* 7.25 10 10 Dana 44* 8.5 10 10 F
CJ 5/CJ 7 76-85 Dana 30* 7.25 10 10 AMC 20* 9 8 12 F
CJ 7 1986 Dana 30* 7.25 10 10 Dana 44* 8.5 10 10 F
Wrangler 87-96 Dana 30 rev* 7.25 10 10 Dana 35* 7.75 8 10 F
Cherokee XJ 84-95 Dana 30 rev* 7.25 10 10 Dana 35* or 8.5 10 10 CC
Dana 44* 8.5 10 10 CC
Comache XJ 84-91 Dana 30 rev* 7.25 10 10 Dana 35* or  7.75 8 10 F
Dana 44* or 8.5 10 10 CC
AMC 20* 9 8 12 F
Grnd Cherokee 92-96 Dana rev* 7.25 10 10 Dana 35*or  7.75 8 10 CC
Dana 44* or 8.5 10 10 CC
Chry 8.25 8.4 10 10 CC

* - Check carrier crown surface height
F - Floating axle
FF - Fully floating axle
CC - "C" clip axle

Model: Years: Front Axle: Crown Size: (Inches) Crown Bolts: Cover Bolts: Rear Axle: Crown Size: (Inches) Crown Bolts: Cover Bolts:
TOYOTA:
2WD 69-96 N/A N/A N/A N/A 7.5 7.5 10 drop-in
2WD 1T or V6 69-96 N/A N/A N/A N/A 8 (V6) 8.1 10 drop-in
4WD 79-85 8 8 10 drop-in 8 8 10 drop-in
4WD 4cyl. 86-96 IFS 7.5 7.5 10 8 8 (V6) 8 10 drop-in
4WD V6/turbo 86-96 IFS 7.5 7.5 10 8 8 (V6) 8.1 10 drop-in

* - Check carrier crown surface height
F - Floating axle
FF - Fully floating axle
CC - "C" clip axle

Model: Years: Front Axle: Crown Size: (Inches) Crown Bolts: Cover Bolts: Rear Axle: Crown Size: (Inches) Crown Bolts: Cover Bolts:
GM:
1/2 T 2WD 64-81 N/A N/A N/A N/A 8.875* 8.875 12 12 CC
1/2 T 2WD 76-96 N/A N/A N/A N/A 8.5* 8.5 10 10 CC
1/2 T 4WD 67-77 Dana 44* 8.5 10 10 8.875* 8.875 12 12 CC
1/2 T 4WD 78-87 Corp. 8.5 8.5 10 10* 8.5* 8.5 10 10 CC
1/2 T 4WD 88-96 IFS 8.2 8.3 10 10* 8.5* 8.5 10 10 CC
3/4 T 4WD 78-87 Corp. 8.5 8.5 10 10* 10.5* N/A 12 14 FF
3/4 T 4WD 6lug 88-96 IFS 8.2 8.3 10 10* 9.5 9.6 12 14 CC
3/4 T 4WD 8lug 88-96 IFS 8.2 8.5 10 10* 10.5* N/A 12 14 FF
1 T 4WD 77-91 Dana 60* 9.75 12 10 10.5* N/A 12 14 FF
1 T 4WD 92-96 IFS 9.2 9.3 12 11 10.5* N/A 12 14 FF

* - Check carrier crown surface height
F - Floating axle
FF - Fully floating axle
CC - "C" clip axle

First, you must remove all the IFS components. Once those are removed and your work area is clean, you can begin to cut off the old IFS mounting hardware that are welded to the frame. Be careful if you use a torch, excessive heat on your frame can cause areas to become brittle. Below is a picture of the frame rails before I removed the stock IFS frame mounts. And yes, I used the infamous SAWZALL, and then grind, grind, grind....

Here's a fuzzy picture of the stock frame rail and IFS mounts!


Next you must either torch off the IFS frame hardware or another cutting device. Then plan on spending some time grinding down the rough edges. If you want it to look perfect, take your time. In this picture I still have one crossmember to cut off. In time it'll come off.

Here's the rail almost finished.


Next I needed to either make or buy control arms. I chose to buy some. I went with Extreme Duty Arms from Rubicon Express. Ed Angel hooked me up at Northern 4x4. Rubicon makes a kick ass stout long arm kit for the Jeeps that allows you to run a 3 or 4-link suspension.

Here's the Rubicon Express Extreme Duty Long Arm!


Next I needed to make brackets to attach the arms to the frame. After a couple of tries I decided to go with a partial sleeve that would surround the inside of the frame rail. The sleeve goes from the inside of the frame out. It's made of 1/4" x 5.5 x 8" steel I had bent to fit snug around the frame. From there I also had another "U" bracket made for the arms to slide into. This sleeve will go directly under the frame and attach to the frame sleeve I made via three 1/2 x 8" Grade a bolts that go through both brackets and the frame. Here's a picture to help show you what I did.


Next I wanted to do a high steer setup. For a true high steer you need flattop knuckles. I went to Dean's Auto Salvage in Anchorage and found the FLATTOP graveyard. I saw about 40 set of flattop knuckles there, a goldmine for many. I found a full size dodge high pinion with right and left flattops as well as the tierod. For $100 bucks I couldn't pass it up. Here's a pic. Keep in mind everything get's sandblasted, primed and painted.

Here's a picture of the Knuckles.


In this picture you see my finished flattop knuckles with avalanche high steer arms, I had to have the right side milled, drilled and tapped to match the left. They came out really nice and new looking!! There are many options for high steer on the market today, for the mild wheeling I'll be doing the Avalanche arms should be strong enough. We'll see!!

Here's the knuckles!


In this picture you see The T100 oil pan I had to install. This is a rear sump vs. the front sump the taco originally came with, thus allowing the capabilities of high-steer.


Next I wanted to show you the knuckles and the high steer arms.


Next I wanted show you all a little peak of the massive gutting of the interior and my new concept for waterproofing. I will also be showing the truck at sound competition's and truck shows when it's back on the road. Below I will include some pictures of the Neoprene Seats, then the neoprene doors, followed by the black carpet, kickpods and amp rack. I also did the headliner in neoprene but have no pictures as of yet. I needed to cut out all the spots where amps, crossovers and fuse blocks will be visible. When finished all you'll see is the components against a nice black backdrop. Up high and away from water was my goal. I have a lot of experience in redoing interiors, so let me know and I'll provide assistance in any way I can.

Here's one of my seats.


Here's a good picture of the door, it came out great.


In the picture below you can't really see the carpet, but the kickpods have just been sprayed with a black vinyl dye.


In this next picture, your looking into the X-cab up at the roof. The two amps and fuse block will be the only things seen through the headliner once it's installed.


Next I wanted to show you the headliner and racks all mounted up. Out of waters way.


Here is a quick picture of the interior stereo and switches.


Next you'll see the shocks I'm using as the main component of my Coil-Over setup. I chose KINGCOILS. They are a 12" piston with a 300 rate upper spring and 350 rate lower. They stand about 3.5 feet tall. Once you recieve your shocks, you should have them tested at a local shop that can fill nitrogen, mine were shipped through USPS and they came filled. The shocks may seem full but check before you run them. They also look and ride perfectly without adding a sway bar.


Next is the picture you've all been waiting for, the upper king mounts. Black Diamond made a kit for the Jeeps that used a similar weaker mount. I used their design and tweeked it a little using 1/4 steel. In this picture you can plainly see how I constructed my mount and why it's taken me so long to complete my swap. These mounts are two peices of steel, laser cut and bent, then welded together. It lays against the outside of the frame as well as sitting on top of the frame rail, boxing it in a "L" fashion. TC and I then drilled through the mount and frame and sleeved it. Perfect fit for the 38's.

Next I wanted to show you the Shock Mounts all finished bolted up with the coils all finished.


Next I would like to show you all the engine brace that connects the two coils mounts together. This is just a little extra to keep those kings from bending inward and tearing the frame rails. This is removable by taking off 4 bolts.


I'd like to show you my bumpers. My friend Stephan welded me up the rear bumper using a 4x6 piece of steel and it's stout. Very clean and it's even knotched to fit into the body slot in the back of the toyota. The other picture is my ARB front bumper. I have an XD9000 Warn that I have mounted on it with internal controls in the cab.


Next I wanted to show you the picture of the sturdy yet controversial clear gearz cover, maybe it's for poser but I really don't give a shit, I think it looks cool.....


Next is a picture of the Tie Rod I made, I used 120 DOM with a 1"I.D. This allowed me to insert a 1" peice of solid stock through the center making it a little stronger.

Here's the tie rod and a close up of the avalanche ends ready for the final welds!


Here the suspension. I have all the templates if needed.


Next is a picture of the upper portion of the King mount, this picture shows how TC and I made the upper cages for the bolts to go through.


Next I needed to make some lower mounts for the king to attach to the axle. I found some lower mounts at Northern 4x4 (http://www.northern4x4.com) and saw these mounts on the wall. He said they went to another kit and if I wanted them to take em. I DID. I drilled a 1/2" horizontal hole through each mount, measuring and checking to make sure the coil wouldn't bind or hit anywhere, then mounted them. Once everything was final, I welded two 1" beads on the mount.

Here's the close-up.


Next is the picture of the left side, suspension. Here you can see the upper left arm mount on the top of the pumpkin, the lower mount under the axle, the lower shock mount and the Kings at there appropriate angle.


The next picture shows an extreme close-up of the right upper axle mount. You can see how TC used tubing, then reenforced it on each side. I had to make every bushing for the front, due the customization (if that's a word). Very tight, the welds were very thick and all axle metal was preheated to 400 degrees.


Next is an extreme close-up of the left upper axle mount. This mount was very tricky to make due to it's location. We used tubing once again and then bent the bottom in, notched it to follow the casting, then proceeded to reenforce the front and back. Again, you must preheat for a strong weld. By March04 I should have this mount replaced with Rubicons left mount that has a plate that goes on both sides of the diff and then a mount is welded to the top.

Here's the pic!


And lastly, for right now, is a picture of the mounted rear frame mount and bracket. In this picture you can see how I had flatplate bent into a "C" channel and then boxed the inside of the frame. I then did the same to the lower portion just wide enough to slide the arm up into. Then I drilled three holes through it all straight up through the frame rail and bolted. This isn't going anywhere. This weekend we'll be boxing in the back after I cut a nice factory looking angle.


I'll have more pictures soon. I'm in the process of painting the entire frame and setting the steering. So check back!! .......L8's

Here's a IFS picture from the early days before she went under the knife.