
| Chapter 7 |
| Fuselage Exterior |
Well this is it!! After I am done with this chapter I will have something that looks like a fuselage. There are some big layups on this and a lot of foam cutting sanding...Did I mention how much I hate sanding??? There seems to be more to sand with every chapter, and I really don't look forward to doing any of it!
Here I started by building the NACA scoop from thick urethane blocks. This was painless, however the sanding that followed was very messy. I took a hacksaw blade by hand and chopped large portions away and sanded, sanded, sanded...Urethane sands quite easily and is very soft, almost fun to sand, when you aren't sanding inches away. After a long while I had a very nicely shaped scoop! The scoop between the two aft bulkheads are built from 3/8" PVC foam and a little birch plywood. I assembled this quite quickly the biggest problem was determing the correct size plywood to cut. I realized after the blocks were in place that they were a little big, this created a lot of extra sanding. Once the entire scoop was built it was time to glass it. There is an infamous joggle in the landing gear area that has caused many a builder to cry. I was ready for the worst when my time came. However, I was very lucky as everything worked according to Nat's plans. A little saran wrap worked wonders.
The time for rounding the bottom had come. Run the jigsaw down the sides, and then sand to shape. To get the shape just right and to make it go fast, I came up with this idea: I bought an inexpensive Rubbermaid 1 gallon pitcher from WalMart, and cut out the section 2 inches from each side of the handle. After that I heated the cutout portion in the oven at 350 for a few minutes until it was plyable. I used the forward part of F-22 to form the plastic to the correct curvature. Contact cement and sandpaper, and I was sanding a nice curve. I installed the RST antennas and brought all the wires through a sincgle point. I have very tiny bumps where the toroids are because they were larger than the foam depth (don't forget to lable those wires!!). Glassing the bottom was easy but time consuming. To help save time I decided to lay both plys down and pour epoxy on. This did not work as well as I had hoped, and I ended up with my dryest layup yet. It meets the criteria, but I am in no way happy with my work here, and from now on I will do one ply at a time.
Sides were next. First cutting the canard clearance/mounting point. It was very emotionally straining to cut through the top of the longeron, a slip up here could cost big time. But I managed, cutting and rounding the top was next, this was easier than the bottom, but still a lot of sanding...Ughhh! Finally time to glass, the sides were easy, but again some long layups, each side took about 4 hours start to finish, no cleanup (that is glass laying...no sanding).
In this chapter I manage to forget to install the hardpoint inserts for the LG cover in chapter 9. A note to Nat told me that I would be okay, just install them now and cover with 1 ply bid. Whew!

|

|
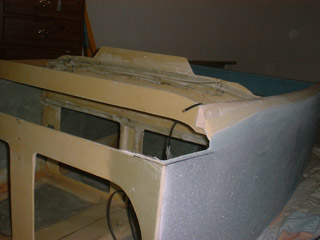
| Bottom corner of Fuselage before rounding | Urethane foam for NACA scoop |

|

|
| Bottom of Fuselage skinned (RST antennas installed) | NACA Scoop complete |
|

|
| Canard cutout | Both Cutouts |

|
|
| Fuselage Tub Complete! |
