
Kites as powered parachutes
Kites as paragliders - Part One
AUTHOR: aprivate
|
|
Specifications:
approximately $150.00
|
Introduction
Flying very LARGE paragliders always brings an interesting
change of
pace to any flying site. Here in Part 1, I am going to talk about
using kites as paragliders and in part 2, I will review the more expensive
purpose built R/C paragliders. This is an article meant for the experienced
modeler and is meant as a guide to prevent unnecessary crashes and
unpleasant events linked to using an airfoil that is non-rigid.
Starting out
Recently I purchased an electric para-glider kit which
turned out to be a kite.
The kit was purchased from http://www.powerglider.com
The kit was package with aluminum struts and is designed to grip
a 7 Cell
pack with Electric Speed 500 motor and a Master airscrew 3.5.1
gearbox
and 12x8 folding prop. No landing gear is included with the Electric kit. The
kit
is suppose to go together as one functional unit using nothing but wire-ties.
This
makes the contraption very very light.
The original kit required that the user hand launch the glider
and to be beware
of the prop at the same time.
I decided against this idea and went ahead with the design of a
gondola with
4 wheels so that an ROG is possible. The gondola was designed by Jimmy Andrews
who also designed the dolly on http://www.singaporerc.com.
The gondola can be used
later to carry payload.
Construction
We will start by talking about the construction of the gondola,
which is a standard payload
which will hang below any large kite.
|
|
|
|
Basic Structure |
populated structure |
The initial idea was that the main body should be as near
the ground as possible and this allowed us to have more
stability during landing. Unfortunately the wheels were attached directly to the
metal frame and this caused the
gondola to tumble in landing because landing shocks were activated randomly at
each wheel. We figured that
by adding model car springs, we can fix this problem. Unloaded, it weighs in at
500 grams (18oz).
The gondola was built with a combination of POP RIVET tools
and LOCK NUTs and metal screws types with a bit of
plain shoulder and threading.
|
|
|
I did a quick retrofit and added 600 grams (21 oz) by using
heavy landing gear, but this reduced the tumbling because
the flexibility on the landing struts absorbed most of the landing stresses. We
will go back to the original design
at a later date because it is very much lighter.
The motor mount is simply a bend in the aluminum using another solid aluminum rod. 2 Slots were cut to thread a hose clip. Double sided tape was used to protect the motor where the hose clip grips the motor.
Do not fill the gaps in the gondola, strong winds blowing
against the gondola's bottom may cause the device to become
unstable.
It is best for the prop's thrust line to be below the hang point of the kite. This is so that we are pushing it into the air with a good high angle of attack. I think the position of the thrust line affects the overall efficiency of lift , the kite may lift easier with a lower thrust line that a higher one but since I don't want my prop blades to hit the ground, this will have to do.
Direct thrust is required, no side thrust up or down thrust is
wanted at this time. However you can always try
and report it to the Ezone or to me if you find anything positive.
The next step is to start making your control gear. You make your servo arms out of K&S flatten aluminum
tubing and a servo horn The aluminum extension arms are about 3 inches long. You
must SAND the servo horn
to fit into the aluminum extension arm.
Note: the picture shows JR LARGE horns. Large Dubro Horns can
also be used however after flying, the JR and Dubro horns sometimes break if you tumble the gondola.
I now recommend MODEL CAR METAL or NYLON servo arms. Change your
servos to metal gear to
prevent stripping the gears.
|
|
|
Eventually the servo arms look as shown. The hole is on the
upper edge of the metal horn to facilitate the gripping
by the small fishing clevis. Servos are
attached to double sided adhesive tape and strapped down with a wire-tie.
The hang bar is where the kite will attach it's bridle to the
gondola. It is the point that bears all the weight. In our
case the hang bar is about 1 feet wide and bent at angle of 20 degrees. No need
for real precision here, as long
as it looks right and it is strong, it will be ok.
The bridle of the kite is attached to a fishing swivel and clevis and the
steering lines are threaded through a
landing gear collar onto the servo arm. The collar is to keep the same tension
steering line.
for best results, sand down the screw in the collar so that it does not cut the steering lines
and use LOCKTITE liquid on all threads.

A is from the steering attachment on the kite, and is threaded
through
the clevis B and is secured onto the servo C arm via a small fishing
clevis.
Kite Preparation
Before we attach the kite, we need to identify its components

Kite components figure
A = Steering clevis,
B = main hang point for the kite, (Bridle loop)
C= Collar to be mounted onto hangbar
Unused
(Note , Lines attached to steering clevis A is also known as BRAKE LINES)
The main component of any foil kite is the foil and the bridle.
In our case we need to SEW
the steering lines onto the kite. This is attached to the midpoint of each
half of the kite.
you can also pull the kite winglet which is like a vertical stabilizer , located
at the tips
of each kite. Pulling on these parts causes the kite to stall and lose lift on
this part of the foil.
consequently the side that is not stalling continue to provide lift, turning the
kite.
For further study check out the real thing , read their
tech notes on steering and CG
http://www.paraplane.com/
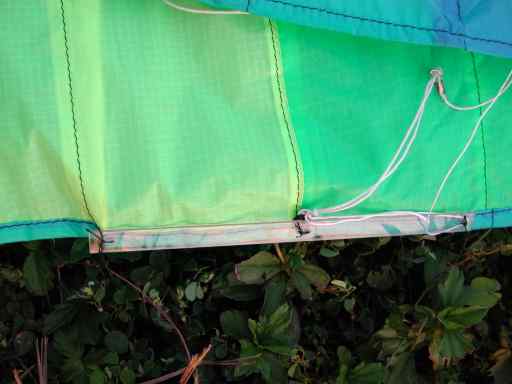
The steering line attachment point is shown with a plexiglass
rod that I purchased as an option from powergliders to
make the kite turn more acutely. You need to sew this rod into the kite. For
safety , CA all knots after sewing on
the plexiglass so you can cut it off later if so wished. The steering line
is made using special fishing line or spectra
line (available from kite shops) and is thinner than the bridle lines. The
length should be 5-6 inches longer than the
bridle line so that it can reach the servos arms.
 |
 |
Here is the whole contraption with the kite attached. The kite
bridle is attached to the hang bar
control line clevis is threaded via the collar and onto the metal servo arms.

In order for a kite to fly properly from a big gondola like
mine, the middle 4 cells must
be taped up with masking tape , slashed open or cut away. Failure to do so will
result in
uncontrollability with the gondola swinging VIOLENTLY in ALL DIRECTIONS.
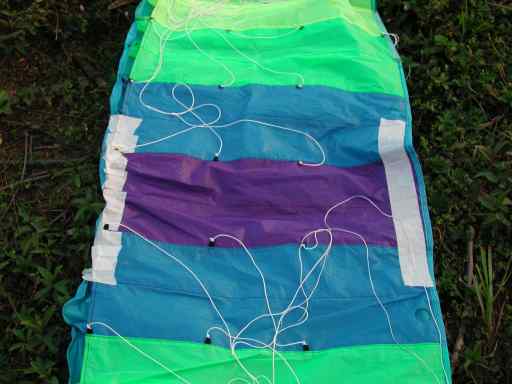
Middle 4 cells taped up. If you still have control problems
try taping up ALL the outlet holes while leaving the inlet
as is...
Power System
Kontronik brushless KBM 40-30 with 3.7:1 gearbox, reversed. 65 AMP BEC
controller.
7 X 2000 ah cells
Topflite 11x6 GAS PROP mounted backwards
Fasten the motor with 2 pieces of double sided tape
and a hose clip. Cut off excess metal of the
hose clip and sand it so that it is not sharp.
Using this system we flew for more than 7 mins, I was not
noting down the time during this experiment
However now , I recommend a 12x8 or larger prop and more
cells for a brushless motor system,
This will be more efficient and can push the kite at lower throttle. When
you are up there you can
cruise at low throttle settings.
Radio Setup
Attach a deans short antenna to the receiver, so that the receiver wire does not snag the prop.
Face the gondola so that the prop is pointing toward you
Set neutral position for the servos and screw in the servo
horns + control
arms so that
they are 30 degrees angled UP.
Make a right turn motion with your control
stick. The Right SERVO
should PULL DOWN
and LEFT move UP (no pulling force)
Vice versa for the LEFT TURN. So Pull down left
side is left turn and pull down right side is
right turn.
When you PULL the elevator , both servos must PULL DOWN, this
is to experiment
'flaring' with the kite. It may never be used in actual
flight, Take the KITE UP high and
try this to see what happens.
Make sure that control movements 2 and 3 will be able to pull
on the chute, if there is too much slack,
reduce the 30 degrees angle at neutral positions. It is NOT important to do step
1 as I
have set it.
Step 1 is important to me because I don't want to break my servo arm during a hard landing.
So keeping both
up would minimize this.
Pre flight check
CA all critical knots on the kite.
Check that motor is secure and cannot be moved by hand
Check motor thrust line is neutral, if not grip the motor
mount and bend it manually
or adjust the motor.
Check that all lock nuts are tight
Hold the gondola by the hanging clevis and make sure the
gondola is a little
tail heavy say 2 degrees
Check the wind direction and make sure wind speed is approx 6-10
MPH
If the wind causes the kite to inflate fully and nearly
trying to take off on its
own, you better wait for the evening so thermals will
hopefully die down.
Place kite and gondola facing into the wind, do not
face into crosswind.
Lift the chute so that it is now sort of lifted in the wind,
apply power gradually
When the gondola starts to move forward, increase power to
full power gradually
Gondola will lift off, don't panic, let it climb and if there
is some turbulance, power down
5 percent at a time. DO NOT TURN until it's at least 20
feet in the air.
NOTE that there will be a LAG TIME for the kite to respond
to controls and to
settle down.
Remember to GRADUALLY MOVE all controls. This may be fixed
with
Exponential settings later.
Flying
The kite will turn slowly once the control stick is MOVED
GRADUALLY. Remember that
there is a LAG TIME between control inputs and the kite's flying behaviour.
DO NOT LET THE CONTROL STICK SPRING BACK, Let the control sticks
come back
to neutral by the force of your fingers. If you don't do this the kite will
swing violently and cause
the gondola to oscillate horizontally.
Always throttle down gradually, any sudden loss of power from the prop
will cause the gondola to
swing backwards losing lift.
Exponential curves are great when flying a kite. So bring
them in only after you are
familiar with the kite.
Pulling on the elevator causes the kite to FLARE a little. You
will need to experiment
more on this yourself..

Watch the video (MPEG 1 mb)
Performance
Performance of a KITE forced into a powered parachute has its
problems. The Kite must
be flown faster than a specially designed airfoil for cruising in the air, its
sort of like having
lots of drag caused by poorer air flow.. You also need to slash the 4 or
more cells
in the middle open to ensure controllability.
You would have to expect shorter flight times compared to a
specially designed
parafoil for powered use.
Technical notes:
Props
Because you are flying a sort of puppet on strings, there seem
to be lots of movements
in flight in all 3 dimensions. I tried MASTER AIRSCREW ELECTRIC PROPS
and these caused me to have a very hard time controlling the kite because of the
UNDERCAMBERED nature of the props.
When the gondola swings from side
to side a little , the prop could have stalled
or the prop will cause the horizontal movements to become too great because
of the huge amounts of thrust it generates. This is compounded by the lag time
of the behavior of the kite with your control inputs.
Take off current with a 11x6 gas prop was 15 AMPS
approximately 120 watts
as measured with the astro whatt meter.
There should be no debate on whether the topflight
prop was a proper 'pusher prop'
as long as there is a clear path behind the prop, any prop can be
reversed into a 'pusher' prop
and still be efficient.
Motor Choice
Always try to use brushless motors as powered kite flying
demands lots of constant thrust.
Brushless motors can also be used with a larger number of cells than is
needed. This will give
you and extra safety margin and the extra cells can provide a longer cruise when
used at
less than full throttle as the brushless motor is highly efficient all round.
Choosing a kite
Some kites have NO outlet, only Inlets, so you may be prepared
to cut holes later.
Whatever kite you choose make sure you realize that you
MAY need to cover up 2 or more of
the middle cells thereby
reducing lift in exchange for controllability, so generally I'd
go for a
bigger kite with 4 or more cells than what I'd really
want.
Also look out for kites with cross vented cells. This Megafoil
kite has crossvented
cells which allow the kite to stay afloat in irregular winds.
Thanks to Airfoil Aviation for the advice on taping up the 4 middle
cells.
I crashed 8 times before I stumbled onto http://www.airfoilaviation.com
Covering or cutting away the cells will allow
air to escape so that when the
kite rams forward, it does not get caught by the air trapped in the 4 middle
cells.
Always test with low wind speed first. Once you are able to control
the kite you try in
stronger wind speeds. Most of these kites are designed to pull people and do stunts and is designed to
operate at wind speeds of 6 to 20 mph. Choose a flat area with no trees or buildings.
trees in the far background may help to block stronger winds but may cause
turbulence.
For test flying, I'd say 0 to 9 mph as a good rule of thumb. With the kites getting LARGER say
3 meters or more a larger motor and prop will probably be needed to maintain control in stronger winds.
The wind may out blow your prop thrust - Beware, you can always take off but you may never
fly back.

So go forth and experiment, in the future you may want to
experiment with Stacked kites.
This is the stylus 1.8 by Prism. You can stack additional kites on it as many as you like.
I hear some people has successfully experimented with this brand. Note that the
stylus
has INLETS but NO outlets.
Article notes:
I did not fly the original product as it was
recommended
So I cannot tell you how it would have performed as a hand
launched paraglider.
According to the manufacturer http://www.powerglider.com
, it will fly quite
well .
My requirement is for ROG so since powerglider
only provided hand launched
kits, I had to do it myself. Powerglider also produces GAS powered
kits that
has landing gear.
Acknowledgements: -
Thanks to Airfoil Aviation for the advice on taping up the 4 middle
cells.
I have ordered their specialized chutes (WHICH ARE NOT KITES)
and will be doing
an ELECTRIC conversion when I get them.
Useful Links
Purpose designed for R/C
http://www.airfoilaviation.com (Electric and Gas available)
Modified kite for R/C
http://www.cobrakite.com/ (R/C windbag)
http://model.hirobo.co.jp/english/ Direct link to paraglider
http://www.hobby-lobby.com
Direct Link
http://www.hobby-lobby.com/skysurfer.htm
Kites that have promising potential
1) http://www.247kites.com/
Direct Link to stunt
foils
2) http://www.intothewind.com search for the word 'Foil'
3) http://www.eskimo.com/~4winds
Direct Link to parafoils
Very slow site but has all latest selections
4) http://www.cobrakite.com - Their new foils may have potential.
Hardware parts carbon fiber strings
http://citystar.com/hang-em-high/ushop/ (Hang them high)
The real thing
Email contact: aprivate_teo@geocities.com
web: http://www.singaporerc.com


