Diagram showing saw levitating above the guide.
This project is a guide for a circular saw or router. It is the type in which the reference edge is cut by the cutter the first time the guide is used. This means that every time the guide is used the cutter runs along the reference edge. After a couple of years of experience with guides of this kind I have found that a momentary laps can cause the cutter to cut into the reference edge making that part of the edge useless for lining up with a pencil line. Nonetheless these guides remain among the easiest to make and use. If you ruin it you can always declare the wood as scrap and make a new guide.Single Edged Guide.
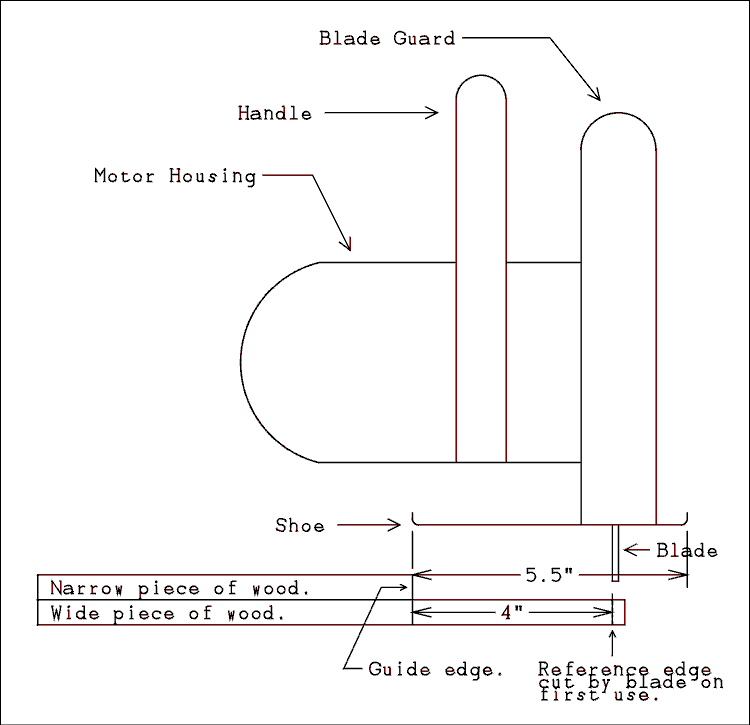
The basic idea is shown in the diagram below.
Diagram showing saw levitating above the guide.
The guide starts with a piece of 1/4 inch plywood or tempered on one side hardboard. It should be wide enough to extend beyond the blade on the side away from the motor, right in the diagram, and far enough beyond the left end of the motor housing to permit the guide to be clamped to the work without the clamps interfering with the movement of the saw along the guide. The dimensions given are for my Black and Decker 7-1/4 inch saw. Yours will be different.
The narrower board should have its right edge far enough from the right edge of the wider board so when your saw is placed on the guide with the motor to the left and the shoe placed against the guide edge, (right in the drawing,) of the narrower board the blade just cuts off the right edge of the wider board making the reference edge. The left edge of both boards should line up.
The length of the two boards depends on whether you want to cut across the 4 foot width of a sheet of plywood or along the 8 foot length. I suggest making it 5 feet for crosscutting. Unfortunately there is no way to make it 9 feet for ripping the long way. I have two, one 5 feet long and another 8 feet long.
I recommend that the narrower piece be 1/2 inch plywood. On all the saws I have the edge of the shoe is not sharp but is curved where it was bent. It would tend to ride up over 1/4 inch sheet goods. This may slightly restrict the lowest setting of the blade as the motor hits the narrower piece of the guide. This should not be a major problem with a 7-1/4 inch saw although there may be some cuts that can't be made with the guide and a 5-1/4 inch saw.

Diagram Showing End View of Double Edged Guide.
A double edged version can be built for two different saws or for a saw on one side and a router on the other. Whether single or double edged it must be clearly labeled so you will know which saw or router and which blade or bit the guide is intended for. The guide edge that the shoe of the saw or base plate of the router rides against must be smooth and perfectly straight. If you use hard board for the bottom piece it should be smooth side up. Placing the rough side against the work will help prevent slipping although clamps will still be necessary. If you really trust the non skid properties of a router pad you can glue a piece to the bottom of the guide.
Mark a line where you want to make the cut. If at all possible clamp the guide to the work piece as opposed to the scrap piece. Position it so the edge of the guide is splitting the line.
Note: If you have clamped the guide to the scrap piece you must allow for the width of the kerf. For a router you would have to allow for the diameter of the bit.Run your machine along the guide. Be sure to put the edge of the saw shoe against the guide edge and on the bottom board of the guide. Do not make the mistake I have made on more than one occasion which is to place the edge of the shoe against the reference edge which makes the cut 4 inches away from the desired cut line.
Blind woodworkers will have to place a finger at the front corner of the saw shoe where it is in contact with the center part of the guide to make sure that it does not drift away from the guide edge. For most saws the finger will be at least 4 inches from the blade. Such action is not usually required for a router. The operator can feel when the base plate is in contact with the guide.
Be careful not to tip the saw or router toward the edge of the guide. This will cause the cutter to move inward and cut off a small part of the reference edge of the guide. This will not effect the line cut by the saw on subsequent uses because the machine is guided by the center piece of wood not by the edge. But with part of the edge cut away this part of the guide can no longer be used to line up the cut.
No matter how careful you are this is going to happen eventually. If this is a double edged guide you may want to mark this edge as unusable and continue to use the other edge. You will have to make a new guide so instead of having two guides taking up space in your shop you might as well write the old one off and make a new guide.
If it is a single edged guide it can be recovered provided that the other edge of the guide is straight and smooth. Adjust the height of your table saw blade so when the guide is placed upside down over the blade with the guide board resting on the table it will just nick the part of the guide that the saw or router rides on when in use. Adjust the fence so when the other, not the reference, edge is placed against the fence the blade will take off just a little less than a kerf width from the guide edge. Use two push blocks to run the guide through the saw and nick off a little of the guide edge. Now re-trim the reference edge of the guide and it is good to go again. You can repeat this until you run out of room to clamp the guide without interfering with the saw.
I do not recommend either of these for blind woodworkers. The guiding finger will have to be within 2 inches of the spinning blade which in my book is too close for comfort. If the motor housing gets in the way figure out another way to do it. Don't risk a finger.
Back to Woodworking Projects Page.
This page last updated April 30, 2012.