For a verbal description click here.
A Simple Way to Test Capacitors.
I wish I had a dollar for every time I have heard or read "I tested the capacitors and they all test good but it still doesn't work." The person doing the speaking or writing had used a modern capacitor tester which only puts about 3 volts across the capacitor. That may be fine for caps used in transistor circuits but not for those used in tube circuits. The voltages in tube circuits can be as high as 600 volts and rarely are less than 100 volts. To perform a valid test you must place a significant voltage across the cap. After giving some preliminary information a method will be provided for making valid tests on capacitors.Types of Capacitors.
There are two basic kinds of capacitors, electrolytic and nonelectrolytic. Electrolytic capacitors are used in the power supplies of vacuum tube and transistor equipment. The testing method described here requires a modification to the basic testing method discussed below.The non-electrolytic caps are subdivided into ceramic, paper, mica, and plastic. The plastic kind are further subdivided into various names of the plastic and all of them seem to begin with "polly". I'm not going to bore you by laboring through each of the various pollies. The next time you order capacitors from a catalog or online you will make their acquaintance.
Common Capacitor Troubles.
The most frequent failure mode of nonelectrolytic capacitors is to become leaky. They behave as if a large value resistor, 100 k ohms or higher, has been connected in parallel with the cap. As these types of caps are most frequently used to block DC from getting to a particular part of the circuit when they become leaky they no longer perform that function.For example in a standard circuit arrangement a cap is used to couple signal from the plate of a tube to the grid of the next tube. The DC which is also present at the plate of a tube is most definitely not wanted at the grid of the next. A leaky cap can send some of the DC to the grid causing lots of trouble.
A leaky cap can manifest itself in several ways. If the grid belongs to an output tube the plate may glow red. The leaky capacitor places some positive DC on the grid which may partly or wholly cancel the negative bias. This causes the tube to draw too much current and the plate has to dissipate more power than it is rated for. To get rid of the extra power it rises to a higher temperature and gets hot enough to glow red. This is never a normal condition. If the coupling cap is between low level stages, further back in the amplifier, the resistance in the plate circuit will keep the tube from dissipating enough power to glow red but the sound will be badly distorted. You can often verify this using a voltmeter to measure grid voltages. Tubes that use cathode bias should have zero volts on the grid. Tubes which use fixed bias should have the negative voltage on the grids and in the case of a push pull output both tubes should have the same grid voltage.
There aren't many places where even a small amount of leakage can be tolerated but there are a few. Often a capacitor is connected from some part of the circuit to ground. These are usually called "bypass" capacitors. That's not a special kind of cap, just the way it is being used in the circuit. If the resistance associated with the cap is not too large it can work for many years with a small leakage current. If it is a screen bypass cap it may lower the screen grid voltage and lower the gain of the amplifier stage. A leaky cap in the AGC circuit of a receiver may or may not have a significant effect on its operation.
Electrolytic capacitors can fail in one of two ways. One is to be open. The capacitance is reduced to a very small value because the electrolyte has dried out. It will no longer provide filtering and the symptom will be a strong AC hum in the radio or amplifier.
The other failure mode is to conduct a heavy current when the operating voltage is applied. This will blow the power supply fuse if the equipment has one. In an all American five radio such a capacitor will burn out the rectifier tube. Note that such a capacitor may test as good on a tester intended for transistor electrolytic capacitors.
One more failure mode of capacitors is to develop a series resistance. This is abbreviated ESR which stands for effective series resistance. This failure mode is difficult to test for using simple equipment such as is being discussed in this article. It happens much more often to electrolytic than to plastic film capacitors. In a power supply it will manifest itself as increased ripple in the power supply but the capacitor will test good using the technique described on this page.
Making the Test.
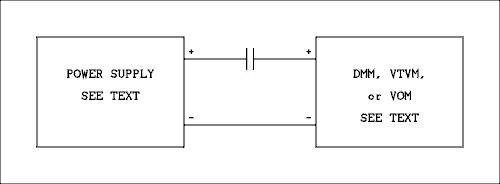
This is not an in circuit test. You must at the very least disconnect one end of the cap. If you are using a DMM or VTVM and you leave one end of the cap connected to the circuit it is possible that some interference can be picked up and throw the readings off. Here is the test circuit.
For a verbal description click here.
The power supply should provide a fairly stable DC output. The meter should be set to measure DC voltage.Power supply voltage.
The power supply doesn't have to be adjustable but things may be easier if it is. It needs to be matched to the capacitors to be tested. If you have a 600 volt power supply, you can only test 600 volt, and higher, capacitors. If you have a 400 volt supply, you can test 400 volt, and higher, caps. If you have a 200 volt power supply ... I think you get the idea. Most coupling and bypass caps are 400 or 600 volts so in the example below a 400 volt power supply will be used.Type and Range Setting of the Meter.
If you use a 20,000 ohms per volt VOM set to the 500 volt range its input resistance is 10 meg ohms. That's the input resistance of most DMMs and VTVMs. Before you use a particular instrument be sure you know what it is. If you have a DMM or VTVM that has a 100 or 1000 meg ohm input resistance you can connect a 10 meg ohm resistor in parallel with it. If you have a 1000 ohms per volt VOM you can't use it, it's not sensitive enough.Match the range setting to the power supply. I use an adjustable power supply set to 400 volts and a VOM set to the 500 volt range. Remember that the resistance of a VOM changes depending on the setting of the range switch. If you are using a 200 volt or 600 volt power supply set the range of your meter accordingly. The meter should always be set to a range higher than the voltage of the power supply. That way even if the capacitor is a dead short you won't do any damage to your meter.
If you are testing an electrolytic capacitor connect a 220 k ohm 2 watt resistor in parallel with your meter.
Making the Test.
In the following it is assumed that the power supply comes on instantly when the switch is thrown. If it does not because of the warm up delay of a rectifier tube you need to connect a switch in series with the capacitor so you can apply the voltage suddenly.Connect up the circuit and set the meter to the proper range as explained above. If the meter is a DMM or VTVM turn it on and let it warm up. Then turn on the power supply. The meter will show a high voltage for a short time but the reading will decay to zero vary quickly.
The time back to zero is about 8 time constants. One time constant in seconds is equal to R in ohms times C in farads. If you are using a meter with 10 meg ohms input resistance and testing a .1 microfarad cap the time constant is 1 second. If the capacitor is good the meter should indicate zero after 8 seconds.
If you are testing an electrolytic capacitor calculate the time constant from 220 k ohms times the capacitance in farads.
If the cap is totally shorted the meter will read the output voltage of the power supply and stay there. A more likely outcome is for the cap to be leaky. In that case the meter will kick high and fall back but not all the way to zero. Using a 10 meg ohm meter the leakage current in microamps is given by I = V / 10. A cap with a leakage current of only 1 microamp will throw the bias off by .5 volts if the grid resistor is 500 k ohms.
Switching the meter to a lower range should be done with caution. If you should forget to change it back you could burn out your meter.
If the meter fails to kick high it means one of two things. Either the capacitor is open or the capacitance is too small to produce a noticeable kick. A .01 microfarad cap is about the smallest that will give the kick. Of course this depends on the response speed of the meter movement. You might be able to go as low as .0025 microfarads if you have a small and fast meter.
If you connect an electrolytic capacitor to the tester a direct current will be observed which will never go to zero. This is termed the leakage current. In normal operation it does no harm but if it becomes too large the capacitor can fail violently as described above. A set of formulas which give the approximate leakage current are given below.
ILMin = Sqrt(VC)/5 Where IL is the leakage current in microamps, V is the rated voltage in volts, and C is the rated capacitance of the capacitor in microfarads.ILMax = Sqrt(VC)/2
ILWorst Case = Sqrt(VC)*6
With a 220 k ohm resistor in parallel with the meter the leakage current is given by
ILMeasured = V / 220 k ohms Where V is the reading on the voltmeter.This circuit can be used to reform an old electrolytic. The current will gradually come down over time when left connected. If the leakage current will not go below the worst case value calculated above it is doubtful that it can be used successfully in a circuit. It should be thrown away.
The ILMin and ILMax values may seem a little optimistic especially on older capacitors. However the ILWorst Case is not. For example suppose you have a 100 uf cap at 450 volts. If you apply 400 volts to this capacitor the worst case leakage current is.
ILWorst Case = Sqrt(400*100)*6 = 1.2 x 10³ microamps = 1.2 mA.
Multiplying this current by 400 volts gives the power dissipated by the leaky capacitor.
P = 1.2 mA x 400 volts = 0.48 watts.
That's getting up to the point where the capacitor may begin to feel a little warm. If it's warm on the outside it's hot on the inside. To avoid a literal explosion it's best not to use a capacitor with this amount of leakage.
NOS and NIB.
These are terms you often run into on eBay or online antique electronics dealers. NOS stands for New Old Stock and NIB stands for New In Box. They mean essentially the same thing. The product May be 50 years old but has never been taken out of the box or has never been used in any way. Electrolytic capacitors that are NOS or NIB have special problems and may be revived as explained in the article Restoring Dead Capacitors. Nonelectrolytics may be as good as the day they rolled off the production line or the may not. This test is absolutely recommended for such caps.A Stand Alone Cap Tester.
If you like to build things you may want to make a dedicated capacitor tester rather than kluge it together each time you test a cap. If so, here is a circuit.
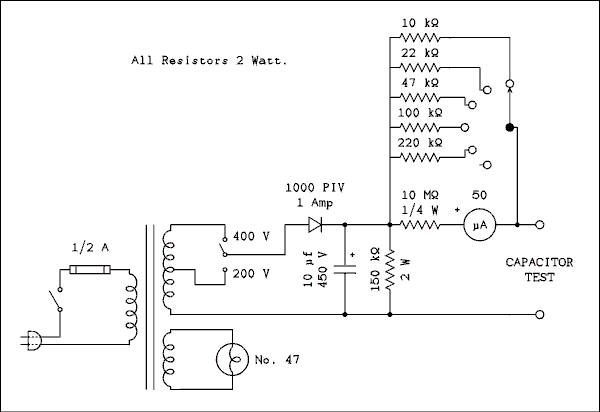
For a verbal description click here.
The transformer should be a 280 VCT (140-0-140) at as low a current rating as you can find. Unless you plan to let it serve double duty as a project power supply. When used to test capacitors the current drawn from the transformer secondary is miniscule. The meter needs to be a 50 microamp full scale movement. If it has a 0 to 50 microamp scale that's fine because the current is what you really want to know. If it has a different scale you can replace it using the techniques described in the Filter Choke Analyzer article. Do not omit the 150 k ohm 2 watt resistor. This is to discharge the filter capacitor after the power switch is turned off. The nature of this tester requires that the voltage start from zero each time. The 150 k ohm resistor discharges the filter capacitor.Eric contacted me to inform me about the version he built. He used a momentary pushbutton switch for power on/off. I think this is an excellent idea. It prevents the power from being accidentally left on and makes sure that when you are ready for the next test the power is off and the filter capacitor fully discharged.
When testing small non-electrolytic capacitors the rotary switch should be set to the open position. In this setting the meter reads leakage current directly.
When testing electrolytic capacitors the meter becomes a voltmeter with 500 volts full scale. The measured leakage current is
ILMeasured = V / R Where V is the reading on the voltmeter and R is the value of the resistor that is selected. The selection of resistors allows the tester to be used to reform electrolytic capacitors. For details on how to reform capacitors refer to Restoring Dead Capacitors.This article illustrates that you can do a lot without sophisticated equipment like that found in university and industrial research laboratories. Have fun.
This page last updated February 20, 2017.