Soldering and Unsoldering.
I have been made aware that many people who view this site have little or no experience at soldering. I have decided to post a soldering lesson. The information here is concerned with soldering connections on tube sockets and terminal strips of the type used in tube equipment. If you are looking for lessons covering printed circuit boards you have come to the wrong place. I suspect there are many sites on the web where PC (and I don't mean politically correct) soldering is explained in detail. Try a Google search.Over time many pages on my site will link to this page. Because of this it is impossible to know where you came from so I can't link you back as I have done on some other pages. When you have finished studying this page use the back button on your browser to return to the page you came from.
The idea behind soldering.
Solder doesn't just glue the wire to the lug. It forms an alloy bond with the copper wire and the steel lug. In an alloy bond some of the atoms of the different metals get mixed together at the surface where the two metals come together. If you were traveling between atoms in an atom sized submarine you would see an occasional atom of the other metal which would slowly merge into a mixture of both then the atoms of the metal you just left would begin to thin out and finally disappear leaving only the atoms of the new metal. A bond of this kind cannot be easily pulled apart and it will conduct electricity very well.To form an alloy bond everything has to be hot. Common 60% tin - 40% led solder melts at a little less than 600 degrees F. My experience indicates that the best temperature for soldering is 700 degrees F. That's the operating temperature of the soldering iron I use, the work being soldered will be a little cooler than this.
You can't just melt the solder and drop it on the lug. You have to heat the lug and all the wires that connect to it as you apply the solder. If the lug is not hot enough the solder will just sit on the surface without forming an alloy bond. It can be physically removed very easily and will not conduct a current very well. Such a soldering job is called a cold joint. (No comments from the 60s generation please.)
Mechanically secure connections.
Anyone who has ever built a Heathkit recognizes the phrase in the heading. A mechanically secure connection will give good enough electrical contact to work until corrosion sets in to increase the contact resistance. When solder is added to such a connection it is assured of an electrical contact that will last for decades or longer. When you are building for permanence you always want to make mechanically secure connections.Breadboarding is another story. When it comes time to take the breadboarded circuit apart you don't want to have to heat the connection and then use a soldering aid to un loop the wire from the lug so you don't loop it in the first place.
In the drawing below you are looking almost straight down on a lug from the top.
Figure A shows how to make a mechanically secure connection. It is not necessary to wrap the wire around and around the lug as I have seen some beginners do. Just go around once and squeeze the loop down tight with needle nose pliers. 
When wiring on the breadboard just make a hook in the wire and hook it through the lug as shown in B. Place a bit of tension on the wire to hold the hook firmly against the lug while you solder it.
Soldering the wire to the lug.
Here is how to make a good solder connectionBeginning solderers are most likely to make two mistakes, usually both at once. One is to use too much solder and the other is to use insufficient heat. Between high school and college I worked in a radio factory for a summer. This was not PC work but tubes and terminal strips. The foreman of the assembly line was forever telling the assembly workers "use less solder and more heat". One day he said to me "Max, use more solder".
- Touch your iron to the lug in such a way that the side of the iron is in contact with the side of the lug. The idea is to make contact over as much area as practical.
- Touch the end of the solder to a place where it is touching both the lug and the iron. Take the solder away before a large amount of solder has melted.
- The molten solder will form a very good thermal connection between the iron and lug which will bring the lug up to soldering temperature very quickly.
- Touch the end of the solder to the lug away from where the iron is touching it. The solder should melt just from touching the hot lug. That's how you tell if the lug is really hot enough. Use the solder sparingly.
- Now that you have solder covering most of the lug start moving the iron around. As long as the iron is immersed in the molten solder heat will be transferred to the lug. Stir the solder and make it flow evenly over the lug.
- Cover all wires and then take away the iron.
You've probably heard that one picture is worth a thousand words. One picture coming up. The tool in the photo is a soldering Aid.
Let us examine the lugs numbered left to right. 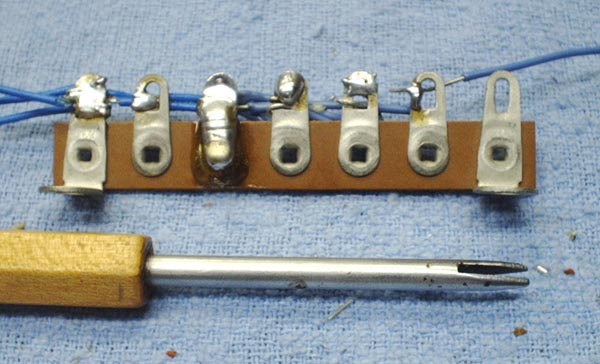
- This one is just about perfect. All wires and the surface of the lug are covered with solder. Although it doesn't show in the photo there is no ball of solder on the back. This is sometimes a mistake of those with limited experience.
- There are only two wires in this lug and both of them are soldered on both front and back. Even so, the joint likely would be rejected by quality control. However there is no law that says you have to fill the hole. The advantage of this soldering job is that it would be easy to add wires to this lug later. Since writing this I have been informed that production lines which are assembling tube equipment in the old way don't want the hole filled. This allows the quality control inspector to easily tell a good soldering job from a bad one. That makes sense to me. So don't fill the hole and you'll likely pass QC.
- In this one the solderer has applied enough heat but used far too much solder. Always watch where your solder is going. It is likely you think you don't have quite enough solder on a lug but it is just running away as fast as you apply it. The mane mistake made here was to hold the iron on the lug much too long applying too much heat and too much solder. When the lug is covered, take away the heat and solder. Know when to stop. If this terminal strip had been mounted in a real chassis the solder would have run down and shorted the lug to ground causing lots of headaches. I know because that has happened to me.
- This is the common mistake of rank beginners. The soldering iron was held above the lug, the solder melted and dropped onto the lug. The solder did adhere but the wires did not benefit from contact with the hot solder. The bottom wire is free to move around.
- This lug has two wires in it. The top wire was soldered very well but the bottom one was missed completely. A mistake of this kind usually happens when there are a large number of wires in the lug and the bottom one gets missed.
- The last one illustrates the breadboarding technique. The hook has been left more open then is recommended to show the principle more clearly.
Once again we are faced with the Goldy Locks effect. You can apply too much solder or too little but you must apply the amount that is just right. You can apply too much heat or too little but you must apply the amount that is just right.
Removing solder from a terminal lug.
To remove excess solder from a lug, or remove solder from a lug that you soldered incorrectly, or clean up lugs on the breadboard which tend to accumulate solder after a while do this.
- Orient the chassis so the lug is as shown in the figure above.
- Touch the iron to the top and then the bottom of the lug until the solder melts.
- When the solder becomes liquid place the iron in contact with the lug underneath it.
- Slowly lower the iron and the solder will tend to flow onto the iron. The solder tends to flow toward the hotter iron and it also goes where gravity says it should. In this case they are working together to move the solder from the lug to the iron.
- Give the iron a flick to throw off the excess solder. Don't throw the solder on your clothes, your dog or cat, a valuable piece of furniture, or the living room floor.
Each time you repeat this the amount of solder you get off the lug will decrease. When the amount is small you will need to wipe the iron tip on a wet sponge. Eventually you will reach a point of diminishing return and further repetitions won't be worth the effort.
It has been pointed out to me that flicking the hot solder off the iron can be dangerous. In deed it can. I personally know of a case in which someone got a drop of solder in his eye. Not a positive experience. When I do this I hold the iron down at my side, below my waste and flick it towards the floor. Do not do this on carpet, vinyl or hardwood floors.Someone suggested wiping the iron with a wet sponge. I keep such a sponge on my bench and use it sparingly. The reason is because I use a plated tip and I had a bad experience once. When I was with the university I had a student assistant to help me build a large number of Heathkits that had been purchased for the physics labs. I had been warned that he tended to take instructions very literally. One morning I came in to find he had left a Weller soldering gun with a very dirty tip. I showed him how to clean it with the sponge after use. I didn't find out until the afternoon that he had applied my soldering gun cleaning instructions to the small plated tip iron and was wiping it AFTER each use. He called me in for help when the iron would no longer make a good soldering job. The tip was covered with a layer of oxide, rust. The combination of heat and moisture, and the absence of fresh solder quickly rusted the steel plating. I was able to recover it by melting a large amount of solder, to get the rosin flux, which cleaned away most of the rust. I reinstructed him that it was OK to wipe the iron on the sponge before using it but not after except when he was finished with the iron for the day and it was cooling down after being unplugged.
So, melting solder from a lug and then wiping it on a sponge and doing this repeatedly for some length of time could seriously damage your soldering tip. When you do wipe the tip, immediately use it to solder a joint or, failing that, touch the solder to it to get a small amount of new solder and flux on the tip.
Desoldering a Printed Circuit Board. Reams of pages have been filled with articles about the proper techniques for removing components from printed circuit boards. The basic problem is to remove the solder so that the component lead can be removed from the hole.
There are many vacuum devices on the market for the purpose of removing solder. These range in price from two dollars to five hundred dollars. The cheap ones don't work very well; I don't know about the expensive ones.
The best and most economical method of removing solder is a product called Soder-WickR. The product consists of copper braid which has been coated with a substance which prevents oxidation and causes molten solder to flow around and along the small wires in the braid.
The writer has read magazine articles in which it was said that the braid removed from shielded cable could be used in place of Soder-WickR. Statements like that were written by people who have never tried it. The chemical coating is absolutely necessary; the braid will not "wick" the solder without it.
A recent development in electronics is the surface mount board. Special devices have been developed to make repairs to these boards. One of these is a hot air blower in which the air is actually hot enough to melt solder. You don't want to get your hand in front of one of these. Someone on the email list recently suggested that one of these devices is good for removing ICs with lots of pins from a board. I can see how this is true. However a stream of hot air may be a rather blunt instrument for cleaning up a solder bridge in the middle of a dense board. For such a job I'll bet on solder wick every time.
The proper use of Soder-WickR is a learned skill and the best way to learn it is to do it. A few pointers will be given here in the hope that they will help.
Use a soldering iron with a lot of heat capacity. Notice that I did not say a hot iron. The iron should not be any hotter than is normally used on PC boards but it should be a bit more massive than the needle tips usually used.
The wick must be hot. It goes without saying that the solder must be molten, but the wick must be above the melting temperature of solder. Hold the iron tip to the joint to be desoldered until the solder melts and then lift the iron tip and trap the wick between the tip and the joint. You will see the copper-colored wick turn silver-colored as the solder is drawn into it. Move the solder wick around a bit to wipe up the solder. Remember you are wiping up a liquid with an absorbent material. The principle is the same as cleaning up spilled water with a paper towel. The only difference is that the liquid and "paper towel" are at a temperature of 700 degrees F.
If at first you don't succeed, melt some new solder on to the joint (resolder it). That may seem to be counter-productive but solder which has been held liquid for a while "gets tired". New solder will refresh it and allow the wick to soak it up. This technique is especially helpful with plated-through holes.
Using Stranded Wire.
I prefer to build projects using solid wire but some builders prefer stranded. Even if you elect to use solid wire most transformers and filter chokes are supplied with stranded wire leads. That means you are going to have to cope with stranded wire eventually.When you push the stripped end of a stranded wire through a terminal and try to crimp the wire around the lug the individual strands will go every which a way. They can short out to adjacent lugs and even to ground. This is a prescription for a project that may never work. The individual strands must be held together by solder before the wire is connected to a lug.
- Strip the insulation from the wire for the desired length, usually 1/4 inch.
- The strands were twisted together inside the insulation before you removed it. Try to figure out which way they were twisted.
- Grasp the stripped area with your fingers and twist the strands in the same direction as they were originally twisted. Don't use needle nose pliers, you will only make a mess of the wire strands.
- After the strands are twisted, melt a small, repeat, small, amount of solder to hold the individual strands together.
- Hint: If you get too much solder on the wire use your iron to gently stroke it toward its end. This will accumulate the excess solder in a little ball at the end of the wire and you can cut it off after the wire cools. This process is often called "tinning" the wire.