Winding Coils
There was a time in my life when I had considerable fear of winding coils. I have dubbed this Helixaphobia. Most beginning builders suffer from this fear but there is no need to. I have developed methods which overcome the problems people normally experience when winding coils.
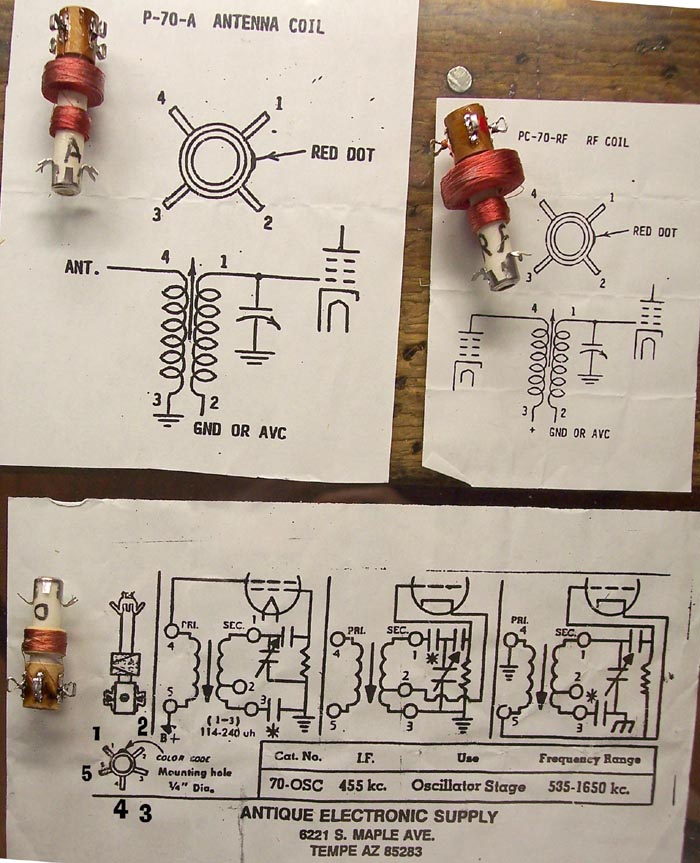
Maybe you just don't want to wind coils. I won't hold that against you. If you would rather buy them ready made try Antique Electronics Supply. After the site comes up look in the frame on the left and scroll down to, and select "Radio Parts & Restoration". In the tree menu that comes up just to the right of where you were looking click on "Coils & Coil Forms". Scroll down to the 9th item. Items 9, 10, and 11, are the antenna, oscillator, and RF, coils for an AM Radio. Below are the data and pictures of the coils.
Obtaining materials.
You need three items to wind the coils for the projects given here. They are;
- Magnet wire
- A 2 inch mailing tube
- Double Stick Scotch Tape (Stickem on both sides)
The magnet wire comes from Radio Shack. I think this product was dropped from the Radio Shack catalog and recently reinstated. They are again using this picture of the wire package. To make all of the coils you will need 2 sets of the wire.
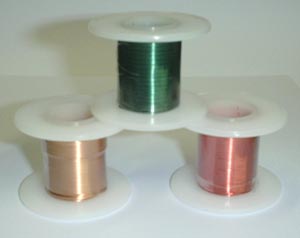
It appears that this package of wire is no longer available from The Shack. Fine gauge wire is available from many sources including Antique Electronic Supply. To help you figure out what to order here are the wire sizes.
It has come to my attention that short lengths of PVC pipe are available from home improvement stores. A plastic form would make a much more durable coil than cardboard. You might want to look into it.
Wire Color Wire Gauge Copper Colored 22 Green 26 Red 30 Next you need a 2 inch mailing tube. These are available from your local post office, Mail Boxes Etcetera, Container World, and many discount and variety stores. To repeat exactly what I have done you need a 2 inch not a 3 inch, not a 2 - 1/2 inch not a 1 - 1/2 inch. The length will be more than you are likely to use.
The third thing is Double Stick Scotch Tape. Once again the local discount or variety store should have it.
Winding the coils
You will eventually need three coils; 1) an antenna coil, 2) an RF interstage coil, and 3) an oscillator coil. The antenna coil, #1, is used in the crystal set and all of the one-tube radio circuits. The RF interstage coil is needed for the two-tube TRF circuit and the deluxe super heterodyne radio. The oscillator coil is used in any of the super heterodyne circuits. The initial posting of this page may not include all three but as they are needed instructions for their construction will appear here. The instructions for each coil are written to stand alone so as you work your way through winding any one coil you won't have to refer back to the instructions for any of the other coils.
Keep reading on this page for the antenna coil.
The Antenna Coil
This coil can be used in the crystal set as well as all of the one-tube radio circuits. It has three separate windings and in some of the circuits only two will be used but that's no problem.
Here are the steps for winding the antenna coil.
- Cut 2 - 1/2 inches of the mailing tube. A hacksaw is recommended
but any fine toothed saw will do the job. Don't waste your time and
effort on scissors or knives. You'll likely break the scissors and it's
almost a certainty that you will cut yourself with a knife. The material
is too tough for these tools and even if you do succeed in using them
the cut end of the mailing tube will look extremely ragged and you will
be ashamed to show it to friends.
- Use a pencil or pen to mark off the cut piece of mailing tube as follows.
- Mark 1, 1/2 inch from one end.
- Mark 2, 1 - 1/4 inch from mark 1.
- Mark 3, 3/16 inch from mark 2.
- Use a 1/16 inch drill bit to make holes in the mailing tube near each
mark. The hole at mark 1 should be just a little to the end of the
mailing tube so the edge of the hole is on the mark. The holes at
mark 2 and mark 3 should also be on the outside end of the mark
as shown in the drawing.
- Now mark six points for drilling holes equally spaced around the
tube half way between mark 3 and the end of the tube. Drill these
holes with a 7/64 bit. Space them so the row of 1/16 holes
is in between two of the 7/64 holes.
- Now wrap the coil form (mailing tube) with Double Stick Scotch
Tape. Be as careful as you can not to leave any wrinkles or bulges
in the tape. If you don't do a perfect job it's not the end of the world.
Don't cover up the 7/64 inch holes.
- Use the drill or a small nail to punch through the
tape at each 1/16 inch hole.
- Now you are ready to start the first winding. Use the Green wire
which is 26 gauge. There is enough to make two coils
with 5 feet to spare.
- Remove the plastic from the spool of green wire and place it over
something that will allow it to turn while holding it in place. I used
a small screwdriver clamped in a small vise.
- Push one end of the wire through the hole at mark 2 from the outside.
Pull 3 or 4 inches of wire through on the inside of the tube.
- Hold the wire on the inside of the tube and begin the first turn.
This winding will end at mark 1. The sticky tape will hold the wire
in place and after about half a turn you won't need to hold the wire
inside the tube any more. Tuck the end of the
wire inside to keep it out of your way.
- Wind the turns so each turn is touching the previous one. This will
not cause a short circuit because the wire is coated with insulating enamel.
- Wind 66 turns. This will give an inductance of 250 microhenrys.
The picture below shows how to setup for winding the coil.
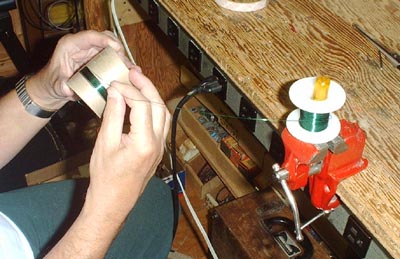
DON'T WIND THE COIL BY HOLDING THE FORM STILL
AND MOVING YOUR HAND AROUND AND AROUND THE
COIL FORM. When you do this every turn puts a twist in the wire.
After a while the wire will start to kink and then get into a hopeless
tangle. Roll the cylinder (mailing tube) around in your hand like
the take up spool on a real to real tape recorder. (Rotate the coil
form [mailing tube] around its axis.)This page last updated November 20, 2005.