For a verbal description click here |
For a verbal description click here |
Designing and Building
Audio Amplifiers.Designing an Amplifier.
If you want to build a tube amplifier and you don't want to just copy someone else's circuit it might be a good idea to learn how to design it. There is a computer program that comes with this page to help you. So, don't be afraid.Selecting the output tube.
This design procedure and program works with either single ended or push-pull output stages. I have said it before and I'll likely say it again, you MUST have a tube manual to work with tubes. If you don't have one look on ebay. At any given moment there are several there. Don't go for one that is too old, try for 1955, preferably 1960, or later.Presumably you have decided whether you want a single ended or push-pull amplifier. I'll sight examples from both as we go along. Common power tubes that can be found in a receiving tube manual are listed in the table below.
If you want to go up to bigger bottles such as 807s, 6146s, or 811As, you will need to get a transmitting tube manual. They are somewhat rare and you may have to watch ebay for a few weeks to find one.
Tube type. Power, single ended. Power, push-pull. 6AQ5 4.5 10 6V6 5.5 14 6L6 10.8 26.5 6CA7/
EL3411 54 6550 20 100
I will use push-pull 6L6s as an example but I will tell how to apply the calculations to single ended circuits as we go along.
Selecting the output Transformer.
After you select a tube and a circuit you know what kind of output transformer you need. Maybe you have one or two lying around and you would like to use them but you don't know anything about them. There are tests you can make.Connect the primary (high side) leads to an audio oscillator or function generator. These are the blue and brown leads for a push-pull transformer, or blue and red for a single ended one. Set the frequency to 1000 cycles per second and the output to maximum. Now use an AC voltmeter to read the voltage on both the primary (high side) and the secondary (low side). Divide the larger number by the smaller one and square the result. This is the impedance ratio.
For example if you measure 5 volts on the high side and 0.2 volts on the low side the quotient is 25 and the square of that is 625. Assuming an 8 ohm speaker connected to the low side the impedance presented to the tube or tubes is 8 x 625 = 5000 ohms.
If you don't have an audio generator of some kind you can excite the transformer from the 120 volt AC power line. If the power rating of the unit is at least 5 watts it shouldn't be damaged by line voltage on the high side. I don't recommend this because an accidental short of the secondary leads can burn out the transformer. Also the frequency is a little on the low side and might be on the edge fore some transformers.
How Much Feedback?
How much feedback to apply is always a good question. I wouldn't recommend any less than 20, and no more than 30 dB. 20 dB will reduce distortion by a factor of 1/10, 30 dB by a factor of 1/31.6. The voltage required to drive the amplifier to full power also goes up by factors of 10 and 31.6 respectively. If you want 1 volt to drive the amp to full power you need to start out with a sensitivity of 0.1 or 0.0316 volts.Driver/Inverter Gain.
Now we are down to some serious calculation. The important piece of data here is the grid driving voltage. There are three different ways to specify this voltage for a push-pull amplifier and two for a single ended one. The one that is for the push-pull amplifier only is the peak grid-to-grid voltage. For a pair of 6L6s this value is 45 volts. The other two can be used for either push-pull or single ended. They are peak grid voltage and RMS grid voltage. For 6L6s in push pull the peak grid voltage is 22.5 volts and the RMS is 15.91 volts. For the single ended 6L6 the peak value is 12.5 and RMS is 8.839 volts. The peak is the RMS voltage times the square root of 2. The grid-to-grid voltage is twice the peak grid voltage. The tube manual will specify it in only one of these ways but I have seen all three used on different tubes even in the same manual. Consistency? Obviously, different people prepared the data on different tubes and they didn't talk to one another. The camel is a horse designed by a committee that never met. But I digress. The program saves you the trouble of converting because there are radio buttons you can use to select which way you need to give the grid drive voltage. If you do it by hand you will need to convert.The program also asks you for the DC bias voltage required. This is done as a check to make sure you enter the AC grid voltage correctly. This value is 22.5 volts for a pair of 6L6s and 12.5 for a single tube. Notice that the peak single grid voltage is equal to the DC bias voltage. The peak grid-to-grid is twice the bias. This is for A1, or Ab1, amplifiers. The number 1 means that no grid current flows because the grid is never driven positive. In A2, AB2, or B2 amplifiers the grid IS driven positive and grid current DOES flow over part of the audio cycle. You can use the program with A2, AB2, or B2. It will ask you only once if you are using the 2 mode of operation and remember your answer for that set of data.
Now. Let's say you want 1 RMS volt of input to drive the amplifier to full output power. If you are not going to use feedback the driver needs to have a gain of 8.839 v / 1 v for a single ended 6L6 amplifier. Scanning the Resistance Coupled Amplifier data for a 12AU7 / 6C4, the 12AU7 is just two 6C4s in the same glass envelope, we find that the lowest gain available is 12.5. So what to do?
Cathode Degeneration.
The best way to lower the gain of a stage is to introduce some cathode degeneration or negative feed back by leaving off the bypass capacitor on the cathode resistor. This will also lower the amount of distortion in the stage. The RC coupled amplifier data for a 12AU7 are as follows. Plate load resistor 47 k ohms, following stage grid resistor 100 k ohms, cathode resistor 1000 ohms and gain 13.5. Looking up the 12AU7 in the tube data part of the manual the plate resistance for a plate voltage of 100 volts is 6800 ohms. Entering these data into the "RC Stage Gain" section of the program gives a gain of 9.323 with the bypass capacitor omitted. This is only a 5.5% error which is about ˝ of a dB.In a push-pull design the long tail pair driver gives an overall gain of 23.8. That's from the input to one output. The two 6L6s require 22.5 volts peak which is 15.9 volts RMS per grid for full power output. Entering these data into the "Global Feedback" part of the program gives an input without feedback of 668.5e-3 which means that you must move the decimal point three places to the left to get 0.6685 volts. With 20 dB of feedback applied the input voltage for full power is 6.685 volts RMS.
If you want 1 volt for full power output you must include a stage with a gain of 6.685 before the feedback loop. You could get this with a single 12AU7 stage with cathode degeneration.
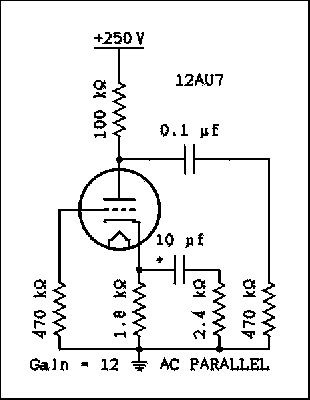
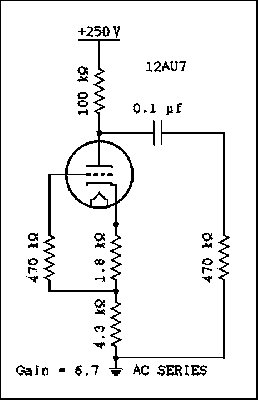
To use this part of the program click the "RC Stage Gain" button. In the first box fill in the number of the tube. I don't provide a database that will automatically fill in the rest of the data but I wanted to keep that possibility open. Look up the 12AU7 data in a tube manual and enter the plate resistance in the next box. Use the data for 100 volts plate voltage. Now go to the resistance coupled amplifier data in the back of the manual and refer to the 12AU7 chart. The plate resistor is 100 k ohms, the following stage grid resistor is 470 k ohms, the cathode resistor is 1800 ohms. (may also be entered as 1.8e3 for 1.8 k ohms), and the gain is 14.3. Now you enter the plate resistor and following stage grid resistor you are going to use. The most accurate results are obtained by using the same values but you can alter them slightly if you need to. Then you must enter the gain you want. If you check the box on "Tell me the gain with no bypass capacitor" and press "Calculate" the value of 10.73 will be filled in. If some other number is there it will be overwritten. To make the calculation uncheck the box and fill in the wanted gain of 6.685 and press the "Calculate" button. The legend to the left of the bottom box may change and will read "Ad in AC SERIES with Rk". The value will be 4.370e3 which is 4.37 k ohms. Use a 4.3 k ohm 5% resistor.
To complete the example change the wanted gain to 12 and click the "Calculate" button. Note that it tells you to use a 2.4 k ohm resistor in "AC PARALLEL". The diagram below shows what is meant by AC series and AC parallel. This stage is outside the global feedback loop so the rule of "one RC in the loop is not violated.
|
For a verbal description click here |
For a verbal description click here |
The signal input is to the grid in each case. In the series circuit a DC blocking capacitor is a necessity and is recommended for the other one. The other end of the capacitor would connect to the wiper of the volume control. The 470 k ohm resistor on the right of each diagram is the grid resistor of the long tail pair or what ever circuit you may be using. The capacitor in the cathode circuit in the parallel circuit can have a voltage rating as low as 6 volts. To use more than 25 V would be a severe case of overkill.
This program works so fast that you can play with values to see what effect they have. You can test values without overheating any tubes or burning out any resistors. Don't be afraid to try something. I have tried to protect the program but even if you do cause a "Run time error" there is still no real harm done. Just restart the program.
The Computer Program.
The program is 1.371 MB in size. You will find it on the programs page. Carefully follow the instructions you will find there.How Does It Do It?
The "RC Stage Gain" part starts with the data from the "Resistance Coupled Amplifier" charts. First it calculates the tubes working value of amplification factor, usually indicated by the Greek letter mu. This value is rather sensitive to the operating point of the tube especially in pentodes. Alright, I know that transconductance is usually used in pentodes to simplify the calculations but there is no reason why a computer program can't make the calculation using the amplification factor. The program takes the data from the RC Amp charts and uses the following equation.mu = Avc ( rp + RL) / RL Where mu is the amplification factor, Avc is the gain taken from the table data, rp is the plate resistance of the tube taken from the tube data, and RL is the parallel combination of the plate load resistor and the following stage grid resistor.The value of rp is not nearly as sensitive to the operating point as is the amplification factor. After finding the working value of mu it is ready to find the gain with the cathode bypass capacitor removed or the cathode resistor to give the desired gain. If you check the "Tell me the gain with no bypass capacitor" box This equation will be used.
Av = mu RL / ( rp + RL + Rk ( mu + 1 ) ) Where Av is the gain without the cathode bypass capacitor, Rk is the cathode resistor and all others are as defined above. The value will be placed in the second from the bottom text box and its label will be changed accordingly.When the check box is not checked, a value for the gain you want must be filled in to the gain box. When you click the "Calculate" button the following set of equations are used.
Rk1 = (mu * RL - Av * (rp + RL)) / (Av * (mu + 1)) Rk1 is the total value of the cathode resistor to give the desired gain. If Rk1 is larger than the original cathode resistor some resistance must be added in series with it. The amount of additional resistance, Rk2, is given byRk2 = Rk1 - Rk If Rk1 is smaller than the original Rk some resistance must be placed in parallel with the original resistor. The parallel resistor, Rk2 is given byRk2 = 1 / (1 / Rk1 - 1 / Rk) The DC operating point of the tube must not be disturbed. See the figures above to see how to add resistance in series or parallel with the cathode resistor without changing the operating point of the tube.The "Global Feedback" calculations go as follows. First they start with the user given values of speaker impedance and power output. The output voltage is calculated from the following equation.
Vo = the square root of (Po Zo) Where Vo is the output voltage, Po is the output power and Zo is the speaker impedance. Then the combined gain of the output tubes and transformer is calculated.Ao = Vo / Vg Where Ao is the combined gain of tubes and transformer, Vo is the output voltage, and Vg is the RMS voltage applied to one grid of a push-pull amplifier or the loan grid of a single ended amplifier. If the voltage has been entered as peak grid voltage or peak grid-to-grid voltage the program converts it. This gain may well be a number less than 1. Then it multiplies the user given Driver/Inverter gain by the output gain to obtain the overall gain.The voltage value of Open Loop Vin can now be calculated. It is the RMS grid voltage divided by the driver/inverter gain.
Now for the feedback. If the user gives the dB of feedback the closed-loop gain is calculated as follows.
A' = A / (10 ^ (dB / 20)) Where A' (pronounced A prime) is the closed-loop gain (gain with feed back connected), A is the open-loop gain (gain with feedback connected), and dB is the dB of feedback. The program takes the absolute value of the number of dB so it won't make any difference if someone enters it as a negative value.If the user elects to enter the feedback factor the program uses this equation.
A' = A / ( 1 + A B ) Where B is the feedback factor. This value is given byB = R2 / ( R1 + R2 ) Where R1 is the resistor from the output transformer secondary back to the cathode or grid of the tube to which global feedback is applied, and R2 is the resistor from that cathode or grid to ground.The program then calculates the value of Closed-loop Vin by dividing Vo by A'.
The "Feedback Network" calculator is lifted from the electronics calculator suite. You can manually enter the feedback factor or if you check the box "Use Feedback Factor from Global Feedback" The value will be read from the file. The number will appear in the box when the "Calculate" button is pressed. The next two boxes solve the problem of having one equation and two unknowns. You also need several sets of values to choose from because forcing the resistors to standard 5% values can cause errors on some combinations. For the maximum number of choices use a ten to one range such as 500 and 5000. A larger range will give duplications of value sets in the next decade. When you click the "Calculate" button the values will appear in the list box. "B" is the actual factor that the particular set of standard values produces. The headings "P in R1" and "P in R2" are the amounts of power dissipated by R1 and R2 respectively. The data to make this calculation comes from the "Global Feedback" part of the program. You select the values that give the smallest error and power dissipations below Ľ watt, ˝ watt or what ever you want to use. You could do it by hand now but isn't it much easier to click that "Calculate" button?
\
Next; A 50 Watt Monoblock Amplifier.Previous; Experiments with a Triode Power Amplifier.
Or use your "Back" button to return to where you were.
Thank you for visiting my page at Angelfire.
Please come back and visit again!This site begun March 14, 2001
This page last updated August 7, 2005.