
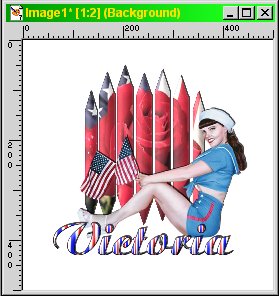
Slat Tutorial
by Victoria Styles, aka
ReaderOfTales@aol.com

Materials
needed
PSP... I use PSP 7 and have written this tutorial with that version in mind but my students proved that it can be done with PSP 8
slat tubes which can be obtained here
(click on link for slattubes)with thanks to MSKris & PaintShopStop
an image, if you wish to fill your slats with it
a tube or tubes of your choice
***********************
1. Open a new image, 500X500, transparent.

2. Open the slat tube you wish to use today.
3. Copy the slat tube (ctrl +C).
4. Make active your blank image and paste as new selection (ctrl +E) your slat tube, slightly above the center of the canvas.

5. This direction is tricky so please read carefully. If you want your slats to be a solid colour, flood fill
![]() them with that colour now. If you want them to be a gradient, flood fill
them with that colour now. If you want them to be a gradient, flood fill
![]() them with that gradient now. If you want them to be filled with your image, go to step 6.
them with that gradient now. If you want them to be filled with your image, go to step 6.
6. This step is for Image-filled slats only! Copy your image (ctrl + C). Go to your slats image and paste into selection (shift + ctrl +L). If you have any parts of your slats that are left black, use your magic wand
![]() or your freehand selection tool
or your freehand selection tool
![]() and delete those parts. Or you may select them and fill them with a colour or gradient for a different look. (Use "shift" to select more than one area.)
and delete those parts. Or you may select them and fill them with a colour or gradient for a different look. (Use "shift" to select more than one area.)

7. Everyone... go to Effects > 3D Effects > Inner Bevel and choose a bevel effects that you like. I used the following settings:

Bevel:quarter circle, Width:14, Smoothness:46, Depth:4, Ambience:5, Shininess:41, Angle:315, Intensity:30, Elevation:52 Color:White
8. Go to Effects > 3D Effects > Drop Shadow and use the following settings:

Vertical:-2, Horizontal:2, Opacity:75, Blur:1, Color:Black
9. Deselect.
10. Go to your tube and copy it (ctrl + C).
11. Go back to your slats image and paste as new layer (ctrl + L).

12. If your tube is too large for the slats image (as mine is), go to Image > Resize. Make sure that "Resize all layers" is UNchecked!
If you set your Resize type to "Bicubic Resample", you don't need to
worry about sharpening after resizing.

13. Add the same drop shadow as before. The settings will still be there when you go back to it. (Repeat steps
9-13 for as many tubes as you want to add.)
14. Go to Layers > New Raster Layer...... name it text and click OK.
15. Choose your text tool and add your name using whatever colours or gradient you like. Make sure that you select floating and antialias.


16. While you still have ants around your text, go to Effects > 3D Effects > Inner Bevel and use the same settings as before. Again, they will still be there when you go back to it.
17. Go to Effects > 3D Effects > Drop Shadow and use the same settings as before.
18. Deselect.
18. Use the mover tool to make sure you have all the pieces of your tag where you want them to be.
19. Go to Layers > Merge > Merge All (Flatten)
Now, I don't like an excess of background on my tags. If you don't mind, then you can stop here and save your tags as a jpg. If you'd like to tidy up your tag, continue on with me.
20. Choose your magic wand tool.![]()
21. In the tool options box, set the tolerance to 20. (If you don't have the tool options box already on your workspace, look on your top tool bar towards the right for an icon that looks like a blue sheet of paper over the top of a red one.
![]() Click on the so it is depressed and you will get your tool options box.)
Click on the so it is depressed and you will get your tool options box.)

22. Click somewhere on the white background. With that tolerance setting, it should select the entire white background pretty much.
23. Go to Selections > Invert.
24. Go to Selections > Modify > Expand and enter 12.


25. This is important. On your colour palette, set your background colour (the lower right one under "Styles") to white. (It must match your background colour.)

26. Take this one on trust. Hit shift + R on your keyboard. That will crop to selection and get rid of all the excess white. The reason you had to change your background colour on the colour palette is that the background areas that weren't selected on your image got filled in with the background colour in your colour palette. If it had been a different colour, you would have seen it, believe me!

27. Now you can resize if need be and save as jpg. :)
I hope you were able to follow along.
Victoria
