My 1989 Suzuki Swift GTi. Formerly Nitrous fed, ( https://www.angelfire.com/de/ksj/nitrous.html for details), currently turbocharged. The GTi Swifts have a strong 4 cylinder, 16 valve motor from which respectable power can be had from. Forged crankshaft, forged rods, web-cast strengthened block, etc.. Also, on the non-motor side of positive living for 'car guy', Swifts are very light weighing in around 1800-1850lbs with full interior. The quickest way to extract a decent amount of power out of the Swift is with nitrous as I first tried. A 50 horsepower shot can be run with decent reliability and no mods to the stock fuel system (one range colder plugs, timing back a couple of degrees, and maybe an exhaust and that's all you need). I ran an extra 50hp for over a year with no problems on a motor with 200,000kms on it. There are also high-rpm, naturally aspirated ways to make horsepower... but I find that arena a bit of a dead end on a 1.3... I have yet to see an extrememly modified NA match the top end/hp of even a low boost Swift anyway. So, onto an area that I love... turbos.
Keep in mind that this system was done years ago, as was the page. The welds were flux-core crap, but held together with no bracing. Some of the ideas changed as I went along. I originally tried to be as cheap as possible, but as things evolved, so did my desire to do it properly. A whole whack more power was gained by doing it the 'better' way. Even still I cheaped out, using the minimum to get to where I was. I did not use a stand-alone, the motor was still standard, and the parts were still cheap... but it made very good power. I learned a lot about tuning while working at a shop doing thousands of dyno runs. Many years, and a few cars later, I have another Swift project that is more refined and should make more power when the boost goes up. Many of the same minimums are in place, but with a few minor changes. This page was meant to give people ideas of how to make a turbo set up on their Swift as there was not a lot of info on DIY turbo projects for Swifts at the time I built this.
To see how the power progressed via some dyno runs go here
With only a few dollars spent I've been able to build and drive a car that will beat stock to slightly modified Mustang 5.0L V8s in a straight-line race, maintain 30-40mpg in the city or highway, and be reliable. So "Why do this to a Swift?" just know that I only do this because I can (and because it's cheap).


What is actually done to your car Kyle??? Here is a quick list that leaves some mods out (can't remember them all at the same time) and includes a little bit of the 'where and how'.
-H&R performance springs. Excellent spring choice, although I'm contemplating going with Coil-overs for height adjustability. Raising up the back-end would help me get some traction on the straights... traction is a concern when you read further.
-Koni adjustable Shocks. Bigger improvement than the springs in actual handling at the track.
-R compound tires (only on race day). Neccessary for traction on corners, or otherwise.
-Stainless steel Braided brake lines. Stock brake lines are rubber and have the ability to flex under braking. The stainless steel braided brake lines eliminate that flex while braking and thus eliminate any spongy pedal feel. Mine were bought from the U.K. and were much cheaper than what is available here.
-Stock Suzuki 1300cc DOHC 16 Valve motor
Hand-built (by me) Junk-Yard turbo set-up...
- turbo manifold built out of a couple of 1/2" steel flanges and Schedule 40 welding elbows and pipe. The elbows and pipe cost me about $50CDN. Welded together with my MIG welder in my garage. I started with a log style manifold (picture a log in front of your cylinders), and because of the high-heat/high-velocity it worked just fine. If you have higher aspirations and want the best however, a manifold that gives each cylinder an exit is the best way to go as the exhaust pulses from each cylinder will be undisturbed. The latter which is more of a header style is what I have now built and use on my car. The log-style worked fine, but it looked like crap and quite simply it wasn't good for higher boost pressure goals. The manifold is really only the tip of the ice-berg on the turbo set-up if you are making it all yourself.
- Mitsubishi TE04H turbo from a 2.2L front drive Chrysler. Because the SOHC turbo Chryslers have such a bad head design vs. the cross-flow of the Swift. The A/R is .48 and this turns out to be not too bad of a turbo to use for the Swift. Although there are some challenges because the turbo is mounted on the rear of hte Chrysler motor and front of the Swift motor. Each housing must be rotated, pins ground down, to suit your needs. If you are picking a different kind of junk-yard turbo up, try to pick something close to same displacement or something that you know will work. Be careful though as you would think that 1.3L Mazda RX-7 (rotary) turbos would be a good choice but they are not, they would be a very BAD choice. Mine cost me $80CDN from a friend of a friend of a friend.
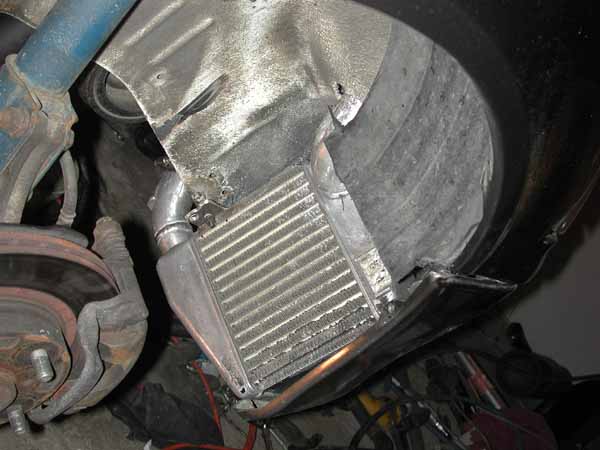
-Intercooler from a turbo DSM, mounted on the side to keep internal pipe volume and the amount of bends in the pipe down. I had to pay to have the pipes going into the DSM intercooler welded into their appropiate place as well as a new mount as the intercooler is aluminum and you need a TIG welder to weld aluminum... something I don't have. Including cost of intercooler and welding. $115 CDN
-Upper Intercooler Pipe out of a $20CDN mandrel bent U-bend chopped into bits and welded to fit. Rather neccessaryBrings air from intercooler to your intake.
-Turbo Inlet pipe... attaches the stock air flow meter and air filter to the new fancy turbo. Again, just made out of a $20 CDN mandrel U-bend
-Lower Intercooler pipe... just a chunk of a $20CDN U-bend used for this purpose. Takes the pressurized air from your turbo to your intercooler for cooling before it goes to your intake manifold.
-BOV mounts on Upper Intercooler Pipe. The blow-off valve has many names depending on it's use and actual terminology vs. commonly mis-used terminology, but we'll just call it a BOV here. It is a neccessary unit for turbo longevity as when the throttle plate closes between shifts there is still a whack of pressurized air in there that wants to come back and spin your turbo backwards. Something your turbo doesn't want to do as it is spinning so nicely the other way, so you vent that pressurized air back through the proper way to spool your turbo, or you vent it to atmosphere. The BOV is responsible for making that PSSHHHTTT sound when vented to atmosphere on turbo cars. :) Mine was a brand spanking new $80 Bosch unit from a turbo Saab dealer.
-Turbo DSM fuel pump that was free from a buddy Darin. Easy as pie direct swap basically. Pumps from a Ford Mustang are also an excellent choice and of the same direct swap easiness.
- Custom built fuel pressure regulator. A stock unit from a turbo Chyrsler, modified for adjustability by a local Mopar handy-man for $75 CDN. THIS IS AN ABSOLUTE NECCESSITY on a turbo GTi Swift. The stock unit doesn't like any reasonable amount of positive manifold pressure (boost), and I actually blew up three of the stock Swift fuel rails before going this route.
-Aluminum fuel rail built by the same local Mopar handy-man that built my regulator for cheap (can't say how cheap on this one). The stock GTi fuel pressure regulator is built into the stock fuel rail and is a rather restrictive sealed crappy kind of unit that restricts flow in the rail itself. Wanted to ditch the regulator, and after seeing the inside of a chopped apart fuel rail, this was the best option for the new remote mounted regulator.
Ever so important gauges to tell what is going on.
Boost gauge- so you can tell how uch pressure your turbo is building in the intake. If you have modified boost control it is an absolute must. Just think if the wastegate hose comes off and it stays shut allowing pressure to go through the roof. It won't be long before a piece of your motor follows suit.
air fuel ratio gauge- takes the signal from your oxygen sensor that will show you how the end result of the combustion process in your motor is. If there is too much air in the mixture, it will read lean. If there is more fuel in the mixture, the gauge will read rich. You want it to read rich if nothing else for safety.
EGT gauge- exhaust gas temperature gauge. Sometimes the accuracy of your a/f gauge can be off, and this gauge gives a good indication of your end mixture as well. If your exhuast gases are really hot, chances are that you are running lean without enough fuel and there is detonation occuring that is causing temperatures rise.
Other mods are hte usual mumbo-jumbo....
-2.5" down-pipe from the turbo. 2" Mandrel bent exhaust thereafter(built of of U-bends and such again)
-Performance air filter of sorts
This turbo project will now consume most of the pictures on here for three reasons. Because I did all the work. Because I have a lot of questions asking 'what do I need to run a turbo' or 'what did you use'. Because if you are one of those asking how so you can do it to your car, it might just try and prepare you for the amount of work/effort that goes in. These pictures should show most of the things you need as well as some considerations you should be thinking about if you are going to create your own Picasso.
Picture of the Koni/H&R set-up. Although you can't see the konis as they are in the same housing as the stock struts (the Konis require drilling out the innards of the OEM stuff). If you peer through the wheel well you can see that new clutch mounted up and ready for the tranny.

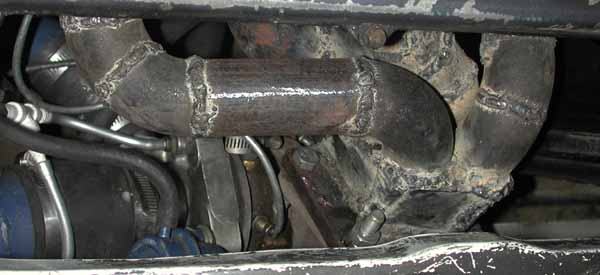
The oh so important exhaust manifold. Well at least there used to be pics here. People razz'd me about my welds, so no pics for u!!! All I have to say to them is that my manifold has survived 20,000kms of abuse with no problems... AND your pretty boy welds will look like brown crud, just like your stock manifold, after it has been on there for a while. Hence why mine is covered up these days. Anyways, you can kind of see the manifold in the first large pic that shows most of the parts in this 'turbo kit' that I had to make/acquire/modify. Anyways, the manifold was built from $30CDN worth of 1.25" welding elbows (actually has 1.44" inner diameter). I cut the flange out of 5/16"inch steel out of a chunk of flat-bar that I picked up from a steel company for $20CDN.Personally I wouldn't want a lot larger as you want the velocity to minimise heat transfer and get your precious air away from the head and to the turbo. I have tried a simple log-style manifold as well and there was nothing wrong with this approach on forced induction street applications and I had decent success with it. However there is still an advantage for each cylinder having their own individual runner as each cylinder will have an undisturbed exhaust pulse going to the turbo.
OK! I lied, just one pic.


To more pictures and info.
***

