

BUILDING PAGE TABLE OF CONTENTS

GETTING SET-UP FOR BUILDING
Your drawing should be on a flat surface that will
accept T-pins to hold the balsa sticks in place. I
use an old Luan hollow core door. The cheapest method
is using corregated cardboard on a flat surface. Another building board idea submitted by Craig is the use of a 4ftx2ft ceiling tile for about $4.00 dollars at the Home Depot.Craig can be reached at Cacboat@aol.com.The latest and most expensive way are the laminated balsa
building boards offered by the hobby shops and
catalogs. Save the money you would spend on the fancy
board and order a bulk order of balsa instead.
A nice order of balsa from Balsa USA or another
company that will build a couple of planes is as
follows;
BALSA AND PLYWOOD ORDER GUIDE TO GET STARTED
The most useful tools I use are the single edge
razor blade, a small electric bandsaw like a Black
and Decker or Craftsmen with a 56 1/8"combination
blade and a Craftsmen,Dremel or Ryobi moto-tool with
attachments.You will need the band saw to make the
wing ribs in the matter covered later. The band saw
needs a rip fence either store bought or made out of
a hardwood strip and two appropriate sized c-clamps.
I use the newer Quick Grip mini bar clamps from Home
Depot.
List the quanity,size and use for all the balsa
and plywood pieces you will need based on your
drawing. Add 1/3rd more fuselage sticks in your
quanity for the top and bottom of the fuselage and
the reinforcements added during the build process.
Cut some extra trailing edge pieces also for
reinforcements later on. Don't concern yourself if
you have a bunch left over. They are great for
repairs and on the next project
Here is a guide to determine the width of the
fuselage at the wing saddle area,inside
dimension;
FUSELAGE WIDTH GUIDE
HINTS ON CUTTING THE BALSA STICKS FROM
SHEETS
Cut the wood slow enough to minimize the sanding
required later. Cut all the wood for a given size at
one time so the different sizes are uniform.
CUTTING THE WING RIBS
Trace the rib shape from the rib drawing on the
wing saddle. Trace all the cut-outs for the main
spars,rear spar and turbulator sticks.Do not trace
the leading adge or trailing edge on this master
rib tracing.Cut out the tracing and paste it to the
2" side of a balsa block. Line-up the front of the
rib to the front of the block. This will eliminate
one cut and insures a nice 90 degree edge in the
front of each rib. Here is a guide for the thickness
of the ribs.Small to 20 size planes use 1/16" wide,40
to 60 use 1/8" wide and 1/4 scale 3/16" or
thicker.
Set up the bandsaw blade to be at exactly 90
degrees to the base. This is important for cutting
ribs. Open the throut of the saw to accept the block
of balsa. allow a little more height so you can
closely control all the cuts.
You may have to cut the block length wise along the
4" surface so the block can fit into the throut of
the bandsaw. First cut the shape of the rib and all
notches in the rib block.While it is still in block
form sand all the saw marks off the rib block,
Set up the bandsaw rip fence for the rib width you
are going to cut. Make sure the rip fence is square
to the table to eliminate any binding or irregular
cuts.Have another block of scape wood handy to push
the last couple of ribs thru the saw.
All the major parts are available to start the
build sequence.
BUILDING THE FUSELAGE
Start the fuselage build sequence by pinning down
the sticks and gluing them in the following
sequence;
1.Centerline stick
2.Bottom outline stick
3.Top outline sticks
4.Front vertical wing saddle sticks
5.Rear vertical wing saddle sticks
6.Top horizontal wing saddle stick
7.Nose vertical stick
8.Tail vertical stick
9.All vertical sticks in between
10.All cross braces on the fuselage plan
11.All gussets on the fuselage plan.
12.Remove all the T-pins from the fuselage side.
BUILDING THE SECOND HALF OF THE FUSELAGE
Lay a piece of saran wrap over the completed
fuselage side on the plan. Tape the saran wrap so it
retains the fuselage side to the plan
temporarily.
Build the second fuselage half over the top of the
completed one using the same sequence of assembly.
Pin the sticks to the completed halve and glue.
Remove the two fuselage halves from the plan
leaving the bottom saran wrap in place. Clean up any
mismatch of the fuselage sides so they match
exactly.
JOINING THE FUSELAGE HALVES TOGETHER
Cut the top front and rear wing saddle cross
sticks to the correct length. Mark the center of each
stick
and pin to the plan at the center line and vertical
wing saddle stick locations front and rear. Using a
right angle triangle, line up the fuselage sides to
the cross sticks and pin and glue the sides to the
sticks. Maintaining the right angles cut and glue the
bottom cross sticks to the fuselage. Reinforce the
bottom of the wing saddle area by cut and gluing
sticks to the bottom opening opposite the top wing
saddle opening.
Line up the fuselage sides at the tail directly
over the centerline and glue together.
Line up the cross sticks top and bottom at the
nose and glue in place with the marks on the cross
sticks lined up with the center line on the plan.
Cut and glue all the bottom cross sticks in place
at the fuselage vertical stick locations the full
length of the fuselage.
Cut and epoxy glue the plywood landing gear plate to the inside bottom fuselage doubled sticks. Cut and glue square plywood side reinforcement plates to the landing gear plate and the fuselage sides.
Cut and glue all the angle braces along the bottom
of the fuselage.
Remove the pins holding the fuselage and turn the
fuselage over. Pin the fuselage to the plan lined up
to the center line and premarked centers on the
bottom cross sticks opposite the wing saddle cross
sticks.
Reinforce the wing saddle opening on the inside
by adding another fuselage stick all the way
around.
Reinforce the vertical wing saddle sticks inside
at the four location with one piece sticks covering
the centerline joint right and left side.
Reinforce the hatch and windshield opening with
double sticks all the way around.
Cut and glue all the remaining fuselage top cross
sticks.
Cut and glue all top angle braces behind the rear
wing saddle cross stick to the rear.
DESIGN, BUILD AND INSTALL THE HATCH AND WINDSHIELD
COVER
===========================================

===========================================
Lay a piece of saran wrap over the hatch and
windshield opening loose. Push the saran wrap into
the opening slightly and tape along the outside to
hold in place.
Cut,fit and pin fuselage sized sticks to the
inside of the opening all the way around. Glue all
the joints while held in place. Add 3 to 4 evenly
spaced cross sticks inside the frame for
reinforcement. Add one cross reinforcement stick at
the joint of the windshield frame to the hatch cover
frame.Cut a piece of 1/16 sheet balsa to fit over the
frame and fuselage sides. Glue in place and sand to
fit. If a rounded hatch is called for, add half moon
supports to cross sticks on the frame before
planking.
Remove the hatch and windshield assembly and taper
the outside of the frame sticks for an easier
fit.
Remove the hatch cover and set aside.
DESIGN, BUILD AND INSTALL THE MOTOR MOUNT
===========================================
===========================================
Cut a 1/8" thick plywood plates doubled up and
epoxy glued.
Custom cut the motor mount doubler plate to fit
into the front of the hatch opening with sides
touching the fuselage sides.
Remove the motor mount plate and make a cutout
slightly smaller then the motor being used. Fit the
motor to the opening and mark the sides of the mount
for a right and left side slot for a hose clamp.Drill
out the slots and clamp the motor to the plate.
Position the motor,clamp and plate assembly to the
fuselage.Line up the motor shaft with a very slight
down thrust and right thrust so it is just noticable.
Epoxy glue the assembly in place and add
reinforcement sticks at the fuselage and plate
corners.
BUILDING THE NOSE SECTION
Cut a piece of balsa block the size to meet the
design on the plans. Using a hole saw drill out the
largest hole you can and still maintain some
structual integrety. The larger the hole the better
the airflow for the motor, speed control and
batteries.
Line up the hole and the motor shaft and glue in
place to the front fuselage frame.Add reinforcement
sticks behind the front fuselage frame and glue in
place.
Remove the motor and set aside.
Shape the nose of the model to match the drawing.
Remove the fuselage from the plan.
Turn fuselage over and frame out a rectangular
hole aft of the vertical wing saddle sticks for air
flow escape. Add plywood tailwheel plate to fuselage
if it's a taildragger. Add a nose gear bulkhead for
a tricycle landing gear set up.
Start the first wing half by pinning down the
lower main spar to the drawing at the center line or
over the wing drawing if you made one.
Position the end ribs in place a locate the rear
bottom spar and pin in place.
Position the trailing edge in place using the end
ribs as guides.
Position and glue all ribs to the main spar,rear
spar and trailing edge.
Position and glue the top main spar into the
ribs,
Position and glue the leading edge to the
ribs.
position and glue the turbulator sticks into the
rib cutouts.Glue the turbulator sticks so they are
slightly higher then the ribs to be effective. There
are some very good articles available on the
advantages of turbulator strips.
Cut,fit and glue all angle braces to the
wing.Refer to the design section or your drawing for
their locations.
Glue gussets at the trailing edge to rear of ribs opposite the cross braces.>br>
Remove the pins and set the wing half aside.
Build the other half of the wing using the same
sequence and method.
INSTALL DIHEDRAL BRACES TO WING
Lay the two wing halves together and get a measurement between the second rib on one wing to the second rib on the other wing.
Cut out (4) diheral braces for the following
locations;
Using the band saw cut slots in the center ends of
the wing halves for the dihedral braces.
Loose assemble the wing halves together with the
dihedral braces in place. Set the dihedral angle you
want and pin down one wing half on the flat surface.
Block up the other wing tip to hold the angle
desired.Remove, epoxy glue and replace all (4)
dihedral braces and squeeze wing halves together and
let cure.
Reinforce the center section of the wing top and
bottom by adding additional sticks along the ribs and
spars. Fill in the center of the remaining openings
in the center wing section with sticks evenly spaces
across the openings.
Cut the wing tip blocks per the drawing and glue
in place. shape the wing tips and sand
smooth.
Install the aileron wire horn and bearing
assemblies to the center section of the wing trailing
edge. Relieve the area behind the aileron wires for
clearance.
Using a Razor plane shape the leading edge of the
wing per the cross section drawing of the
wing.
BUILD THE TAIL SECTION ASSEMBLIES
Cut,pin and glue the following tail assemblies
over the drawing.
1. Vertical stab
2. Rudder
3. Horizontal stab
4. Elevator
Remove the tail assemblies and shape the rudder
and elevator front edge like a wedge to provide
clearance when attached to the stabs.
FINAL LINE-UP AND ASSEMBLY
Fit the wing to the wing saddle with a front dowel
and two rear nylon screws on large models and one
screw in the back on small models. The rubber bands
and side dowel method could also be used.Before the
rear screws are located through the wing set the wing
on the saddle so the measurement from one wing tip to
the center of the nose of the fuselage is the same as
from the other wing tip. Then drill and tap the
holes for the nylon screws. On rubber band wing hold
downs put
some foam tape on the wing saddle to prevent the wing
from shifting.
With the wing secured to the fuselage, position
the horizontal stab to the rear of the fuselage.
Position the stab so the ends are equal distances
from the wing tips on both sides.Also check that the
stab is level to the imaginary flat plane of the
wing.Glue the horizontal stab in place.Reinforce the
attachment point of the stab and the fuselage with a
few sticks between the bottom of the stab and the
side of the fuselage.
Position the vertical stab to the horizontal stab
and set it to line up centered to the fuselage and at
90 degrees to the horizontal stab.Pin the vertical
stab in position. Hold the complete model looking
down the nose of the airplane. You should not be able
to see any of the side of the vertical stab on either
side.
Glue the vertical stab in position and remove the
pins.Reinforce the vertical stab to the horizontal
stab with triangular sticks at glue joint.
NOTE:Attach the rudder, elevator and ailerons to
the airplane after covering.
Attach the landing gear and tailwheel (or nose
gear) after the plane is covered.
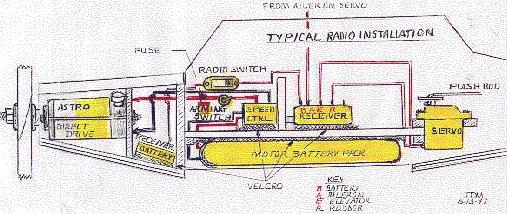
RADIO INSTALLATION TO AIRCRAFT
===================================
===================================
Every radio installation is slightly different based on the design of the aircraft and the location of the radio components to balance it for flight.
THIS IS THE END OF THE BUILD SECTION

BUILDING THE FUSELAGE
Start the fuselage build sequence by pinning down
the sticks and gluing them in the following
sequence;
1.Centerline stick
2.Bottom outline stick
3.To
Click To Next Page
Test Flying Your Own Design
Boomer's Electric Flight Home Page
Choosing a Project
Boomer's Links Page
Boomer's Pictures Page
Designing Your Creation
