This is a quick help
to configure the dreamcast to be able to read CDRWs.
if i get a digital camara i make more photos and then call
this a guide. but if you want to do this immediately,
and have a staedy hand, it might be helpful.
first,remove all cables. this is not really needed
but make sure you work on a table and not on the floor.

turn the dc
remove the modem (red arrows)
remove the 4 screws at the cover (green arrows)
turn the dc again and remove the top.
remove the 3 screws on the gd-drive (blue arrows)
connect all neccessary cables
first, put the bootdisk or any other bootable cdr onto the drive,
hold down the switch (yellow circle) and press the power button(red circle)
and hear and see how normal booting sounds and looks!

to see the adjustable resistor you have to lift the drive.
on the right side (green round arrow)
you may have to move the wires (green circle) off there position.
lift the drive slow and carefully,
dont damage the drive cable (purple arrow)
the resistor looks like this:

once you know what you are doing, bring the screwdriver in position.
either turn it some degrees clockwise, put the drive back and
use a cdrw to see if it works or -
leave the screwdriver in position as shown on the picture (use low preassure)
close the drive, use a rw, and if its not booting, turn the driver again.
remember, you always have to push the yellow circeled button which
is simulating closing the tray.
you have a small chance that both, cdr and cdrw are working with the new adjusting.
to use cdrs again you have to adjst the drive again (counter-clockwise)
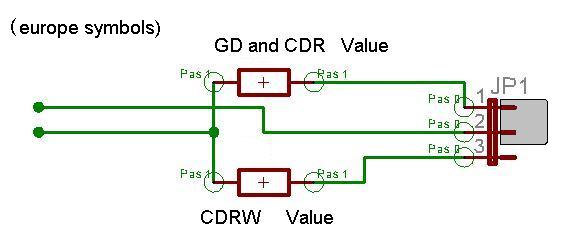
to have a permanent switch its necesary to remove the drive and desolder
that potentiometer. you have t know the values for each position.
than you need a switch (1x um)or a 3-pin jumper and 2 resistors.
more about this in the near future
before:

after:
last updated 08 of may 2004