Site hosted by Angelfire.com: Build your free website today!

Dance Pad Controller and Wiring Diagram


This is the $5.99 Gamestop Playstation Controller that
I used. Unfortunately, it's not available anymore. The best
controller to use is the Official Sony Playstation Controller.
To get to the solder points on the Sony controller you will
have to scrape off the black stuff with a knife. If you don't
have an old PSX controller, then I would try a third party
(non-Sony brand) controller that you can usually find at a
Gamestop or Electronics Boutique for only $5. Another
idea is to use the controller from a DDR soft pad.


I opened up and soldered 5 wires to the controller.
One each for the UP, DOWN, LEFT, RIGHT and
GROUND. The black wire is the controller's wire that
plugs into the playstation. I drilled a hole in the
controller and the tan cable is a telephone wire with
five wires that go to the pad. I designed the pad this
way so that the controller is still functional. I use
it for the X and O and START and SELECT.

If you have never soldered before, read this article about
Avoiding Static Electricity


To Solder the Controller
1 - Where the cable comes out of the controller,
drill a hole underneath it so that the
telephone cable can fit through there.
2 - Put the telephone cable through
the hole in the controller.
3 - Take out the circuit board from the controller.
4 - Drill a very small hole at the edge of the
solder points. (I used 1/16 inch drill bit)
5 - Stick the wire through the back of the circuit
board into the hole you just drilled.
6 - Solder the wire to the solder point.
7 - 
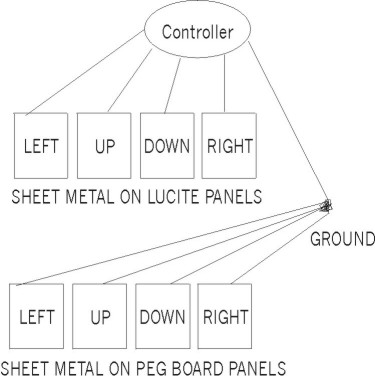
Repeat the steps for all five solder points
- UP, DOWN, LEFT, RIGHT and GROUND.
8 - You will have to cut away some of the circle
shaped plastic in the controller to fit the wires.
9 - Put the controller back together, use some tape
to hold the shoulder buttons from being pressed.
10 - Plug the controller into the playstation
and put in a game.
11 - Touch the ground wire to each of the UP, DOWN,
LEFT and RIGHT wires to see if everything
works correctly.


These are the solder points on the circuit board.
I only soldered to the UP, DOWN, LEFT, RIGHT and
GROUND. Larger picture at DDR Metal Catastage


This is a diagram of the wiring from the playstation
controller to the pad. There are 5 wires coming from
the controller - UP, DOWN, LEFT, RIGHT and GROUND.
Get 4 more wires and connect them to the GROUND
wire by twisting them and soldering them all together
or use a wire nut. So you have a total of 4 GROUND wires.
Now you have 8 wires going into the pad - 4 GROUND wires,
and one each for UP, DOWN, LEFT, and RIGHT. The 4 GROUND
wires are each connected to the 4 sheet metal on peg board
panels. The other 4 wires UP, DOWN, LEFT, and RIGHT
connect to the sheet metal attached to the lucite panels
for the UP, DOWN, LEFT and RIGHT arrows.


If you still need help on how to solder a PSX
controller check out these links for more help.

Solder Points on a PSX Controller

Build a DDR Control Box written by _ter

Wiring for a Gamestop PSX Controller

Don't Use a Sony Controller

List of PSX Controllers to Use

Building a PSX Controller

Solder Points on a PSX Controller Soldering an XBOX Controller