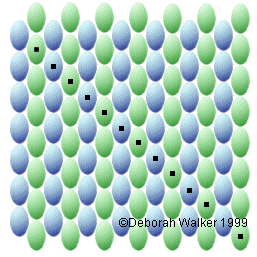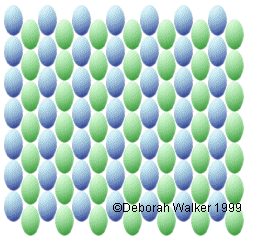
I use tubular peyote stitch to make amulet bags. It can
also be used to decorate any kind of cylinder such as keychains,
bottles, lighters, quartz crystals,
coffee cups, and such. Tiny versions, a 12 to 14 bead cylinder, can be made into nifty earrings, and are best worked on a pencil or
small dowel rod for support.
Materials:
- Size 12 Beading needle
- Size A Nymo thread
- Blue and Green seed beads, Size 11
The number of beads you begin with determines how WIDE
your beadwork piece will be. In tubular peyote, you always start with
an EVEN number of beads. These first beads will make up both rows
1 and 2 in a graph. Single stitch beading begins with row
3. (note: I learned to peyote from left to right, and from the
top of the pattern to the bottom. Many beading books teach peyote
from bottom to top. Either way is fine, whatever works for you.)
TIP: When making medicine bags, it's a good idea to add
two extra beads to your total. If you want to make a pouch 40 beads
wide on each side (totalling 80 beads to load at beginning), load
two more (82 total) so that when you press the bag flat,
these extra beads end up as side rows. That way the bag still has 40
beads to a side, but part of your design won't be wrapping around the
sides. FOR MORE HELPFUL TIPS, please see the end of this article! It is advisable to read the entire tutorial before you begin.
We'll make a small bag to begin. Thread about 18 inches
of Nymo on your needle. Pick up 42 beads, alternating blue and green
(or any other contrasting colors you like).
Please note: I have separated the beads in the
illustrations so you may see the thread path. When working this
stitch, your beads should touch as in the completed
illustration at bottom.

Leave about three inches for a tail (which you can weave into the beads later)
. Loop into a circle, bringing the first and last beads together, and tie off your thread
behind the first bead you strung (the blue bead in the drawing). Leave a little gap of 2
or 3 beads worth of space. If you do not do this, the top of your bag could be smaller
in diameter than the bottom.
Insert the needle through the first blue bead and pick up a green bead on
your needle. Remember, this bead begins row 3. Skip the next bead (green) and go through
the 3rd bead (blue). Come back out and pick up another green bead, skip a bead, go into the next bead, and so on. Proceed around the circle.

Adding these beads will have the effect of forcing the top beads up, like
this:

THE STEP-DOWN: Okay, you've gone all the way around and you're back to that
first green bead you added. You will go through it AGAIN to begin the next row. This
is called the "step-down."
You can tell when you get to the end of a row: there seems to be no
place to add a new bead. But if you go back through the blue bead where you began AND the first bead of the 3rd row
again (the green one with which you began row 3 which is bead "A" in the
illustration), you will find you can now add a bead--this time a
blue one. You have "stepped down" into row 4. When you get back
around to this point again, that green bead and the blue bead you just added will then be your
step-down bead for row 5, and so on. Note you are going through
two beads in the step-down only:

Now we add the blue beads of row 4:

Here's an image to show how the Step-Down will move
over one and down one bead at the beginning of each row:

It may take 4 or 5 rows for you to see the pattern of the weave. Be careful
not to pull your thread too tightly--uneven tension can warp the bag and is unattractively
noticeable. Continue adding rows until the bag is as long as you want it to be.

Finishing the bag: Press the bag flat. Notice how the beads seem to
interlock at the bottom. Weave the thread in and out of these beads, zig-zag style,
to lock them together. Finish with fringe (boy, can you get wild with the fringe--it's
my favorite part!), and add a neckstrap. Myself, I often use Acculon™ (TigerTail) for neck
straps, as the finished bag tends to be heavy, and thread breaks.
Some Tips:
Some folks like to use a support for round peyote work. Most common is a
toilet paper tube, cut down one side, rolled to the proper diameter, and taped in place.
Then the work is looped and tied around this. There is a nifty resizeable plastic one available in
most bead supply and craft stores. Michael's, LeeWards, and Hobby Lobby all have been
known to carry them. By mail order, you can contact
Fire Mountain Gems, also. I don't use a support,
per se, as they just get in my way and give the thread something else to tangle on.
Instead, I support the work around my fingers.
Cull (sort) your beads. Using beads of unequal sizes makes the bag warp and look uneven.
Also, watch your thread tension. Don't pull too tight; if you slacken it later, it will
be noticeable.
Lastly, never wear your bag swimming or in the shower. Water will get into the tiny bead
holes, but can't get back out. Over time, this will rot the threads and ruin the
bag.
If you have a question, e-mail me using the address (reproduced in text format only) found on this site's home page: HOME. I'll get back to you as quickly as I can.
ALL GRAPHICS are COPYRIGHT 1998,
Deborah Walker. These images may be downloaded to your hard drive for instructional purposes, but MAY NOT be used on other web pages, nor may they be copied in any manner or distributed in classes without prior permission and payment of a fee to the author.
