
|
|
Within Lightwave [6]'s Modeler, you can now setup
your skeletal hierarchy for animation with a new feature called,
"Skelegons". You can name, cut, copy, clone,
mirror, size, stretch, etc. these (pre)bones. In LW[6], you no
longer have to only rely on bone fall-off in Layout, you can
now custom assign percentages of bone influence on a point per
point basis for each bone. This weighted vertice technology,
called "WeightMaps", is most useful in tweaking
the how your mesh reacts at limb joints over a solid skin surface. |
|
This
"100 Proof"
Method is just my simple approach
for setting up WeightMaps to animate a lowpoly character model
mainly for video game developers. It may, however, be useful
for other applications too. It does not rely on any automated
map generator, nor does it involve the pain staking task of airbrushing
weights onto a mesh. Rather, its a quick and dirty hands on method
that gives you a good start. |
|
Note: Before continuing, please
make sure you read and follow everything on page 1 & 2 of
Customizing LW 6.0 Workflow because I'll be taking a lot for granted in
regards to menu layout and certain installed plugins. |
|
Let's Begin... |
|
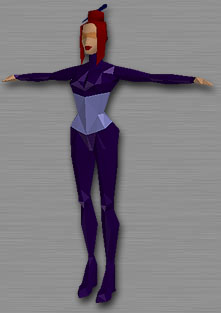
This is the lowpoly model I'm going to use for the demo.
It was provided by Tamara Michicich (mikicic@21stcentury.net).
It is roughly 5 feet 8 inch's tall and is made up of 680
polygon triangles in Layer One. The Limbs are symmetric.
Note: this model is facing positive Z, with her back out
towards the screen.
Before we get to WeightMaps, we'll need some bones... |
 |
|
|
 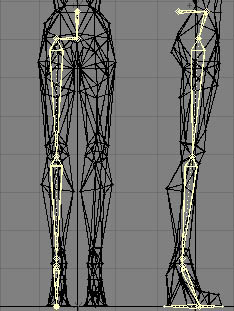 First
we're going to create all the bones for the left side of her
body. We'll begin this process in Layer Two,
utilizing our new custom VMap Menu
Tab. I will use DrawSkelegons to construct a skeleton
hierarchy for her (VMap > Revise > DrawSkelegons). We'll
first want to initialize the Root
bone's rotations along the Z axis.
So, in the Right View, start behind
her waist pressing down and dragging straight right. Release
the mouse button and continue to create the Pelvis
bone by mouse clicking once at the pelvis. Now switch to the
Back View to create the Hip
bone in the same manner. Switch again to the Right
View and create all the child leg bones by mouse clicking
once at every joint position down the leg, starting at the knee
and ending at the tip of her toes. Hit the Space
Bar to release this draw mode. Make sure that the actual
leg bones are in a straight line only when viewed from
the Back View (same X value). This
is important for setup in Layout, so we'll fix later. The extra
heel foot bone is for visual reference to plant feet down on
the floor when animating. It is created in the Right
View by selecting the foot bone, turning on DrawSkelegons
and clicking once at the heel. Notice it auto-snapped and auto-parented
itself to the selected bone. First
we're going to create all the bones for the left side of her
body. We'll begin this process in Layer Two,
utilizing our new custom VMap Menu
Tab. I will use DrawSkelegons to construct a skeleton
hierarchy for her (VMap > Revise > DrawSkelegons). We'll
first want to initialize the Root
bone's rotations along the Z axis.
So, in the Right View, start behind
her waist pressing down and dragging straight right. Release
the mouse button and continue to create the Pelvis
bone by mouse clicking once at the pelvis. Now switch to the
Back View to create the Hip
bone in the same manner. Switch again to the Right
View and create all the child leg bones by mouse clicking
once at every joint position down the leg, starting at the knee
and ending at the tip of her toes. Hit the Space
Bar to release this draw mode. Make sure that the actual
leg bones are in a straight line only when viewed from
the Back View (same X value). This
is important for setup in Layout, so we'll fix later. The extra
heel foot bone is for visual reference to plant feet down on
the floor when animating. It is created in the Right
View by selecting the foot bone, turning on DrawSkelegons
and clicking once at the heel. Notice it auto-snapped and auto-parented
itself to the selected bone.
Finish the rest of her left side, up the chain from the Root
bone using the same method, going back and forth between the
Back & Right view ports. For this demo, lets make sure we
keep the UpperTorso bone straight
up along the Y axis (Same Z value). Notice there is only one
bone for the head and no hand bones, just one at the wrist. This
is because I prefer to use Endomorphs
to animate them.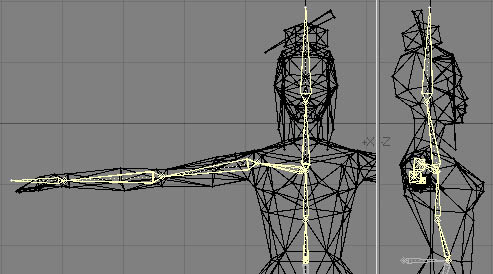 |
|
  Now
select each bone, one at a time, and use Rename. For this
demo, we'll use a naming convention where all limb bones that
branch off to the left have a "L_"
in front of its name. You can select SkelegonTree to view
your hierarchy and make sure that it is correct. You may also
rename and change parenthoods in this window. Now
select each bone, one at a time, and use Rename. For this
demo, we'll use a naming convention where all limb bones that
branch off to the left have a "L_"
in front of its name. You can select SkelegonTree to view
your hierarchy and make sure that it is correct. You may also
rename and change parenthoods in this window.
To finish the skeleton, select all the left side limb bones
only and use Lightwave's Mirror
tool (Multiply>Replicate>Mirror) to create the right side
limbs. Once the tool is activated, drag it along y at the 0 x-position,
hit the Spacebar to release the tool. Finally rename all these
new right side bones by replacing the the "L"
with a "R". To be safe,
double check your skeletal structure with SkelegonTree and make
sure everything is in order. |
|
Finally we have all our bones,
now lets get down to this so called "100 Proof" Method already! |
First, if you have my config, you can use the Numeric Pad
2-Key to select a preset window scheme with the perspective
window in Weight-Shade mode.
 The method simply works like
this; for every bone (except the Root),
make a new WeightMap by selecting the vertices that you feel
belong to that bone and mouse clicking on (new)
in the lower right hand corner weight pull-down menu. A new window
prompt will open. Type in the exact name of the bone leaving
Initial Value checked and the value
at 100%. The method simply works like
this; for every bone (except the Root),
make a new WeightMap by selecting the vertices that you feel
belong to that bone and mouse clicking on (new)
in the lower right hand corner weight pull-down menu. A new window
prompt will open. Type in the exact name of the bone leaving
Initial Value checked and the value
at 100%.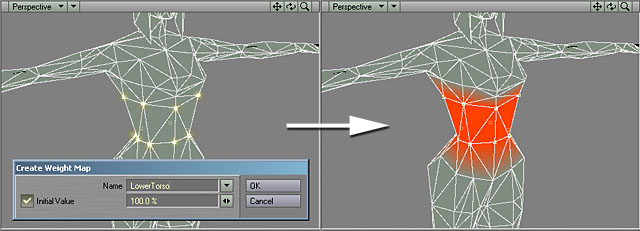
That's
It ! ! !
The key thing to remember is that it is totally OK to overlap
vertices from one WeightMap to another. In fact, I especially
encourage it on points around joints. Yes, this means that two
separate bones can have 100% influence assigned to the same exact
point . Remember, I said it was a quick and dirty method. Even
if you went in and made one bone pull that point at 50% and the
other at 50%, you haven't disturbed the influence ratio, and
you will get the same result.
 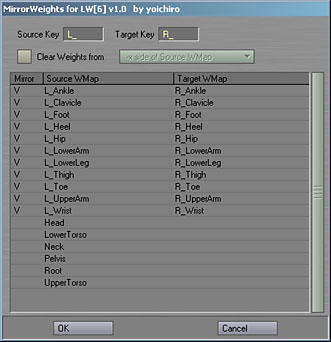 Since
this model's limbs are symmetric, I can follow this method and
create only new WeightMaps for the all the centric bones and
the left limbs. I'll then use a plugin by Yoichiro to generate
the right side weightmaps for me. In the VMap Menu Tab, select Mirror WMap
and a new window prompt will pop up. Following our naming convention,
type "L_" for the Source
Key and "R_" for the Target
Key, then OK. Done. Since
this model's limbs are symmetric, I can follow this method and
create only new WeightMaps for the all the centric bones and
the left limbs. I'll then use a plugin by Yoichiro to generate
the right side weightmaps for me. In the VMap Menu Tab, select Mirror WMap
and a new window prompt will pop up. Following our naming convention,
type "L_" for the Source
Key and "R_" for the Target
Key, then OK. Done.
Thanks Yoichiro!
Now we're ready to bring our lowpoly character model into
Layout and see the WeightMaps in action. SAVE
your model and exit Modeler. |
Well,
there you have it!
You should now have your
character model boned & weighted and ready for animating.
Once in Layout we'll convert our Skelegons into bones and see
how our mesh reacts to our new WeightMaps. Then, we can easily
go back and forth between Modeler and Layout and adjust our Weights
until we get the result we're looking for.
OK, so lets take a look at what we've done in Layout...
NEXT
PAGE |
 -last updated on 08.19.00-
Questions, Comments; e-mail Skip Intro
-last updated on 08.19.00-
Questions, Comments; e-mail Skip Intro |

