I just got this setup for everyone.
*Disclaimer - The information provided here is strictly for informational purposes only. I will not be held responsible for any mishaps by following these instructions. You undertake the task at your own risk. and also, this shit is copywritten.
WARNING: valves should only be adjusted when the cylinder head temperature is lower than 100 degrees F or 38 degrees C. Failure to follow may result in wrong adjustment
Vavle Adjustment on D16Y7, D16Y8, and D16Y5 (this has a lot of pics that will take time to download on 56k. Just to warn you
alright, I will try to be as detailed as possible on this DIY, but if you have any questions feel free to email me at bambbrose@hotmail.com
Required Tools:
-Racthet with 10mm socket
-Feelers guage
-Pliers
-10mm wrench
-Small flathead screwdriver

Removing the valve cover:
First, take out the spark plug wires

Next, take out the 10mm bolts that hold the throttle wire and spark plug wire brakets in place. Also, if you have VTEC (d16y8. d16y5), you probably have to disconnect a vtec wire of some sort right now.
 .
.

Now you need to take out the 5 valve cover bolts, they are also 10mm. In fact, every bolt in this entire process is 10mm. The back two bolts are long, the front three are short.

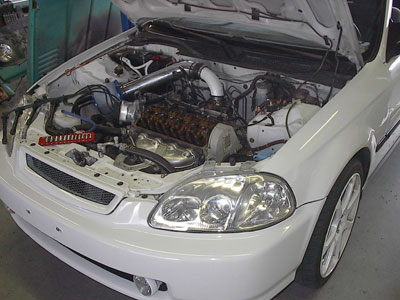
Now you can take the Valve Cover off, as you are doing this, watch the rings around the spark plug wire holes to make sure they come with the valve cover as well as the valve cover gasket. Your engine should now look like this:

Removing the Upper Timing belt cover:
Now you need to removing three more 10mm bolts that hold the upper timing cover on. After you get them off, pull off the cover to reveal your cam gear. Notice where it says "up" on the cam gear

.

Adjusting the Valves
the next part is kinda hard, what you have to do first is put cylinder one to Top Dead Center (TDC). the way to tell is by your cam gear, first make it look like this pic

you can get TDC a few ways, one is to crank the engine and hope it lands right, but the easiest way is just to turn the cam gear really slowly with the bolt that holds it on. Just be careful to not loosen the bolt, only turn the engine. Make sure you are in neutral if you try this.
after you get cylinder one to TDC, adjust the valves. You do this by first loosening the locknuts that hold the valve adjustment screws in place. Here is a pic of all the locknut locations for each cylinder. The valve adjustment screw is the screw inside the locknut.
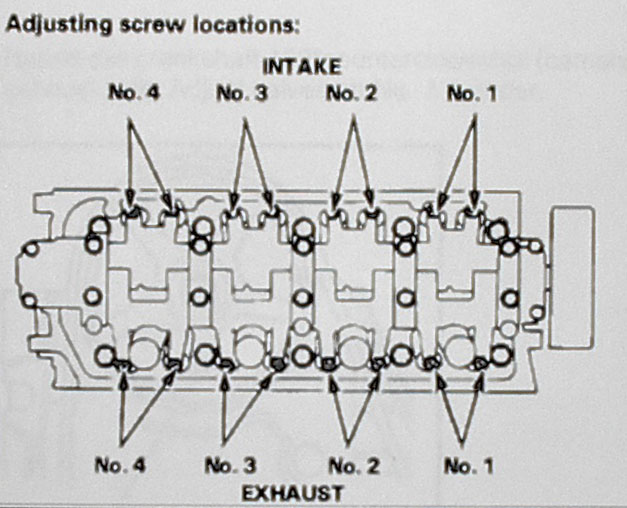 First do the exhaust side of the first cylinder, what you need to do is loosen the locknuts on cylinder 1, then slide the feelers guage under the adjusting screw. The setting that you need is .23-.27 mm (.009-.0011 inches) for the exhaust side.

After you adjust the screws so that the feelers guage can slightly move under the correct setting, then you tighten the locknut again. YOU MUST NOT OVER TIGHTEN THE LOCKNUTS. They should be torqued down to 13 ft lb for the D16Y7 and 14 ft lb for the D16y8 and D16y5. After you do both the exhaust ones, move to the back and do the intake ones. The intake settings are .18-.22 mm (.007-.009 inches)
After you do the first cylinder its really easy, its just understanding what to do that is hard.

After you finish the 4 valves from the first cylinder, you need to rotate the cam gear 90 degrees counter clockwise so it looks like this

With the cam gear set like this, you can now adjust cylinder three. Do it just like cylinder one
After adjusting the valves on cylinder three, rotate the cam gear 90 degrees counter clockwise once again so it looks like this

Now you can do cylinder four
after you are done with cylinder 4, Rotate it once again so it looks like this

and then adjust cylinder two.
Now you are done with the hardest part. From here on out it is just reassembly. One thing to remember is that the Valve Cover bolts should just be snug due to the fact that the head is made of alluminum. Trust me, you do not want to strip a valve cover bolt in your head.
When putting the valve cover back on, you should replace the valve cover gasket unless it looks like it is in good condition, then you can reuse it. When putting it back on, put a small amount of non hardening gasket sealant in the four locations noted in the pic

After you get everything back together take it out for a ride and if you did it correctly you should have a smoother running engine with a lot less ticking sound. Honda recommends doing this every 30,000 miles
Hope this helped out

