
 |
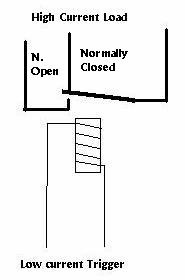
A low-current electromagnet is used to draw down a
spring-loaded bar to complete the high-current circuit. This
allows low-current switches, such as your stock dip switch,
to control high-current devices, such as a Halogen headlamp.
Or your low-current-capable horn button to trigger an airhorn
compressor. Or just about anything your batteryc can handle.
To wire it in, you need only identify the low-current terminals - they will make the relay "click" when connected to power - and the high-current terminals - they will close when the "click" is heard from the low-current connection. |
It allows you to run a really heavy (#12, say) wire from your battery directly to your headlight high beam (via the relay, of course). and then "trigger" this line with a low-current much less direct line from your dip switch. The second "trigger" line would of course be a ground.
In this test, you look for a small voltage where there shouldn't be one - between the battery "hot" terminal (the one not grounded to the chassis) and the headlight high beam feed wire, as close to the light as possible.
Open up the headlight shell, leaving the sealed beam connected. Strip
the high beam feed wire on one side, close to the light, or clip a jumper
to the connector on the back of the light if applicable. Using your
multimeter on low volts range (0 - 5 V max), turn on the headlight, and
check for a voltage between the battery "hot" terminal and the headlight
supply line. If a voltage shows, a resistance, or voltage drop,
is present, due to power loss in the circuit - from battery
through light switch, possibly also ignition switch, dip switch, the
thin wires involved, to the light. This may be remedied by direct connection
from battery to light with large-gauge wire. So we will run a new, large
(#14 Ga.) wire directly from battery to the light, interrupted only by
the points in the relay, which we will also install.
Tools and Materials
What Connects Where?
There is often a little teensy diagram on the relay itself,
but if you use a small one you can barely see it. There will be
5 connections. So, here's a coping strategy:
How To Connect It
We will use the relay only for the high beam, and the low beam continues
to be fed with the
regular circuitry. The high beam feed from the dip switch will be used to
energize the relay, which provides high-current feed directly from the
battery.
For safety purposes, disconnect the battery ground cable.
Remove the fuel tank. Then mount the relay in the headlight shell.
Cut the wire from the dip switch to the headlight high beam. Connect the high beam feed wire to one of the relay's "load" terminals. Run a length of #14 wire from the headlight shell along the frame tube to the battery. Connect the other relay "load" terminal to the battery "hot" terminal.
Connect the wire you just cut from the dip switch to the high beam to one of the relay's "energizer" terminals. Connect the other energizer terminal to a good chassis ground.
Locate the high beam indicator lamp feed line. This may be connected to the high beam feed line between relay and lamp, or to the energizer line from the dip switch to the relay.
Now, test your wiring. Ensure that no "hot" terminals are in contact with chassis ground, and re-attach the battery ground cable. Turn on the light switch, and check both beam settings with the dip switch. The relay should click when you select high beam, and the light should light.
Hit your browser's back button to return to previous page
