MATERIALS NEEDED:
2 sheets of seven(7)count plastic canvas One(1)Blue (1) White sheet
24 inch peice of 16 gauge wire (A wire clothes hanger can be used as well. It is also much stronger!)
Craft Cord (You can also use sport or worsted weight yarn which I suggest you use or even embroiddery floss.
#1 Swivel (I'd get them in the Fishing Department at Walmart. They are a LOT cheaper!)
210 6 x 9 Pony Beads (80 Dark Blue - 50 Lt. Blue - 80 White )
#16 Tapestry Needle
Scissors
THE WIRE - Carefully bend the wire so that it is as straight as you can get it before you begin
PLASTIC CANVAS - The measurements here are in holes/squares instead of threads so that it makes it a lot easier to make counts. Carefully follow the cutting diagram below(see figure 1)to make sure you have plenty of canvas. Cut the two(2) 9 x 9 squares from the bottom of your canvas.. Next cut the rest of the canvas into strips in the lenghts shown below and be sure that each strip is five(5) squares wide.

Cut one(1)of the pieces shown below(Figure 2) in each color.(from the two 9 x 9 peices) The two(2) red squares are where you will thread your cord(Or whatever your using)through to attach the beads.(See Step 11 for more information)

STEP 2. Start "threading" the strips of canvas and beads onto the wire.In the order given below. Make sure that you run the wire through the center hole of the third(3rd) row of each peice of canvas. Only use Lt. Blue beads down the center of the "body".
The "Double" look is created by adding strip of canvas of each color between each Lt. Blue bead.(Two strips total)
5x5 Blue strip
Lt. Blue bead
7 x 5 Blue strip
7 x 5 White strip
Lt. Blue bead
9 x 5 Blue strip
9 x 5 White strip
Lt. Blue bead
13 x 5 Blue strip
13 x 5 White strip
Lt. Blue bead, ect.
STEP 3. Continue adding the next two longest strips of canvas and beads(As seen above) Onto the wire until you have "threaded" the 41 x 5 strips and a bead onto the wire.
STEP 4. Now you will start adding the strips of canvas in reverse order.(See Below)
39 x 5 Blue strip
39 x 5 White strip
Lt. Blue bead
37 x 5 Blue strip
37 x 5 White stip
Lt. Blue bead, ect.
STEP 5. Continue adding the strips and beads until you put on the two(2) 7 x 5 strips and a bead.
STEP 6. Now add the 5 x 5 Blue strip, Lt. Blue bead, a White bead, and a Dark Blue bead onto the wire. Next bend this end of the wire into about a 3/8 loop and make sure that the canvas and beads are tight/snug on the wire. Cut off the excess(if any) wire.
Step 7You now should have a "Diamond" shape with two(2) sides. Only work one side at a time. Start adding the White beads to the Blue strips first from top to bottom. Then add the Dark Blue beads to the White strips on the same side. Repeat this on the second side as well.
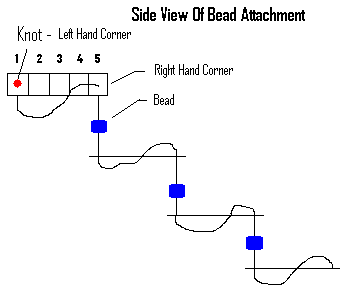
IMPORTANT All beads must be added on the right hand side of each strip. In other words the bead will be below the fifth(5th) hole of the strip above it and above the first(1st) corner/hole of the strip below it. This Is what will make the Whirligig Swirl.
STEP 8. Start by making a knot in the end of the cord.(or whatever your using) Now take it down throught the left hand corner/first(1st) hole of the top strip of canvas. Then bring it up and over the canvas and down through the right hand/fifth(5th) corner/hole of the strip. Now add a White bead and thread the cord through the left hand/first hole of the next strip. Once again bring it up and over the strip and through the left hand corner/hole. Be careful to make sure that you place a bead between each strip. Continue doing this until you get to the bottom strip. Once you have done this, thread the cord through the last corner/hole and make a knot and cut off excess.
STEP 9. Repeat Step 8 for the White strips on this side.
STEP 10. Repeat Step's 8 and 9 to complete the other side.
STEP 11. Cut One Butterfly in each color. On The Blue Butterfly use the cord to string a Lt. Blue, a White, and a Lt. Blue bead on each side of the Butterfly using the two holes shown above. On The White Butterfly string a Blue bead, a White bead, and a Blue bead on each side. Tie a 4" piece of cord to the top center hole of each Butterfly to make the antennas's. Next tie a 18' piece of cord(Folded in half) to the bottom loop on the wire. Now tie one end to the top center hole of the Blue Butterfly and the other end to the top center hole of the White Butterfly. The two(2) Butterfly's should hang at different lengths.