
Creative Cards Newsletter Issue Thirty Two - 4th August 2002
In This Issue:
1. Heated Pearls Backgrounds By Trish Bayley
2. Heated Pearl Alternatives By CCI Members
3. Gallery Showcase - Readers Show and Tell Their Art Work
4. Card Galleries & Stamping Websites
Back
To The Top
Heated Pearls Backgrounds By Trish Bayley
These backgrounds are surprisingly both very easy and quick to make. Infact they are so simple you will find yourself making them in no time at all! They look so stunning when they are finished that they look like works of art in their own right! It almost seems a shame to stamp on them! The backgrounds have a wonderful 3 dimensional and textured surface, with is achieved through the use of a heat source, from the scans you cant really tell just how textured they are.
Read on for details on how you can create these wonderful backgrounds!
What You Will Need:
Black Gloss Card Stock:
Matt black card stock works too, but you find that gloss is better as it makes the pearl ex and glue sit on top of the surface which creates a stronger background colour.
I find with the matt that the glue and the pearl ex dry too fast before you get a chance to heat it properly to create the 3d effect.
Pva Glue: this is ordinary cheap white school glue. I used a brand by 'Anitas' ..I don't use expensive glue as the cheap stuff works just as well. It dries clear also.
Pearl Ex in 2 colours: I used copper and lilac together and gold and lilac together as they created a wonderful contrast.
I find that it doesn't matter what 2 colours of pearl ex you choose so long as you pick 1 metallic and 1 other colour.
Stipple brush: I used a cheap shaving brush.
Embossing Heat Gun
How To Create:
1. Take your black gloss card stock, and in the centre of it squirt a good size dollop of glue the size of a coin.
2. Using your stippling brush stipple the glue so that it moves roughly around the surface of the card.
When you have done these 2 steps you are left with a piece of card that looks to put it bluntly a mess!
But all is not loss because it is now ready for its transformation.......
3. Take your pearl ex, and tap the side of the jar to spill out a little of the pearl ex into the centre of the glue covered card, do this for both colours.
If your worried about wastage you can use one of those special scoops for pearl ex if you prefer. I don't use one, I prefer to play with as little or as much as the pearl ex that spills out! Its more spontaneous that way and creates different background effects.
4. Using your brush, stipple to move the powder around in the glue, the glue is going to act as a sealant which binds the pearl ex onto the card.
You want to really blend the 2 colours of the pearl ex together to get an interesting background effect.
And now for the most important and final stage for creating this background:
5. Place your freshly pearl ex-ed background under a heat gun, this is to dry the glue and also as it is drying, watch how the glue bubbles up to create a textured surface.
You can experiment with the amount of time you leave it under the heat gun, as it heats the glue kind of bubbles up and creates 'blusters' of colour. The more you heat it the more defined they are.
Once cooled the background has a wonderful raised texture which is a result of heating the glue!
Now your background is ready for stamping on!
Important: Remember to wash your stipple brush out straight away before the glue dries and hardens and ruins your brush! Warm soapy water works best.
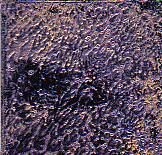
Background Samples
Using Copper and Lilac Pearl Ex:


Using Gold and Lilac Pearl Ex:


You can also use this background technique to create backgrounds on Cds!
See the Cd Below for an example:
 This Cd was created using Copper and Lilac Pearl Ex, the scan doesn't really show off the reflective nature of the pearl ex on this background.
As well as creating backgrounds the way I have just covered, you can also use this technique to create wonderful little tiles which would look good as card embellishments all on their own!
Here is how to create them:
Heated Pearls Tile Backgrounds
This technique is better suited for smaller pieces of card, I used small squares of approx 2 inches square which can be used as tile embellishments on cards.
1. Take 2 pieces of black gloss card roughly the same size.
2. Place a dollop of glue on one of the pieces of card only and stipple it all over using the stipple brush
3. As before tap on some pearl ex in 2 different colours and then stipple that into the glue
4. Place the sheet of card which doesn't have any glue or pearl ex on it over the top of the card that does.
5. Rub the card evenly over the back and then peel it off slowly..you have created 2 backgrounds in one!
6. Heat to set to finish
Experiment with how you peel apart the tiles, if you do it slowly you can create ripples and textures. Or smoosh them around in a clockwise motion to create swirls!
Add less or more glue..this also creates different effects for backgrounds too!
Heated Pearls Tile Background Samples
Here are some samples of the heated pearl tiles I have just covered:
Using Gold and Lilac Pearl Ex:

Using Copper and Lilac Pearl Ex:


More Heated Pearls Tile Background Samples
These 2 samples where created by twirling the card stock around in a clockwise motion before peeling apart:


As you can see I have been experimenting using less and more glue or pearl ex and also with how I pulled the 2 tiles apart to achieve different effects:
Stamping On Heated Pearls Backgrounds
For stamping on these backgrounds I recommend the Brilliance inkpads as they are juicy enough to stamp on this type of surface, plus they air dry naturally.
I have used my brilliance inkpads to stamp on these backgrounds and they give a wonderful effect...
Pearl Ex Alternatives
If you don't have Pearl Ex you can substitute with other mica alternatives such as Moon Glow, Fairie Dust, Perfect Pearls or Powered Pearls!
Some cheap eye shadows have mica in them and they too would be suitable!
More Ideas for Creating Heated Pearl Backgrounds:
You could sponge the glue on rather than stipple it it on...or use other tools, for example; one thing I like to use is household pan scourers..you know the cheap plastic types? These would also create and interesting texture.
You could also add more glue to create a combing or wood graining effect in the glue and pearl ex, for this you could use an ordinary comb or a wood graining tool bought from DIY shops.
I have tried this technique on lighter colour card and to be honest it looks better on the darker card as it sets off the pearl ex...it still works..but obviously not as vivid...
The little tiles would look good binded in gold cord and mounted on cards!
I hope you enjoyed this background class and have as much fun creating these backgrounds as I did!
Please share your artwork with us all. If you create backgrounds using this technique we would all LOVE to see them! Don't be shy now!
Back
To The Top
Heated Pearl Alternatives By CCI Members
Before I gave the Heated Pearls class on my yahoo group C.C.I ( http://groups.yahoo.com/group/Creative-Cards-International ) I uploaded some scans of the backgrounds without giving any details at all regarding how I made them, and asked members to 'take a guess'...
Not one person guessed it was pearl ex! But we did get some interesting theories which I would like to share with you now:
Spot (Alison Chandler):
I think it was stippled on to black card using Marvy Metallics
Kathy Beringer:
I have achieved a similar effect after I dtp with Encore Metallic ink - then left large, thick "smudges" with a pom pom - and heated with my heat gun. It gets raised bubbles. Kind of looks like this.
Sandra WIlliams - USA:
I think it looks like radiant pearls stippled on dark cardstock, then heat embossed.
Julie Bradwell:
Is it black glossy cs which has been stippled with Lumiere's or Stewart Gill paints.
Pat Cline:
Just did a background at a Stampin' Up workshop - put a few drops of re-inker on a cotton ball along with a drop of some kind of metalic re-inker than sponged in onto glossy cs - looks something like this except I think you used black. . .
Casey Cholaski:
I'm gonna guess its Floor wax stippled with embossing powders and maybe some colored markers thrown in.
Back
To The Top
Gallery Showcase - Readers Show and Tell Their Art Work
This weeks gallery is dedicated to Heated Pearls!
We have 3 galleries in all, featuring wonderful work from the talented members of CCI!
Nanette VerHagen's Gallery:
Heated Pearl Cards

 Heated Pearl Backgrounds


I have fallen in love with Nanettes wonderful copper leaf card! The texture and colour is perfect!
Julie Bradwell's Gallery:
Heated Pearl Card

Heated Pearl Backgrounds


Julies backgrounds are amazing! I love the striking use of colour on the gold and russet background, this would be perfect for an Autumn or Fall theme card. Julies green background is also stunning, I can almost imagine a wonderful fantasy silhouette scenery stamped upon it!
Gallery Showcase:
Card Artist: Kim Szabo

Card Artist: Robin Arnold

Card Artist: Sandra Williams

Card Artist: Ruth Cooper

The showcase features 4 very different styles of cards created by 4 talented artists!
Kim Szabo cleverly used her heated pearl backgrounds to create a faux snow effect on her card.
Robin Arnold created a wonderful background with striking visible texture and movement.
Sandra Williams created a fantastic autumn theme card using wonderful warm hues of colour.
Ruth Coopers card literally bounces at you! Im lucky enough to actually own this piece of artwork and I think it is absolutely stunning! The texture and colours are really something else.
Back
To The Top
Card Galleries & Stamping Websites
More Heated Pearl Cards:
Debby Brandt another talented member of my CCI group has uploaded some of her fantastic Heated Pearls Background cards on her website. They are stunning! I love the way she cleverly used them for water scenes! The url to see them is:
http://www.debbysthings.com/cardgallery.htm
Newsletter Charity Listings
I was sent details of this charity by Newsletter reader Kath Woods, who asked me if I could mention a cat charity she supports in the newsletter.
If anyone has details of charities which would like donations of handmade cards and artwork please do not hesitate to contact me via the newsletter for a mention in a future issue.
Cat Call
Cat Call is a small UK charity which runs a cat sanctuary and has people on call 24 hours a day who rescue unwanted cats.
Audrey Rice makes and sells cards and decorated notebooks to help raise funds for the charity. She puts a great deal of effort into this and would appreciate any handmade cards that she could sell to help raise funds, at the beginning of the year Audrey managed to raise a total of Ł3000 for the kitties!
Audrey is also seeking any unwanted bits and pieces that she could use in card making plus ideas for quick and easy Christmas cards.
Her address is Audrey Rice, 14 Manor Road, Edenbridge, Kent, TN8 5HA. United Kingdom.
Official Creative Cards Groups
The Following are 2 groups which I run on Yahoo Groups, one is exclusively for UK members and the other group is an International group which features members from all over the globe!
If You would like to join please click on the relevant links and then click on the 'Join This Group' button:
Creative Cards International
An expanding International group with members all over the world dedicated to rubber stamping and related paper arts. For artists who like to create greetings cards, book marks, tag art, collage, book arts, pins, tins, magnets, jewellery and so much more!
Exchange handmade work, share ideas and inspiration, ask for help and ideas, Show and Tell your work, and take part in online classes hosted by myself. Stampers and Crafters of all skill levels welcome. To join go to: http://groups.yahoo.com/group/Creative-Cards-International
Creative Cards UK Group
Do You Like To Make and Receive Handmade Cards? If the answer is YES then Why Not Join Create Cards. Creative Cards is a group especially for Rubber Stampers Who live in the UK who wish to exchange cards and ideas: http://groups.yahoo.com/group/Creative-Cards
Creative Cards Website:
You can view all of the classes and techniques featured in this and past newsletters on the Creative Cards Website. Also check out the handmade card galleries: http://www.creative-cards.co.uk/
Rubber Waffle Ezine
Dedicated To Rubber Stamping and Card Making Ideas. Most of techniques that I have written for this site are taken from the old paper version of the Creative Cards Newsletter.
https://www.angelfire.com/zine2/rubberwaffle/
Creative Cards Bulletin Board: http://pub15.ezboard.com/bcreativecards
Created especially for those who don't have the time to commit to belonging to a busy email group, you can come and go as often or as little as you wish without having lots of email overwhelming you!
Wanted: Ideas, Card Scans, Tips, Online Classes, Techniques, Web Links, Sources, Ads, ANYTHING! If you can provide any of the above then please get in touch and I will feature your work/contributions here! Do You Have A Website or Card Gallery? Or maybe you know of a good website that features online classes, techniques, templates, freebies and patterns. Send me the link and I will feature it in this section: trishbayley@gmx.net
Credits: Spot (Alison Chandler), Kathy Beringer, Sandra WIlliams - USA, Julie Bradwell, Pat Cline, Casey Cholaski, Nanette VerHagen, Kim Szabo, Robin Arnold, Sandra Williams, Ruth Cooper, Debby Brandt & Kath Woods.
All Text and Spelling Mistakes Trish Bayley
Copyright © 1999/2000/2001/2002 Creative Cards
Free Rubber Stamping News In Your Email Every Fortnight

